Are you struggling to keep your materials steady while working on a project? A pipe clamp might be the simple tool you need to make your job easier and more precise.
Whether you’re a DIY enthusiast or a professional, knowing how to use a pipe clamp can save you time and frustration. In this guide, you’ll discover step-by-step instructions, handy tips, and common mistakes to avoid. By the end, you’ll feel confident handling your pipe clamp like a pro, ensuring your work stays secure and accurate every time.
Ready to master this essential tool? Let’s dive in!
Choosing The Right Pipe Clamp
Picking the right pipe clamp is key for a safe and strong hold. Different clamps fit different tasks and pipes.
This guide helps you understand types, size choices, and materials of pipe clamps.
Types Of Pipe Clamps
Pipe clamps come in many styles. Each style suits certain pipe shapes and tasks.
- Standard Pipe Clamps: Hold round pipes tightly and evenly.
- Swivel Pipe Clamps: Allow some pipe movement while clamping.
- Heavy-Duty Pipe Clamps: Made for thick or heavy pipes.
- Quick-Release Clamps: Easy to open and close for fast work.
- Spring-Loaded Clamps: Use spring force for steady grip.
Selecting Based On Project Size
Project size affects the clamp size and strength you need. Bigger pipes need bigger clamps.
| Project Size | Recommended Pipe Clamp Size | Notes |
| Small (DIY, home repairs) | 1/2 inch to 1 inch | Use light clamps for small pipes |
| Medium (Furniture, plumbing) | 1 inch to 3 inches | Choose clamps with solid grip |
| Large (Industrial, construction) | 3 inches and above | Heavy-duty clamps needed |
Materials And Build Quality
Good materials make clamps last and work well. Look for these features:
- Steel body: Strong and durable
- Rust resistance: Prevents corrosion over time
- Plastic grips: Protect pipe surface from damage
- Solid welds or joints: Ensure clamp won’t break
- Easy adjustment mechanisms: Save time and effort
Preparing Your Workspace
Getting your workspace ready is important before using a pipe clamp. A clean and safe area helps you work better and avoid accidents.
Organizing tools and following safety rules makes the job easier and protects you from harm.
Clearing And Organizing Tools
Clear your work surface to have enough space for your project. Remove anything not needed to avoid clutter.
Organize tools by placing them where you can reach easily. Keep the pipe clamp and other clamps ready to use.
- Put small tools in a box or tray
- Arrange clamps and pipes near your work area
- Keep measuring tools handy for quick checks
- Make sure your workspace is well lit
Safety Measures To Follow
Safety is a top priority when using a pipe clamp. Wear protective gear like gloves and safety glasses to protect your hands and eyes.
Check your tools for damage before starting. Broken clamps or tools can cause accidents or damage your project.
- Wear gloves to protect your hands
- Use safety glasses to shield your eyes
- Inspect clamps for cracks or rust
- Keep your work area free of spills and trip hazards
- Work slowly and carefully to avoid slips
Setting Up The Pipe Clamp
Using a pipe clamp correctly ensures your project holds together firmly. Setting it up right helps avoid mistakes and saves time.
This guide explains how to adjust the clamp size and position it properly for best results.
Adjusting The Clamp Size
Start by selecting the correct pipe length for your clamp. The pipe length determines the maximum opening of the clamp.
- Loosen the clamp jaws by turning the handle counterclockwise.
- Slide the movable jaw along the pipe to the needed position.
- Tighten the handle slightly to hold the jaw in place.
- Check that the jaws open wide enough for your workpiece.
- If needed, replace the pipe with a longer or shorter one.
Make sure the clamp size matches the size of the parts you want to join. A wrong size can cause weak pressure.
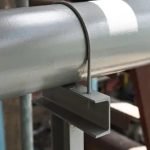
Positioning The Clamp Properly
Positioning the clamp correctly keeps your work steady. Place it where it applies even pressure across the joint.
| Clamp Part | Positioning Tip |
| Fixed Jaw | Place on one end of the workpiece firmly. |
| Movable Jaw | Slide to touch the other side without forcing. |
| Handle | Use to tighten gradually for even pressure. |
| Pipe | Keep straight and aligned with the workpiece. |
Always check that the clamp is stable before applying full pressure. This prevents slipping or damage.
Credit: www.wesanco-zsi.com
Clamping Techniques For Strong Joints
Using a pipe clamp correctly helps make strong joints in woodworking. Good clamping keeps pieces tight while glue dries.
Learn how to apply even pressure, avoid over-tightening, and protect delicate materials. These tips improve your results.
Applying Even Pressure
Even pressure keeps the joint tight and prevents gaps. Uneven pressure can cause weak spots and poor glue bonds.
Adjust the clamp so the force spreads across the whole joint. Check the alignment before tightening fully.
- Place the clamp pads evenly on the workpieces
- Tighten the clamp gradually and check pressure
- Use multiple clamps for long or wide joints
Avoiding Over-tightening
Too much force can squeeze out glue and damage wood. It can also bend or warp the pieces you join.
Tighten the clamp until the joint is snug. Stop once the glue starts to squeeze out slightly.
- Turn the clamp handle slowly to feel resistance
- Watch for glue squeeze-out as a sign of good tightness
- Do not force the clamp beyond this point
Using Cauls For Delicate Materials
Cauls are pieces of wood used to spread pressure. They protect soft or delicate materials from clamp marks.
Place cauls between the clamp and the workpiece. This keeps pressure even and prevents damage.
- Use smooth, straight cauls for best results
- Wrap cauls in tape or scrap wood for extra protection
- Check caul placement before tightening the clamp
Maintaining Your Pipe Clamp
Keeping your pipe clamp in good shape helps it last longer. Regular care makes sure it works safely and smoothly.
Follow simple steps to clean, lubricate, and store your pipe clamp. This guide covers these key tasks.
Cleaning After Use
After each use, remove dust, glue, and dirt from your pipe clamp. Use a dry cloth or soft brush for cleaning.
- Wipe the pipe and jaws with a clean cloth
- Use a mild soap and water solution for sticky residue
- Dry all parts completely to avoid rust
- Check for any damage or wear while cleaning
Lubrication Tips
Lubricate moving parts to keep your pipe clamp working smoothly. Use light machine oil or silicone spray.
| Part | Lubricant Type | Frequency |
| Threaded Rod | Light machine oil | After every 5 uses |
| Sliding Jaws | Silicone spray | Monthly |
| Handle | Light machine oil | Monthly |
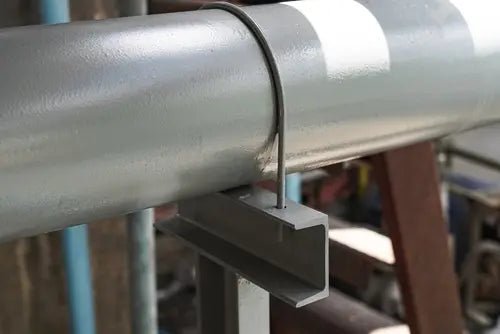
Storage Recommendations
Store your pipe clamp in a dry place to prevent rust and damage. Keep it away from heavy tools or sharp objects.
- Hang pipe clamps on a wall rack or pegboard
- Keep clamps off the floor to avoid moisture
- Store clamps in a climate-controlled area if possible
- Cover clamps with a cloth if stored for a long time

Credit: www.thehosemaster.co.uk
Troubleshooting Common Issues
Using a pipe clamp can sometimes lead to problems during your project. Knowing how to fix common issues helps save time and effort.
This guide covers how to handle slippage, misalignment, and clamp damage with simple solutions.
Dealing With Slippage
Slippage happens when the clamp does not hold the pipe firmly. This can cause your work to move or come apart.
- Check that the pipe and clamp surfaces are clean and dry.
- Tighten the clamp screws evenly and firmly.
- Use rubber pads or grip strips to increase friction.
- Replace worn or damaged clamp parts if needed.
- Apply steady pressure without over-tightening to avoid damage.
Fixing Misalignment
Misalignment occurs when pipes are not held straight or at the right angle. This affects the final assembly.
| Cause | How to Fix |
|---|---|
| Uneven tightening | Tighten clamp screws evenly on both sides. |
| Wrong clamp size | Use a clamp that fits the pipe diameter. |
| Damaged clamp jaws | Inspect and replace jaws if bent or worn. |
| Improper pipe placement | Position pipes carefully before clamping. |
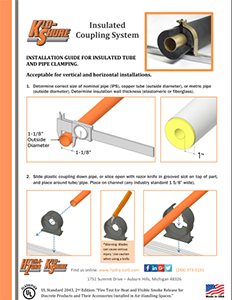
Handling Clamp Damage
Clamp damage can cause poor performance or safety risks. Fix or replace damaged parts quickly.
- Cracked or bent pipes
- Worn threads on screws
- Loose or missing bolts
- Damaged jaws or pads
Regularly inspect your clamp for these issues. Clean and lubricate moving parts to extend clamp life.

Credit: uniclampusa.com
Frequently Asked Questions
What Is A Pipe Clamp Used For?
A pipe clamp secures and holds materials during woodworking or metalworking. It provides strong, adjustable pressure for glue-ups and assemblies.
How Do You Adjust A Pipe Clamp Properly?
To adjust, slide the movable jaw along the pipe. Tighten the screw handle to apply pressure evenly on the workpiece.
What Sizes Of Pipe Clamps Are Available?
Pipe clamps come in various lengths, typically from 12 inches to 72 inches or more. Choose based on project size.
Can Pipe Clamps Damage Work Surfaces?
If over-tightened, pipe clamps can dent or mark surfaces. Use protective pads or scrap wood to prevent damage.
Conclusion
A pipe clamp is a handy tool in many projects. It holds materials firmly. Easy to use. Just follow the steps outlined in our guide. Secure your work with confidence. Practice makes perfect. Soon, you’ll handle clamps like a pro.
Remember safety first. Always check your setup before starting. Proper use ensures better results. Enjoy your projects and the satisfaction they bring. Happy clamping!