
Are you struggling to get smooth, perfect edges on your woodworking projects? Using a power planer for trimming edges can make your work faster and cleaner, but only if you know the right techniques.
In this guide, you’ll discover simple steps to use a power planer like a pro, avoid common mistakes, and achieve flawless results every time. Whether you’re a beginner or want to sharpen your skills, this article will give you the confidence and tips you need to take your edge trimming to the next level.
Keep reading—you’re about to transform the way you work with wood!
Choosing The Right Power Planer
Using a power planer helps trim and smooth wood edges quickly. Choosing the right one makes your work easier and safer. This guide covers key points to consider before buying.
We will explore types of power planers, important features, and safety gear you need. Read on to find the best match for your projects.
Types Of Power Planers
Power planers come in different styles to suit various tasks. Knowing the types helps you pick the right tool for trimming edges.
- Handheld Planer:Portable and easy to use for small jobs and tight spaces.
- Benchtop Planer:Larger and fixed, used for flattening and thicknessing boards.
- Corded Planer:Offers continuous power without battery limits, ideal for long jobs.
- Cordless Planer:Battery-powered for mobility but limited runtime.
Key Features To Consider
Look for features that improve performance and ease of use. These details affect the quality of your work and comfort.
| Feature | Why It Matters |
| Cutting Width | Wider blades cover more surface quickly. |
| Depth Adjustment | Allows control over how much wood is removed. |
| Power | Stronger motors handle tough wood better. |
| Dust Collection | Keeps workspace clean and improves visibility. |
| Ergonomics | Comfortable grip reduces fatigue during use. |
Safety Gear Essentials
Safety gear protects you from injury while operating a power planer. Always wear the right equipment.
- Safety glasses to shield your eyes from flying wood chips.
- Hearing protection to prevent damage from loud noise.
- Dust mask to avoid breathing in wood dust.
- Work gloves for a firm grip and to protect your hands.
- Proper footwear to prevent slips and protect feet.
Preparing Your Workspace
Before using a power planer, set up your workspace carefully. A clean and safe area helps you work better and avoid accidents.
Organize your tools and materials so you can reach them easily. Take time to prepare well for smooth trimming of edges.
Clearing And Securing The Work Area
Remove any clutter from your workbench and floor. Make sure the surface is stable and strong enough to hold your workpiece.
- Clear all loose tools and debris away
- Check that the workbench does not wobble
- Ensure good lighting to see your edges clearly
- Wear safety gear like goggles and ear protection
Marking The Edges
Use a pencil or chalk to mark where you want to trim. Clear marks help you guide the planer for a smooth finish.
| Tool | Purpose |
| Pencil | Make fine, visible lines |
| Chalk | Mark rough or dark surfaces |
| Measuring Tape | Measure exact edge lengths |
| Square | Mark straight, right angles |
Setting Up Clamps And Supports
Secure the workpiece using clamps and supports. This stops movement and gives you control while planing.
- Place clamps to hold the board firmly
- Use supports to keep edges stable
- Check that clamps do not block your planing path
- Test stability by trying to move the piece gently
Power Planer Setup
Setting up your power planer correctly ensures smooth and precise trimming of edges. Proper setup helps avoid damage and improves the quality of your work.
This guide covers blade installation, depth setting, and base plate checks. Follow each step carefully for the best results.
Installing And Adjusting Blades
Before you start, make sure the planer is unplugged. Remove the blade cover to access the blades. Use the correct tools to loosen the blade screws.
- Carefully remove old blades if needed.
- Place new blades with the sharp edge facing out.
- Tighten screws firmly but avoid over-tightening.
- Check blade alignment to avoid uneven cuts.
Setting The Depth Of Cut
Adjusting the depth controls how much material the planer removes. Start with a shallow cut to avoid damaging the wood or the tool.
- Locate the depth adjustment knob or lever.
- Turn the knob to set a small depth, like 1mm.
- Test the setting on a scrap piece of wood.
- Increase the depth in small steps if needed.
Checking The Planer’s Base Plate
The base plate must be flat and secure for steady planing. Check for damage or unevenness before use.
| Check Point | What to Look For | Action |
| Flatness | Use a ruler or straight edge | Replace or adjust if warped |
| Attachment | Make sure screws are tight | Tighten loose screws |
| Cleanliness | Remove dirt and debris | Wipe with cloth before use |
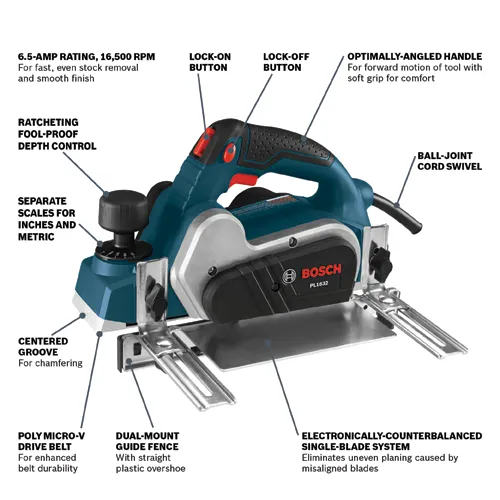
Credit: www.boschtools.com
Techniques For Trimming Edges
Using a power planer to trim edges makes wood smooth and even. It helps create clean lines on your projects.
Good techniques improve your results and keep your work safe. This guide covers key tips for trimming edges well.
Starting The Planer Correctly
Place the planer flat on the wood before turning it on. Make sure the blade does not touch the surface yet.
Turn the planer on and let it reach full speed. Then, push it forward smoothly to begin trimming.
- Keep the planer steady and level
- Start at the edge of the wood
- Do not force the planer when starting
Maintaining Consistent Pressure
Apply even pressure as you move the planer along the edge. Avoid pressing too hard or too light.
Consistent pressure helps the blade cut smoothly and keeps the edge straight. It also prevents gouges.
- Hold the planer firmly with both hands
- Keep pressure balanced front to back
- Move at a steady, controlled speed
Using Multiple Passes For Smooth Finish
Take several light passes instead of one deep cut. This reduces the risk of mistakes and rough edges.
Each pass removes a small layer of wood. The final surface will be smooth and even after all passes.
- Set the blade depth shallow for the first pass
- Gradually increase depth for later passes
- Check the edge after each pass
Handling Common Challenges
Using a power planer for trimming edges can be tricky. You may face issues like gouges, hard wood, or uneven edges.
Knowing how to handle these challenges helps you get smooth, clean results every time.
Avoiding Gouges And Dips
Gouges and dips happen when the planer moves too fast or the blade digs too deep. This ruins the wood surface.
Keep the planer steady and move it slowly along the edge. Adjust the blade depth to remove thin layers each pass.
- Set a shallow cutting depth
- Hold the planer flat and steady
- Move the planer slowly and evenly
- Check the surface often for smoothness
Dealing With Knotty Or Hard Wood
Knotty or hard wood can slow down your planer and cause uneven cuts. The blade may catch or skip over knots.
Use sharp blades and reduce the cutting depth. Plan your passes to go around knots carefully to avoid damage.
- Use fresh, sharp blades
- Set a lower cutting depth for knots
- Slow down the feed speed near knots
- Sand rough spots after planing
Fixing Uneven Edges
Uneven edges happen if the planer tilts or if you don’t keep a steady hand. This results in wavy or rough edges.
Use guides or fences to keep the planer straight. Check your work often and make small passes to even out the edge.
- Attach a straight guide or fence
- Hold the planer firmly with both hands
- Make light passes to even the edge
- Inspect the edge and repeat if needed

Credit: www.findbuytool.com
Maintaining Your Power Planer
Taking care of your power planer helps it work well for a long time. Regular maintenance keeps the tool safe and efficient.
Simple cleaning, blade care, and proper storage will improve your planer’s performance and lifespan.
Cleaning After Use
Clean your power planer after each use to remove dust and wood chips. This prevents buildup that can damage the tool.
Use a brush or compressed air to clear dust from vents and moving parts. Wipe the surface with a dry cloth.
- Unplug the planer before cleaning
- Remove wood chips from the blades and base
- Clear dust from vents and motor area
- Wipe the tool with a dry cloth
Sharpening And Replacing Blades
Dull blades reduce cutting quality and strain the motor. Keep blades sharp for smooth trimming.
Check blades often. Sharpen them if they look dull or replace them if damaged.
- Remove blades carefully following the manual
- Use a sharpening stone or professional service to sharpen
- Replace blades if they are chipped or worn out
- Install blades securely before use
Storage Tips
Store your power planer in a dry, clean place. Proper storage protects it from moisture and dust.
Keep the tool in its case or cover it with a cloth. Avoid places with extreme temperatures.
- Unplug and clean the planer before storing
- Cover or store in a protective case
- Keep in a dry, cool area away from dust
- Store blades separately if needed
Safety Tips For Beginners
Using a power planer can help trim edges quickly. Safety is very important for beginners. Follow these tips to avoid accidents.
Always prepare well before starting. Knowing how to handle the tool can keep you safe.
Proper Hand Placement
Place your hands firmly on the planer. Keep one hand on the front knob and the other on the rear handle. This gives you better control and balance.
- Hold the front knob with your left hand.
- Grip the rear handle with your right hand.
- Keep your fingers away from the blade area.
- Do not force the tool; let it move naturally.
Avoiding Kickback
Kickback happens when the planer suddenly moves backward. It can cause serious injuries. Watch for these signs to avoid it.
| Cause | Prevention |
| Planing against grain | Always plane with the grain |
| Dull blades | Sharpen or replace blades regularly |
| Pushing too hard | Apply steady, even pressure |
| Loose workpiece | Secure the wood firmly before planing |
Emergency Procedures
Know what to do if something goes wrong. Quick action can prevent injuries and damage.
- Turn off the power planer immediately.
- Unplug the tool from the power source.
- Check for any injuries and seek help if needed.
- Do not try to fix the planer while it is plugged in.
- Report any malfunctions to a supervisor or technician.

Credit: www.familyhandyman.com
Frequently Asked Questions
What Is A Power Planer Used For?
A power planer is a tool used to smooth and flatten wood surfaces. It trims edges, removes excess material, and creates a uniform thickness. Ideal for woodworking projects, it ensures precise and efficient shaping of wooden pieces. It’s commonly used in carpentry and furniture making.
How Do I Safely Operate A Power Planer?
To safely use a power planer, first wear safety goggles and ear protection. Secure your workpiece firmly. Maintain a steady grip and apply even pressure while moving the planer. Always follow the manufacturer’s instructions and keep hands clear of the blade.
Ensure the tool is off when not in use.
Can A Power Planer Trim Edges Effectively?
Yes, a power planer is excellent for trimming edges. It provides a smooth, even finish by removing excess material precisely. It’s ideal for straightening and smoothing wooden edges, ensuring they align perfectly. A power planer is a go-to tool for efficient edge trimming in woodworking projects.
How Do I Maintain My Power Planer?
Regularly clean your power planer to prevent dust build-up. Check and replace blades when they become dull. Lubricate moving parts as recommended by the manufacturer. Store it in a dry, safe place to prevent damage. Regular maintenance ensures optimal performance and prolongs the life of your tool.
Conclusion
Using a power planer makes trimming edges faster and neater. Take your time and keep the tool steady. Always check the wood before you start. Safety comes first—wear protective gear every time. Practice on scrap wood to build confidence. Clean the planer after use to keep it working well.
With patience and care, your edges will look smooth and professional. Give it a try, and enjoy better results on your woodworking projects.
