Are you looking to give your surfaces a brand-new shine without breaking a sweat? A rotary tool might just be the solution you need.
This handy device can transform dull surfaces into gleaming masterpieces, making your home or project look its absolute best. In our guide, you’ll discover how to master the art of polishing with a rotary tool, unlocking secrets that even seasoned DIY enthusiasts swear by.
Whether you’re sprucing up old furniture, rejuvenating metal fixtures, or adding the final touch to a creative project, this tool can make the process quick and satisfying. Stay with us, and you’ll learn simple, effective techniques that will have you polishing like a pro in no time. Ready to see your surfaces shine like never before? Let’s dive in!
Choosing The Right Rotary Tool
Using a rotary tool for polishing surfaces can make your work easier and faster. Picking the right tool is important for good results.
Different rotary tools fit different polishing jobs. Learn what to look for before you buy or use one.
Types Of Rotary Tools
Rotary tools come in many types. Some are small and easy to handle. Others are bigger and more powerful.
Choose a type that matches your polishing project and surface size.
- Mini rotary tools: Good for small, detailed polishing
- Variable speed rotary tools: Adjust speed for different materials
- Cordless rotary tools: Offer freedom of movement
- Heavy-duty rotary tools: Best for large or tough surfaces
Key Features To Look For
Look for features that make polishing easier and safer. Speed control is very important.
Also check the tool’s size and weight. You want something comfortable to hold for a long time.
- Variable speed settings: Control polish speed for different surfaces
- Ergonomic design: Comfortable grip to reduce hand fatigue
- Power source: Corded for steady power or cordless for mobility
- Durability: Strong build to last through many uses
- Accessory compatibility: Fits different polishing attachments
Selecting Appropriate Accessories
Accessories are key for polishing. Use the right ones for your rotary tool and surface type.
Different pads and brushes work best on different materials. Match them carefully for best polish.
- Polishing pads: Soft for delicate surfaces, firm for tough spots
- Buffing wheels: Help create a shiny finish
- Abrasive attachments: Remove scratches before polishing
- Cleaning brushes: Prepare surface before polishing
- Attachment size: Must fit your rotary tool securely
Preparing Surfaces For Polishing
Preparing the surface is important before polishing. A clean and smooth surface helps the rotary tool work better.
Proper preparation can improve the shine and protect the surface from damage.
Cleaning And Degreasing
Remove dirt, dust, and grease from the surface. These can cause scratches or uneven polishing.
Use a mild cleaner or degreaser and a soft cloth. Make sure the surface is dry before starting.
- Wipe off loose dirt with a dry cloth
- Apply cleaner or degreaser
- Scrub gently with a soft brush or cloth
- Rinse with water if needed
- Dry the surface completely
Assessing Surface Condition
Look closely at the surface for scratches, dents, or rust. These can affect the polishing result.
Decide if you need to fix any damage before polishing. Sometimes sanding or filling is needed first.
- Check for deep scratches or gouges
- Look for rust spots or corrosion
- Feel for uneven areas or bumps
- Plan repairs if needed
Applying Primer Or Base Layer
Some surfaces need a primer or base layer before polishing. This helps polish stick and shine better.
Apply primer evenly and let it dry fully. Follow the product instructions for best results.
- Choose the right primer for the surface
- Apply a thin, even coat
- Let the primer dry completely
- Lightly sand if the primer is rough
- Clean dust before polishing
Polishing Techniques
Using a rotary tool for polishing can improve the look of many surfaces. Polishing removes small scratches and adds shine.
To get good results, you must use the right techniques. This guide explains important polishing tips.
Setting The Correct Speed
Choose the right speed for your rotary tool before you start polishing. Too fast can damage the surface.
Lower speeds work well for soft materials. Higher speeds can be used for hard surfaces but need care.
- Start at a low speed and test on a small area
- Increase speed slowly if needed
- Stop if you see smoke or burning marks
Using Polishing Pads And Compounds
Choose the right polishing pad for your project. Soft pads suit delicate surfaces, and firm pads work on rough ones.
Apply a small amount of polishing compound to the pad. The compound helps smooth the surface and adds shine.
- Use foam pads for fine polishing
- Use wool pads for heavy polishing
- Apply compound evenly on the pad
- Replace pads if they get dirty or worn out
Maintaining Consistent Pressure
Press the rotary tool gently on the surface while polishing. Too much pressure can cause damage.
Keep your hand steady and move the tool evenly across the surface. This avoids uneven polishing marks.
- Hold the tool firmly but not tightly
- Use light, even pressure
- Move the tool in slow, circular motions
- Check the surface often to avoid over-polishing

Credit: sonaxusa.com
Safety Precautions
Using a rotary tool for polishing surfaces can make your work easier. Still, safety is very important to avoid injuries. Always follow safety rules before and during use.
This guide covers key safety precautions. You will learn about protective gear, safe handling, and common mistakes to avoid.
Protective Gear Essentials
Wearing the right protective gear protects you from dust, sparks, and flying debris. Always prepare before starting your work.
- Wear safety goggles to protect your eyes.
- Use a dust mask to avoid inhaling particles.
- Put on gloves to protect your hands from heat and sharp edges.
- Wear ear protection to reduce noise exposure.
- Use long sleeves and closed shoes for extra protection.
Handling The Tool Safely
Handle your rotary tool with care to prevent accidents. Follow these tips to keep control and avoid damage.
- Check the tool and attachments before use.
- Hold the tool firmly with both hands.
- Keep your work area clean and well-lit.
- Do not force the tool; let it work at its speed.
- Unplug the tool when changing bits or cleaning.
Avoiding Common Mistakes
Avoid these common errors to stay safe and get good results when polishing.
| Mistake | Risk | Solution |
| Using damaged bits | Bits can break and cause injury | Inspect bits before use |
| Applying too much pressure | Tool may slip or overheat | Use light, steady pressure |
| Ignoring tool speed settings | Surface damage or tool damage | Match speed to the material |
| Not securing the workpiece | Workpiece may move and cause harm | Clamp or hold workpiece firmly |
| Working without breaks | Tool and user fatigue | Take regular breaks to cool down |
Troubleshooting Common Issues
Using a rotary tool for polishing can sometimes cause problems. Knowing how to fix these issues helps you get better results. This guide covers common problems and how to solve them.
Follow these tips to keep your polishing smooth and avoid damage to your surfaces.
Dealing With Uneven Surfaces
Uneven surfaces can make polishing hard. The tool might skip or polish too much in one spot. This leads to a rough finish.
To fix this, move the tool slowly and keep it flat on the surface. Use a smaller polishing head for tight spots. Check your work often to keep it even.
- Hold the tool steady and flat
- Use light pressure, not heavy
- Move the tool in slow, circular motions
- Switch to smaller pads for corners and curves
Preventing Overheating
Rotary tools can get hot from long use. Overheating can damage the tool and the surface you polish. It also reduces the tool’s life.
To stop overheating, take breaks often. Let the tool cool down after a few minutes of work. Use the right speed for your material. Lower speeds make less heat.
- Work in short sessions with breaks
- Use lower speed settings for soft materials
- Keep the tool clean from dust and debris
- Use cooling pads or fans if available
Fixing Swirl Marks
Swirl marks are small scratches that show after polishing. They happen from using the wrong pad or too much pressure. Swirl marks make the surface look dull.
To fix swirl marks, switch to a finer polishing pad. Use gentle pressure and polish in straight lines. Finish with a clean cloth to remove residue.
- Choose a soft, fine polishing pad
- Apply light, even pressure
- Polish in straight, overlapping passes
- Wipe with a microfiber cloth after polishing
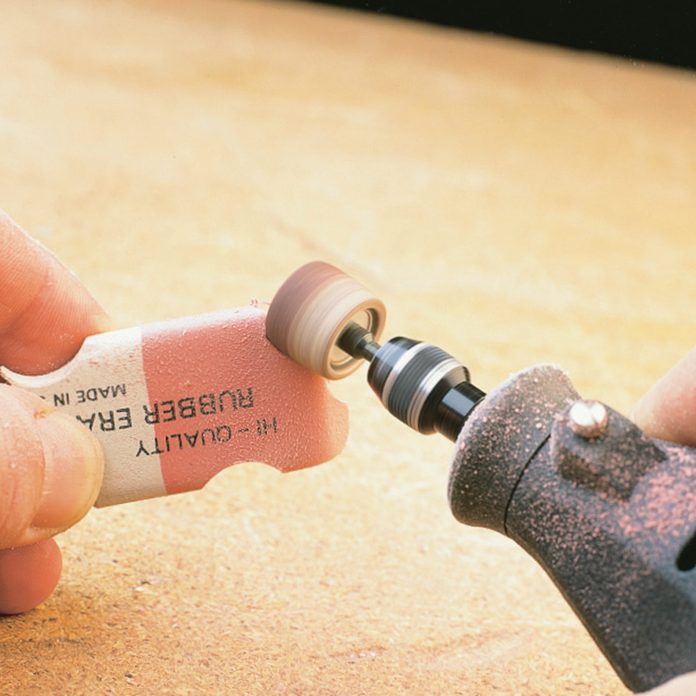
Credit: www.familyhandyman.com
Maintaining Your Rotary Tool
Keeping your rotary tool in good shape helps it work better. Regular care stops problems and saves money.
Follow simple steps to clean, store, and check your tool often. This guide shows you how.
Cleaning And Storage Tips
After each use, wipe the tool with a dry cloth. Remove dust and debris from vents and moving parts.
- Use a soft brush to clean tight spaces.
- Store the tool in a dry, cool place.
- Avoid leaving it in damp or dusty areas.
- Keep accessories in a separate container.
Replacing Worn Accessories
Check polishing pads and bits for wear. Replace them if they look torn or worn out.
| Accessory | Signs to Replace |
| Polishing Pads | Frayed edges or uneven surface |
| Grinding Bits | Rounded or chipped tips |
| Sandpaper Discs | Torn or smooth patches |
Regular Maintenance Checks
Inspect your rotary tool regularly to keep it safe and working well. Check power cords for damage.
- Look for cracks or frays in the power cord.
- Test the on/off switch for smooth operation.
- Listen for unusual sounds during use.
- Make sure the tool does not overheat quickly.
- Tighten any loose screws or parts.
Credit: hardell.com
Frequently Asked Questions
What Surfaces Can I Polish With A Rotary Tool?
You can polish metal, wood, plastic, and glass surfaces using a rotary tool. It works well on small and detailed areas, restoring shine efficiently.
How Do I Prepare Surfaces Before Polishing?
Clean the surface thoroughly to remove dirt and grease. Use a mild detergent and dry the area well before polishing.
What Polishing Attachments Work Best With Rotary Tools?
Felt wheels, polishing pads, and buffing brushes are ideal attachments. Choose based on surface type and desired finish for effective results.
Can Rotary Tools Damage Delicate Surfaces During Polishing?
Yes, excessive speed or pressure may cause damage. Use low speed and gentle pressure on delicate materials to avoid scratches or burns.
Conclusion
Using a rotary tool for polishing can save time and effort. Choose the right attachment and keep a steady hand. Clean the surface before starting for best results. Work slowly and check your progress often. Polishing brings out shine and smoothness in many materials.
Practice makes polishing easier and more effective. Enjoy the satisfaction of a well-polished finish. Keep your tool clean and store it safely after use. Ready to make surfaces look their best? Grab your rotary tool and start polishing today.