Are your plants struggling to thrive in sandy soil? You’re not alone.
Many gardeners face the challenge of poor plant growth due to sandy soil conditions. But what if you could change that? What if you could give your plants a fighting chance by enhancing the soil they grow in? The secret lies in aerating your sandy soil.
This simple yet effective technique can make a world of difference for your plant roots, improving water retention and nutrient absorption. Imagine your garden blooming with vibrant, healthy plants! Keep reading to discover how you can transform your sandy soil into a nurturing haven for your plants.

Credit: kansodesigns.co
Benefits Of Aerating Sandy Soil
Aerating sandy soil helps plants grow stronger roots. It improves soil structure and allows air to reach roots.
This process makes it easier for roots to get water and nutrients. It supports healthy plant growth.
Improved Root Development
Aeration creates space in sandy soil for roots to expand. Roots grow deeper and wider in loose soil.
Better root growth helps plants absorb more water and nutrients. Strong roots support healthy plants.
Enhanced Water Retention
Sandy soil drains water quickly but aeration helps it hold moisture longer. It stops water from running off.
Air pockets from aeration let water reach roots easily. Plants get steady water supply for better growth.
- Improves water holding capacity
- Reduces water loss
- Allows water to spread evenly
Better Nutrient Absorption
Aerated soil helps roots take in nutrients faster. Nutrients move easily through loosened soil to the roots.
Plants use nutrients well and stay healthy. Aeration helps soil stay rich and full of life.
Signs Sandy Soil Needs Aeration
Sandy soil can sometimes become hard for plant roots to grow. This happens when the soil gets packed down.
Aerating the soil helps air, water, and roots move better. Watch for these signs to know when to aerate.
Compacted Soil Surface
The top layer of sandy soil feels hard and crusty. It is tough to dig or poke your fingers into it.
Compacted soil stops roots from spreading and blocks air flow. This makes plants weak.
Poor Plant Growth
Plants look small or have yellow leaves. They may grow slowly or unevenly in sandy soil.
When roots cannot get enough air or water, plants cannot absorb nutrients well. This stunts their growth.
Water Drainage Issues
Water may run off quickly or pool on the surface. This shows soil is not absorbing water properly.
Good sandy soil should soak water evenly. Poor drainage can harm roots and cause plant stress.
Tools For Aerating Sandy Soil
Aerating sandy soil helps plant roots get air, water, and nutrients. It improves soil structure and promotes healthy growth.
Using the right tools makes aeration easier. Different tools suit different garden sizes and soil conditions.
Manual Aerators
Manual aerators are simple hand tools for small gardens. They help poke holes in the soil to increase airflow and water penetration.
These tools are easy to use and do not need power. They work well for sandy soil because they create small holes without much effort.
- Garden fork: Push and pull to loosen soil.
- Handheld spike aerator: Poke holes by pressing into soil.
- Core aerator (manual): Remove small plugs of soil by hand.
Mechanical Aerators
Mechanical aerators are powered tools that cover larger areas quickly. They are best for medium to large gardens or lawns.
These machines either spike the soil or remove plugs to improve aeration. They work well on sandy soil because they break compacted layers efficiently.
- Gas or electric core aerator: Removes soil plugs with rotating tines.
- Spike aerator machine: Pierces holes by pushing spikes into soil.
- Walk-behind aerator: Ideal for bigger spaces and regular use.
Natural Aeration Methods
Natural aeration uses plants and animals to loosen sandy soil over time. These methods improve soil without tools or machines.
They help create channels in the soil for air and water. Natural aeration supports soil health and root growth gently.
- Planting deep-rooted cover crops like clover or rye.
- Adding organic matter such as compost or mulch.
- Encouraging earthworms which tunnel through soil.

Credit: au.mowrator.com
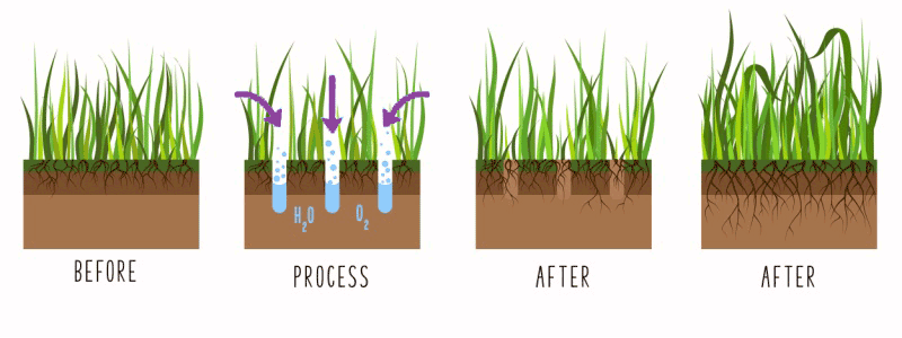
Step-by-step Aeration Process
Aerating sandy soil helps plant roots get more air and water. It improves soil health and plant growth. This guide shows easy steps to aerate sandy soil.
Follow these clear instructions to prepare, aerate, and care for your soil. Proper aeration makes your garden stronger and more productive.
Preparing The Soil
Start by clearing the area of debris like stones and dead plants. Remove weeds by hand or with a hoe. Water the soil lightly to soften it before aeration.
Choosing The Right Time
Pick a dry day for aeration to avoid compacting wet soil. Early spring or fall is best for sandy soil because plants grow actively then. Avoid aerating during very hot or dry weather.
Performing Aeration
- Use a garden fork or aerator tool to poke holes about 6 inches deep.
- Space holes 4 to 6 inches apart across the soil surface.
- Work the tool gently to avoid damaging roots.
- Repeat the process to cover the entire area evenly.
- If the soil is very dry, water lightly after aeration.
Post-aeration Care
| Care Step | Action | Reason |
|---|---|---|
| Watering | Water the soil deeply within 24 hours | Helps roots absorb nutrients and recover |
| Mulching | Apply mulch to keep moisture and temperature steady | Protects soil and improves nutrient retention |
| Fertilizing | Use balanced fertilizer after aeration | Supports healthy root and plant growth |
Improving Sandy Soil After Aeration
Aerating sandy soil helps air and water reach plant roots. It makes the soil less compact. This improves root growth and plant health.
After aeration, you can improve sandy soil further. Adding organic matter, using mulch, and watering well are key steps.
Adding Organic Matter
Organic matter helps sandy soil hold water and nutrients. It also feeds beneficial microbes in the soil.
- Add compost to your soil after aeration.
- Use well-rotted manure for extra nutrients.
- Mix leaf mold or shredded bark into the soil.
- Top dress with organic mulch that will break down over time.
Mulching Techniques
Mulch protects soil and keeps moisture longer. It also reduces weeds and temperature swings.
| Mulch Type | Benefits | How to Apply |
| Wood Chips | Slow breakdown, long-lasting | Spread 2-3 inches thick around plants |
| Straw | Lightweight, good for vegetable beds | Apply 2 inches, avoid thick layers |
| Grass Clippings | Rich in nitrogen | Use thin layers to prevent matting |
| Leaves | Break down quickly, add organic matter | Shred and spread 2 inches thick |
Regular Watering Tips
Sandy soil drains fast, so plants need regular watering. Proper watering helps roots absorb nutrients.
- Water early in the morning or late afternoon.
- Use drip irrigation to save water and target roots.
- Check soil moisture by feeling the soil 2 inches deep.
- Water deeply but less often to encourage strong roots.
Common Mistakes To Avoid
Aerating sandy soil helps plant roots get air and water. Doing it wrong can hurt your plants.
Learn what mistakes to avoid to keep your soil healthy and your plants growing well.
Over-aerating The Soil
Too much aeration breaks down soil structure. It makes the soil loose and weak.
Plants may have trouble holding roots in very loose soil. This can cause stress and poor growth.
- Do not aerate more than once or twice a year
- Avoid deep aeration that disturbs roots too much
- Use gentle tools for sandy soil
Ignoring Soil Testing
Soil testing shows what your soil needs. Ignoring it can waste time and money.
Without testing, you might add wrong nutrients or aerate at the wrong time.
- Test soil pH and nutrient levels before aerating
- Use test results to plan aeration and fertilizing
- Retest every year to track soil health
Neglecting Follow-up Care
Aeration is only the first step. Plants need water and nutrients after aerating.
Ignoring follow-up care can make aeration useless and harm plant roots.
- Water soil deeply after aeration
- Add compost or fertilizer as needed
- Keep soil covered with mulch to retain moisture

Credit: 1stproducts.com
Frequently Asked Questions
What Is The Best Way To Aerate Sandy Soil?
The best way to aerate sandy soil is by using a garden fork or aerator tool. This creates small holes that improve air and water flow. Regular aeration prevents soil compaction and promotes healthy root growth for plants.
How Often Should Sandy Soil Be Aerated?
Sandy soil should be aerated once or twice a year. Aerating in spring and fall helps maintain good soil structure. This timing supports plant roots by ensuring adequate oxygen and moisture absorption throughout the growing season.
Can Organic Matter Improve Sandy Soil Aeration?
Yes, adding organic matter like compost improves sandy soil aeration. It increases water retention and nutrient content while keeping the soil loose. This combination supports stronger, healthier plant roots and better overall plant growth.
Does Aeration Help Plant Root Development In Sandy Soil?
Aeration significantly helps root development by increasing oxygen availability. It reduces soil compaction and allows roots to expand easily. This improves nutrient uptake and water absorption, leading to healthier, more vigorous plants in sandy soil.
Conclusion
Aerating sandy soil helps plant roots grow strong and healthy. It improves water flow and air movement in the soil. You can use simple tools like a garden fork or aerator. Regular aeration prevents soil from becoming compacted. Healthy roots mean better plants and bigger blooms.
Keep your soil loose and well-drained for best results. Try these easy steps to give your garden a boost. Your plants will thank you with vibrant growth and blooms. Simple care makes a big difference in sandy soil.