Have you ever admired a beautifully carved design and wondered how it was made? Imagine creating your own intricate patterns that catch everyone’s eye.
Carving detailed designs may seem difficult, but with the right tips and techniques, you can bring your ideas to life. You’ll discover simple steps to help you carve with precision and confidence. Ready to unlock your creative potential and transform ordinary materials into stunning works of art?
Keep reading, because your carving skills are about to get a serious upgrade.

Credit: www.schaaftools.com
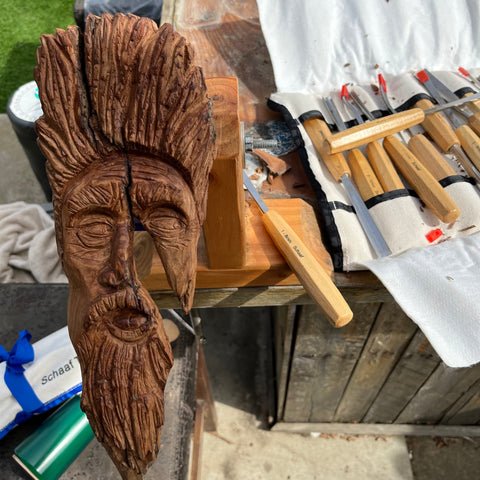
Choosing The Right Tools
Carving intricate designs needs the right tools to get fine details. Using good tools makes carving easier and safer.
Select tools that fit the material and design style. This helps you work with precision and control.
Essential Carving Tools
Start with basic carving tools. These include knives, gouges, and chisels. Each has a shape for different cuts and depths.
- Carving knives: for general cutting and shaping
- Gouges: curved blades for scooping and hollows
- Chisels: straight edges for flat cuts
- V-tools: for making fine lines and grooves
Maintaining Sharp Blades
Sharp blades improve accuracy and reduce slipping risks. Regular sharpening keeps blades clean and effective.
| Tool | Sharpening Method | Frequency |
| Carving knife | Whetstone or sharpening stone | Before each use |
| Gouges | Slip stone or fine sandpaper | After several uses |
| Chisels | Honing guide with sharpening stone | Weekly or as needed |
Specialized Instruments For Details
Use small tools for fine details. These tools help carve tiny shapes and textures.
- Micro carving knives for delicate edges
- Needle files to smooth tiny areas
- Detail chisels with narrow blades
- Magnifying glasses for better view
Selecting Suitable Materials
Carving intricate designs requires the right materials. Choosing suitable materials makes carving easier and better.
Good materials help you create fine details and avoid mistakes while carving.
Wood Types For Carving
Softwoods and hardwoods both work for carving. Softwoods are easier to carve but may not hold details well.
Hardwoods are tougher but show fine details better. Pick wood with tight grains for smooth carving.
- Basswood: soft, easy to carve, good for beginners
- Butternut: light, soft, with nice grain
- Oak: hard, strong grain, holds detail well
- Mahogany: dense, smooth finish, great for fine work
- Cherry: hard, reddish, ages nicely
Alternative Materials
Other materials also work for carving intricate designs. Some are softer and easier to shape.
Try materials like soapstone, foam, or plaster for practice or special projects.
- Soapstone: soft, smooth, good for beginners
- High-density foam: lightweight, easy to shape
- Plaster: moldable, good for casts and details
- Linoleum blocks: used in printmaking, carve fine lines
Preparing The Surface
Prepare the surface before carving to get good results. A smooth surface helps your tools glide better.
Remove dirt, dust, and rough spots. Sand the wood lightly to create an even base.
- Clean the material with a dry cloth
- Use fine sandpaper to smooth rough areas
- Mark your design clearly on the surface
- Secure the material so it does not move
Planning Your Design
Carving intricate designs needs careful planning. Start by understanding what you want to create.
Good preparation helps avoid mistakes and saves time during carving.
Sketching Your Idea
Begin with a simple sketch of your design on paper. This helps visualize the final look.
- Use a pencil for easy changes.
- Draw basic shapes first.
- Add details slowly.
- Keep your lines clear and simple.
Transferring Designs
Move your sketch from paper to the carving surface carefully. This step guides your work.
Use one of these methods to transfer your design:
- Carbon paper to trace outlines.
- Light pencil marks directly on the surface.
- Print and cut stencils for complex shapes.
Scaling And Proportion
Check the size and balance of your design. It must fit well on the object you carve.
| Design Part | Ideal Size | Proportion Tip |
| Centerpiece | 50% | Make it the largest part |
| Border | 25% | Keep it thinner than center |
| Details | 25% | Use smaller, fine shapes |
Mastering Carving Techniques
Carving intricate designs requires patience and skill. Learning the right techniques helps create beautiful patterns with precision.
Understanding basic cuts, creating depth, and handling fine details are key parts of carving. Each step builds on the last to improve your work.
Basic Cuts And Strokes
Start with simple cuts to shape your design. Use smooth strokes to control the tool and avoid mistakes. Practice these cuts often.
- Straight cuts for edges and outlines
- Curved strokes for rounded shapes
- V-shaped cuts for fine lines
- Chisel cuts to remove large areas
Creating Depth And Texture
Depth adds life to your design. Use different cuts to create layers and shadows. Texture makes the surface interesting to touch and see.
| Technique | Effect |
| Shallow cuts | Light shadows |
| Deep cuts | Strong shadows and layers |
| Cross-hatching | Rough texture |
| Smooth carving | Soft texture |
Handling Fine Details
Small details need steady hands and sharp tools. Work slowly and focus on accuracy. Clean edges make the design clear.
- Use small carving knives
- Hold the tool close for control
- Keep your hands steady
- Take breaks to avoid mistakes
Avoiding Common Mistakes
Carving intricate designs takes patience and care. Many beginners face common problems that affect the final result. Learning to avoid these mistakes helps improve your carving skills.
This guide covers key areas like preventing splits and cracks, fixing errors, and following safety precautions.
Preventing Splits And Cracks
Wood can split or crack if you apply too much pressure or carve against the grain. To avoid this, choose wood with tight grain and carve slowly. Keep the wood moist to reduce cracking.
- Use sharp tools to make clean cuts
- Carve along the grain, not against it
- Avoid deep cuts in one pass
- Keep your wood damp but not wet
- Store wood in a stable environment
Correcting Errors
Mistakes happen even to skilled carvers. Fix errors by smoothing rough edges or filling gaps. Sandpaper and wood filler help restore the design.
| Error Type | Fix Method | Notes |
| Small chip | Use fine sandpaper | Sand gently to avoid more damage |
| Deep gouge | Fill with wood filler | Let dry before sanding smooth |
| Split | Apply wood glue and clamp | Use clamps until glue is fully set |
Safety Precautions
Carving tools are sharp and can cause injury. Follow these safety tips:
- Always carve away from your body
- Wear cut-resistant gloves
- Keep your work area clean and well-lit
- Store tools safely after use
- Use clamps to hold the wood steady
Finishing Touches
Carving intricate designs takes patience and skill. The finishing touches bring your artwork to life. They protect the wood and enhance its beauty.
Focus on sanding, staining, sealing, and displaying. Each step adds value and helps your design last longer.
Sanding And Smoothing
Sanding removes rough edges and splinters from your carving. Use fine-grit sandpaper for a smooth finish. Sand gently to avoid damaging delicate details.
- Start with medium-grit sandpaper (around 120 grit).
- Finish with fine-grit sandpaper (220 grit or higher).
- Sand along the grain to prevent scratches.
- Use a soft cloth to wipe away dust.
Applying Stains And Sealants
Stains add color and highlight your carving’s details. Sealants protect wood from moisture and dirt. Choose products suitable for your wood type.
| Product Type | Purpose | Tips |
| Wood Stain | Adds color | Apply evenly with a brush or cloth |
| Clear Sealant | Protects surface | Use polyurethane or lacquer for durability |
| Wax Finish | Gives shine | Buff with a soft cloth after applying |
Displaying Your Artwork
Proper display shows your carving at its best. Choose a spot with good light and low humidity. Use stands or wall mounts to keep it secure.
- Place away from direct sunlight.
- Keep in a dry place to avoid warping.
- Use a soft base to prevent scratches.
- Consider a glass case for dust protection.
Inspiring Project Ideas
Carving intricate designs lets you create beautiful and detailed artwork. It is a rewarding skill that adds a personal touch to wood or other materials.
Try different styles to find what inspires you most. Floral, geometric, and figurative carvings each offer unique challenges and results.
Floral Patterns
Floral patterns bring natural beauty to your carvings. They often include petals, leaves, and stems arranged in flowing shapes.
- Rose designs with layered petals
- Leafy vines that wrap around corners
- Sunflowers with detailed centers
- Abstract flower shapes mixing curves and points
Geometric Designs
Geometric designs focus on shapes and symmetry. They create a modern and clean look that fits many styles.
| Design | Description | Difficulty |
|---|---|---|
| Checkerboard | Alternating squares in a grid | Easy |
| Hexagonal Tiles | Six-sided shapes arranged tightly | Medium |
| Interlocking Circles | Overlapping circles creating patterns | Hard |
Figurative Carvings
Figurative carvings show people, animals, or objects. They tell stories or capture emotions in the wood.
Ideas for figurative carvings:
- A bird in flight with detailed feathers
- A human face showing expression
- A tree with twisting branches
- Animals like deer or horses in motion

Credit: beavercrafttools.com

Credit: lsirish.com
Frequently Asked Questions
What Tools Are Best For Carving Intricate Designs?
The best tools for intricate carving include fine chisels, gouges, and rotary tools. Precision and control are key. Choose tools based on your material and design complexity to achieve clean, detailed cuts.
How Do I Prepare Wood For Detailed Carving?
Prepare wood by sanding it smooth and removing dirt or oils. Choose hardwoods like basswood or walnut for fine details. Proper preparation ensures better tool control and prevents splintering during carving.
What Techniques Improve Carving Precision?
Use steady, controlled strokes and carve with the grain. Start with rough outlines, then refine details gradually. Maintaining sharp tools and good lighting also enhances precision and reduces mistakes.
How Can Beginners Avoid Common Carving Mistakes?
Beginners should practice on soft wood and avoid applying too much pressure. Keep tools sharp and work slowly. Learning basic carving techniques first helps prevent accidents and uneven designs.
Conclusion
Creating intricate designs can be a rewarding experience. Practice regularly to improve your skills. Use the right tools for clean cuts. Choose simple patterns to start. Gradually, move on to complex designs. Patience is key in this craft. Enjoy the process, not just the result.
Share your creations with friends and family. Inspire others with your unique designs. Remember, each piece is a work of art. Keep experimenting and learning. Happy carving!
