If you want to give your woodworking projects a smooth, professional finish, learning how to carve rounded edges in wood is a skill you can’t miss. Rounded edges not only make your pieces look better but also feel better to the touch and safer to use.
Whether you’re working on furniture, frames, or small decorative items, mastering this technique will take your craftsmanship to the next level. You’ll discover simple steps and tips that anyone can follow to create perfect rounded edges every time. Ready to transform your woodwork?
Let’s get started!

Credit: www.youtube.com
Tools Needed
Carving rounded edges in wood requires the right tools. Using proper tools makes the job easier and safer.
This guide covers the essential carving tools and safety gear you need before starting your project.
Essential Carving Tools
You need sharp tools designed for shaping wood. These tools help create smooth, rounded edges.
- Gouges: Curved chisels for scooping wood and shaping curves
- V-tools: Used for detail cuts and sharp lines
- Carving knives: For fine cuts and smoothing edges
- Rasps and files: To smooth rough areas and refine shapes
- Mallet: Helps tap chisels gently for controlled carving
- Sandpaper: For final smoothing of rounded edges
Choose tools that fit your hand comfortably. Keep them sharp for the best results.
Safety Equipment
Safety is important while carving wood. Wear protective gear to avoid injuries.
- Safety glasses to protect your eyes from wood chips
- Cut-resistant gloves to protect your hands
- A dust mask to avoid breathing wood dust
- Apron or work clothes to keep your clothes clean
- First aid kit nearby for emergencies
Work in a well-lit and clean area. Take breaks to stay focused and safe.
Preparing The Wood
Preparing wood is the first step to carving smooth, rounded edges. You must select the right wood and mark the edges carefully. Proper preparation makes carving easier and safer.
This guide covers choosing the right wood and marking the edges before carving. Follow these tips to get a clean, precise shape.
Choosing The Right Wood
Select wood that is soft enough to carve but strong enough to hold shape. Avoid very hard woods for beginners. Softwoods like pine or basswood work well.
- Pick wood with straight grain for easier carving.
- Avoid wood with knots or cracks.
- Choose dry wood to prevent splitting.
- Use a smooth surface for better marking and carving.
Marking The Edges
Marking helps guide your carving and keeps edges even. Use a pencil and tools to draw clear lines on the wood surface.
| Marking Tool | Use |
| Pencil | Draw rounded edge outlines |
| Ruler | Measure equal distances from edges |
| Compass | Draw smooth curves for rounded edges |
| Sandpaper | Lightly smooth marked lines if needed |
Basic Carving Techniques
Carving rounded edges in wood adds a smooth, finished look to your project. Learning simple carving techniques helps you shape wood safely and accurately.
Start with the right tools and careful cutting. These basics make carving easier for beginners and improve your results.
Holding The Tools
Hold your carving tool firmly but not too tight. A relaxed grip gives better control and reduces hand fatigue.
Use your dominant hand to hold the tool. Support the wood piece with your other hand or secure it with clamps.
- Hold the handle close to the blade for precision
- Keep your fingers away from the cutting edge
- Use your thumb to guide the tool gently
- Keep your hands steady and avoid sudden movements
Making Initial Cuts
Start your carving by making shallow cuts along the edge. These cuts outline the rounded shape you want to create.
Use gentle pressure to avoid removing too much wood at once. Smooth, small cuts give you better control over the shape.
- Make light cuts following the wood grain
- Remove thin layers gradually
- Work slowly to shape the curve evenly
- Check your progress often to keep the roundness consistent
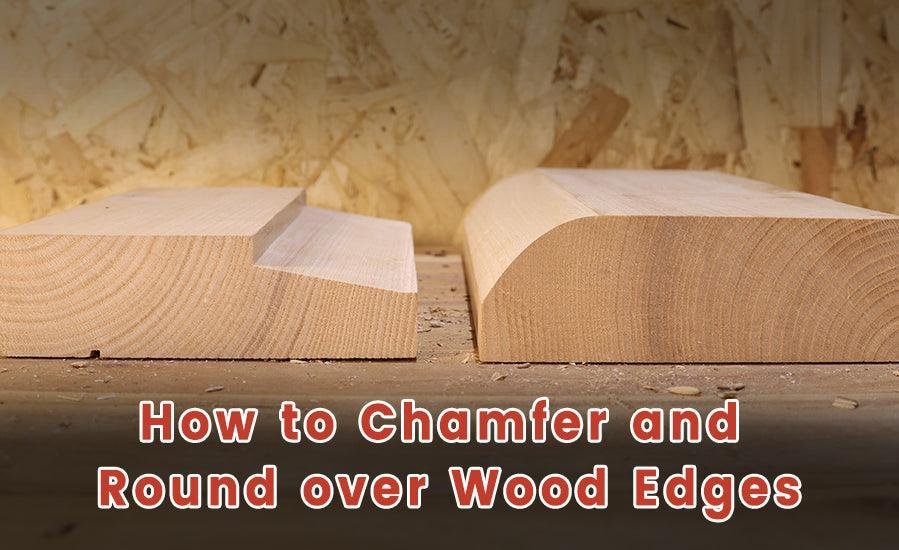
Shaping Rounded Edges
Carving rounded edges in wood makes your project look smooth and polished. This technique adds softness to sharp corners.
Using the right tools and methods helps you shape clean, even curves. It takes patience and gentle work.
Using Gouges And Rasps
Gouges have curved blades that scoop out wood easily. They help you create smooth, rounded shapes on edges.
Rasps are rough files that remove wood quickly. They shape the curve and smooth rough spots after gouging.
- Start with a gouge to carve the main curve
- Use a rasp to refine the shape and remove bumps
- Work slowly to avoid removing too much wood
- Keep your tools sharp for better control
Smoothing Transitions
Smoothing transitions means blending the rounded edge into flat surfaces. This makes the edge look natural.
Use fine sandpaper or small files to remove rough lines. Sand evenly along the curve for a soft finish.
- Start sanding with medium-grit paper
- Switch to fine-grit sandpaper for smoothness
- Sand along the wood grain to avoid scratches
- Check the shape often and adjust as needed
Finishing Touches
After carving rounded edges in wood, finishing is important. It makes the wood smooth and protects it.
Good finishing improves the look and feel of your wood project. It also helps the wood last longer.
Sanding For Smoothness
Sanding removes rough spots and sharp edges on the wood. It makes the rounded edges soft to touch.
Use fine-grit sandpaper to smooth the surface. Sand gently along the curve to keep the shape.
- Start with medium-grit sandpaper (120-150 grit)
- Finish with fine-grit sandpaper (220 grit or higher)
- Wipe dust away with a clean cloth between sanding steps
- Smooth all around the rounded edges evenly
Applying Sealant Or Finish
Sealant protects the wood from moisture and dirt. It also enhances the wood’s color and texture.
Choose a finish that suits your project. Options include oil, varnish, or polyurethane.
- Apply a thin coat with a brush or cloth
- Let the finish dry as per instructions
- Lightly sand between coats for smoothness
- Apply multiple coats for better protection
- Allow full cure before using the wood piece
Common Mistakes To Avoid
Carving rounded edges in wood takes patience and care. Many beginners make simple mistakes that can spoil their work.
Knowing these common errors helps you avoid damage and get smooth results.
Over-carving
Removing too much wood can ruin the shape of the edge. It is easy to carve away more than needed.
Over-carving makes edges uneven and weak. It is hard to fix mistakes without starting over.
- Work slowly and check your progress often
- Use light pressure on your tools
- Stop carving when the edge looks rounded enough
- Practice on scrap wood before your main project
Uneven Edges
Uneven edges happen when the carving is not smooth or balanced on all sides. This makes the wood look rough.
Uneven edges reduce the quality of your work and can cause splinters or weak spots.
- Mark the edge with a pencil to guide your carving
- Use consistent strokes and tool angles
- Sand the edges gently after carving
- Check the edge from different angles as you work
Tips For A Perfect Finish
Carving rounded edges in wood gives your project a smooth, soft look. A perfect finish makes the wood safe and nice to touch.
Using the right technique helps you avoid rough spots and mistakes. Focus on steady work and good habits for great results.
Consistent Pressure
Keep your hand pressure steady as you carve. Too much pressure can cause deep cuts or slips.
Light, even pressure helps shape the wood smoothly. This way, you avoid rough or uneven edges.
- Hold your carving tool firmly but not tightly
- Move slowly and control the tool’s depth
- Check your work often to keep edges even
Patience And Practice
Take your time when carving rounded edges. Rushing can cause mistakes and rough finishes.
Practice on scrap wood before working on your project. This builds skill and confidence with tools.
- Start with simple shapes to build control
- Learn how different woods carve differently
- Repeat the process to improve smoothness

Credit: www.familyhandyman.com

Credit: www.reddit.com
Frequently Asked Questions
What Tools Are Best For Carving Rounded Edges In Wood?
The best tools include a router with a round-over bit, sandpaper, and carving knives. These provide smooth, precise rounded edges efficiently.
How Do I Prepare Wood Before Carving Rounded Edges?
Start by sanding the wood surface to remove rough spots. Clean off dust for better carving results and tool control.
Can I Carve Rounded Edges On Hardwood Easily?
Yes, but hardwood requires sharp tools and slower carving. Patience and proper technique ensure smooth, rounded edges on hardwood.
What Safety Tips Should I Follow When Carving Wood Edges?
Always wear safety goggles and a dust mask. Secure wood firmly and keep hands clear of blades during carving.
Conclusion
Carving rounded edges in wood can be simple. Start with the right tools. Practice makes perfect. Smooth edges bring beauty to any project. Always sand carefully to avoid splinters. Choose the right wood for ease of carving. Pay attention to grain direction.
This helps in achieving smooth curves. Remember, patience is key. Take breaks to avoid mistakes. Safety is important, so wear protective gear. Enjoy the process of learning and improving. Soon, you’ll create wonderful wooden pieces with ease. Happy carving!