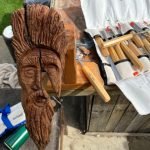
If you want to carve wood safely, you need more than just tools and talent—you need the right approach. Every cut you make can either bring your idea to life or lead to injury.
Imagine creating beautiful designs without worrying about slips or accidents. In this guide, you’ll discover simple, effective ways to protect yourself while sharpening your skills. Ready to carve with confidence and keep your hands safe? Keep reading to learn the essential tips that every woodcarver should know.

Credit: www.schaaftools.com
Choosing The Right Wood
Choosing the right wood is very important for safe carving. The wood type affects how easy and safe the carving process will be.
Different woods have different hardness and grain patterns. Knowing these helps you pick the best wood for your skill level.
Softwoods Vs Hardwoods
Softwoods are easier to carve because they are less dense. Hardwoods are tougher and need sharper tools and more strength.
Softwoods can be safer for beginners since the tools do not slip as easily. Hardwoods require careful handling to avoid accidents.
- Softwoods:Pine, Cedar, Basswood
- Hardwoods:Oak, Maple, Walnut
Best Woods For Beginners
Beginners should start with soft, smooth woods. These woods cut easily and have fewer knots or rough spots.
Basswood is a popular choice. It is soft, light, and has a fine grain that is easy to carve safely.
- Basswood
- Pine
- Butternut
- Cedar
Wood Grain And Its Impact
Wood grain shows the direction of fibers in the wood. Carving with the grain is safer and easier.
Carving against the grain can cause the wood to split or chip. This can make tools slip and cause injuries.
- Follow the grain direction when carving
- Avoid knots and rough spots
- Check grain tightness for smoother cuts
Essential Tools For Carving
Wood carving requires the right tools to work safely and well. Using good tools helps you shape wood with control and detail.
This guide covers knives, gouges, chisels, and how to keep them sharp and ready to use.
Types Of Carving Knives
Carving knives come in many shapes. Each shape has a use for different cuts and details. Choose knives that fit your hand well.
- Detail knives: Small blades for fine lines and tight spaces.
- Roughing knives: Larger blades for shaping big areas quickly.
- Chip carving knives: Thin blades to make small chips and patterns.
- Hook knives: Curved blades for hollow or rounded cuts.
Using Gouges And Chisels
Gouges have curved edges for scooping wood. Chisels have straight edges to cut flat surfaces and sharp corners.
| Tool | Shape | Use |
| Straight chisel | Straight edge | Cut flat surfaces and clean edges |
| U-gouge | U-shaped edge | Remove wood in curved areas |
| V-gouge | V-shaped edge | Make sharp lines and grooves |
| Spoon gouge | Curved, spoon-like | Carve deep hollows and bowls |
Sharpening And Maintaining Tools
Sharp tools cut better and are safer. Dull tools slip and need more force. Keep blades sharp and clean.
- Use whetstones or sharpening stones to grind edges.
- Hone blades regularly to keep a fine edge.
- Clean tools after use to stop rust.
- Store tools in dry places with blade covers.
Setting Up A Safe Workspace
Carving wood can be fun and creative. It needs a safe workspace to avoid accidents. A good setup helps you work better and stay safe.
Keep your tools and materials organized. Make sure your space is clean and free from hazards before you start carving.
Proper Lighting And Ventilation
Good lighting helps you see your work clearly. Bright light reduces mistakes and eye strain. Use natural light or strong lamps.
Ventilation is important to avoid breathing wood dust. Open windows or use fans to keep air moving. This keeps the air fresh and safe.
Secure Workbench Setup
Your workbench should be strong and steady. A stable bench stops your wood from moving while you carve. This lowers the risk of injury.
Clear the bench surface. Remove any tools or scraps that can get in the way. A clean bench helps you focus and work safely.
Using Clamps And Supports
Clamps hold your wood pieces firmly in place. They free both hands for carving and reduce slipping. Use clamps that fit your work size.
Supports like blocks or stands keep your wood steady. Place them under your work to prevent wobbling. This adds control and safety.
- Use strong clamps to hold wood tightly
- Check clamps before starting work
- Place supports to balance your wood piece
- Adjust clamps and supports as needed
Safety Gear And Precautions
Wood carving is a fun hobby but can be dangerous without safety gear. Wearing the right equipment keeps you safe from cuts and splinters.
Taking precautions helps prevent injuries and makes carving more enjoyable. Always prepare your workspace before starting.
Protective Gloves And Eyewear
Wear protective gloves to keep your hands safe from sharp tools and rough wood. Gloves also help prevent splinters.
Always use safety glasses or goggles to protect your eyes from flying wood chips. Clear, snug eyewear works best for carving.
- Choose cut-resistant gloves for better protection
- Use glasses with side shields for full eye coverage
- Replace damaged gloves and eyewear promptly
First Aid Essentials
Keep a first aid kit nearby to treat small cuts and splinters quickly. It helps stop bleeding and avoid infection.
Include bandages, antiseptic wipes, and tweezers in your kit. Check the kit often to make sure supplies are fresh.
- Bandages for covering small wounds
- Antiseptic wipes to clean cuts
- Tweezers for removing splinters
- Disposable gloves to keep treatment clean
Safe Handling Practices
Hold your carving tools firmly and cut away from your body. This lowers the risk of injury if the tool slips.
Work on a stable surface and keep your hands clear of the blade path. Take breaks to avoid fatigue and loss of focus.
- Use sharp tools to reduce force needed
- Keep tools clean and well maintained
- Carve in good light to see details clearly
- Never rush; work slowly and carefully
Basic Carving Techniques
Wood carving is a fun and creative hobby. It needs some simple skills and safety. Learning basic carving techniques helps you work safely and make nice designs.
Start with easy methods and practice often. Use the right tools and control your cuts. This keeps your hands safe and your wood smooth.
Whittling And Relief Carving
Whittling uses a small knife to carve shapes from wood. It is good for beginners. Relief carving cuts shapes into a flat wood surface. It makes a 3D picture.
Both techniques need sharp tools and steady hands. Cut away small pieces at a time. Always carve away from your body for safety.
Chip Carving Basics
Chip carving removes small chips of wood to create patterns. Use a sharp knife or chisel for this. The cuts are shallow and precise.
This technique uses repeated shapes like triangles and diamonds. It works well on flat wood pieces like boxes or signs.
- Mark your design lightly with a pencil
- Make small, clean cuts
- Work slowly to avoid mistakes
- Keep your hands behind the cutting edge
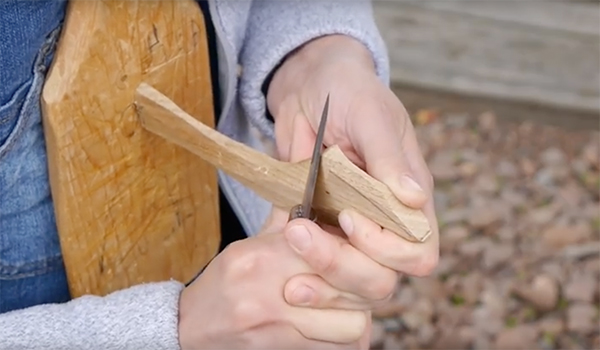
Using Controlled Cuts
Controlled cuts mean you guide your tool carefully. Use your fingers to steady the wood and tool. Cut with slow, even pressure.
Keep the blade sharp for easier cutting. Dull blades need more force and cause slips. Always carve away from your body and hands.
- Hold the tool firmly but not too tight
- Use your thumb as a guide
- Make shallow cuts first
- Clear wood chips often
Credit: www.woodworkersjournal.com
Avoiding Common Injuries
Carving wood is a fun and creative hobby. It needs care to keep safe. Many injuries happen from simple mistakes. You can avoid these with good habits and focus.
This guide shows how to spot unsafe moves, hold your hands right, and stop tools from slipping. Follow these tips to keep your hands safe while carving.
Recognizing Unsafe Movements
Unsafe movements can cause cuts or bruises. Watch how you move your hands and tools. Avoid quick or wild motions. Always carve away from your body and fingers.
- Do not rush your cuts.
- Keep your hands steady and calm.
- Never carve towards your hand or body.
- Use slow, controlled strokes.
Proper Hand Positioning
Good hand placement protects you from slips and cuts. Hold your wood piece firmly but not too tight. Keep your hands behind the cutting edge.
| Hand | Safe Position |
| Carving Hand | Hold the tool with a firm grip |
| Supporting Hand | Keep fingers curled away from the blade |
| Wood Piece | Secure it on a stable surface |
Preventing Tool Slips
Tool slips cause most carving injuries. Keep your tools sharp and clean. Dull tools need more force and can jump off the wood.
Tips to prevent tool slips:
- Sharpen your tools before each use.
- Keep your hands dry and free of sweat.
- Wear a carving glove on the hand holding the wood.
- Carve on a stable and non-slippery surface.
Finishing And Caring For Carvings
Carving wood is only the first step. Proper finishing and care keep your work beautiful. These steps protect your carving and help it last longer.
Learn simple ways to sand, finish, and store your wooden pieces safely. Good care shows the true beauty of your carving.
Sanding And Smoothing
After carving, sanding removes rough spots and sharp edges. It makes the wood surface smooth and ready for finishing.
- Start with coarse sandpaper (around 80 grit) to shape rough areas.
- Use medium grit (120-150) to smooth the surface further.
- Finish with fine grit (220 or higher) for a soft touch.
- Sanding blocks or sponges help reach curves and tight spots.
- Always sand along the wood grain to avoid scratches.
Applying Finishes And Sealants
Finishes protect wood from moisture, dirt, and damage. They also enhance color and texture. Choose a finish that fits your carving’s use and look.
| Finish Type | Benefits | Best Use |
|---|---|---|
| Oil (e.g., linseed, tung) | Deepens color, easy to apply | Indoor carvings, natural look |
| Wax | Gives soft shine, protects surface | Small details, smooth finish |
| Lacquer | Hard, glossy surface | Durable finish, display pieces |
| Polyurethane | Strong protection, water-resistant | Outdoor carvings, heavy use |
Apply finish with a soft cloth or brush. Use thin coats and let each dry before adding more. Always work in a well-ventilated area.
Storing Carved Pieces Safely
Proper storage keeps carvings safe from damage and warping. Wood can change shape if exposed to moisture or heat.
- Store carvings in a dry place with stable temperature.
- Avoid direct sunlight to prevent color fading.
- Use padded boxes or wrap pieces in soft cloth.
- Keep carvings away from sharp objects and heavy items.
- Check stored carvings regularly for dust or pests.

Credit: www.woodcraft.com
Frequently Asked Questions
What Safety Gear Is Essential For Wood Carving?
Always wear cut-resistant gloves, safety goggles, and a dust mask. These protect your hands, eyes, and lungs from injuries and dust.
How Do I Keep Carving Tools Sharp Safely?
Use a sharpening stone or strop carefully. Maintain a consistent angle and avoid rushing to prevent slips and cuts.
What Is The Safest Carving Technique For Beginners?
Use controlled, small cuts away from your body. Keep your hands behind the blade at all times to avoid injuries.
How Should I Set Up My Carving Workspace Safely?
Ensure good lighting, a stable workbench, and clear space. Keep tools organized to prevent accidents and improve focus.
Conclusion
Carving wood can be safe and fun with the right steps. Always wear protective gear like gloves and goggles. Use sharp tools and handle them carefully. Keep your workspace clean and well-lit. Take your time and focus on your work.
These habits help prevent accidents and improve your carving. Enjoy the process and stay safe every time you carve. Safety makes carving more rewarding and enjoyable.