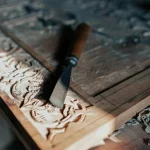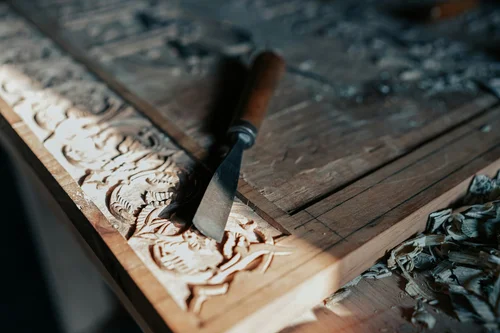
Are you ready to bring your woodworking skills to the next level? Learning how to carve wood with a mallet can open up a world of creative possibilities.
Whether you want to craft beautiful sculptures or add intricate details to your projects, using a mallet gives you control and power. In this guide, you’ll discover simple, practical steps that make wood carving easier and more enjoyable. Stick with me, and you’ll be carving like a pro before you know it.
Let’s get started!
Choosing The Right Mallet
Carving wood requires the right tools to work well and stay safe. A mallet helps you tap your carving tools with control. Picking the right mallet makes carving easier and improves your results.
There are many mallets to choose from. Knowing about types, materials, size, and weight helps you find the best one for your wood carving projects.
Types Of Mallets
Malets come in different styles. Some have wooden heads, others use rubber or rawhide. Each type works differently depending on the wood and tools you use.
- Wooden mallets are common and give a firm hit.
- Rubber mallets are softer and reduce tool damage.
- Rawhide mallets are gentle and good for fine work.
- Plastic mallets are lightweight and easy to handle.
Material Considerations
The mallet’s material affects how it hits your carving tools. Hard materials give strong taps but can wear tools faster. Softer materials protect tools but may need more force.
Wooden mallets made from hardwood last longer and feel natural. Rubber mallets absorb shock and reduce noise. Rawhide heads are tough but gentle, good for delicate carving.
- Hardwood: durable and firm hits
- Rubber: shock-absorbing and soft
- Rawhide: gentle and flexible
- Plastic: lightweight and easy to clean
Size And Weight Factors
Choose a mallet size that fits your hand well. A too-large mallet is hard to control. A too-small one may need extra effort to use.
Weight affects how much force you deliver. Heavier mallets need less effort but can tire your hand. Lighter mallets give more control but need more taps.
- Medium size fits most hands comfortably
- Weight between 8 to 16 ounces suits most carving tasks
- Heavier mallets work for deep cuts
- Lighter mallets suit detailed, delicate work

Credit: www.reddit.com
Selecting Suitable Wood
Choosing the right wood is important for carving with a mallet. The wood must be easy to shape and not too hard. This helps you work safely and get good results.
Look for wood that matches your skill level and project type. Some woods are better for beginners, while others suit detailed work.
Best Wood Types For Carving
Softwoods and hardwoods both work for carving. Choose wood that is easy to cut but strong enough to hold shape. Here are some popular types:
- Basswood – soft and smooth, good for beginners
- Butternut – light and easy to carve, nice grain
- Cherry – harder wood, takes detail well
- Mahogany – fine grain, good for finishing
- Walnut – strong and dark, good for experienced carvers
Wood Grain And Texture
Wood grain affects how the mallet and tools work on the surface. Straight grains are easier to carve and less likely to split. Coarse textures may need more effort.
| Grain Type | Carving Ease | Best Use |
| Straight Grain | Easy | General carving |
| Interlocked Grain | Moderate | Detailed work |
| Cross Grain | Hard | Experienced carvers |
Preparing Wood For Carving
Before carving, prepare the wood by checking for cracks and knots. These can cause problems while working with a mallet. Sand the surface slightly to remove rough spots.
- Cut the wood to a suitable size
- Remove bark carefully
- Use a moisture meter to ensure wood is dry
- Mark your design lightly with a pencil
Essential Carving Tools
Carving wood with a mallet needs the right tools. Good tools make carving easier and safer.
Knowing about the main tools helps you get started and improve your skills.
Chisels And Gouges
Chisels and gouges are the main tools for carving. They come in many shapes and sizes.
Chisels have straight edges. Gouges have curved edges to carve rounded shapes.
- Use flat chisels for straight cuts and details
- Use gouges for scooping and shaping curves
- Select sizes based on your carving project
Sharpening Techniques
Sharp tools cut wood cleanly and reduce effort. Dull tools can be dangerous and damage wood.
Use a sharpening stone or a honing guide to keep edges sharp and even.
- Start with a coarse stone to shape the edge
- Use a fine stone to polish and sharpen
- Keep the same angle while sharpening
- Test sharpness by carefully slicing thin wood shavings
Tool Maintenance Tips
Regular care keeps carving tools in good shape and extends their life.
Clean tools after use and store them safely to avoid rust and damage.
- Wipe blades with an oily cloth to prevent rust
- Store tools in a dry place with blade guards
- Check handles for cracks and tighten if loose
- Sharpen tools regularly before use

Credit: www.youtube.com
Basic Carving Techniques
Carving wood with a mallet takes skill and practice. It uses a mallet and chisel to shape wood carefully.
Learning basic techniques helps you carve safely and create clean designs. Start slow and focus on control.
Holding The Mallet And Chisel
Hold the chisel firmly with your dominant hand near the blade. This gives you better control over the cut.
Grip the mallet with your other hand. Keep it loose enough to swing but firm enough to hit the chisel precisely.
- Chisel hand close to the blade for accuracy
- Mallet hand holds the handle near the end
- Keep your hands steady to avoid slips
Controlling Force And Angle
Use light taps with the mallet to start carving. Too much force can split the wood or damage the chisel.
Hold the chisel at an angle to control how deep the cut goes. Smaller angles make shallow cuts, larger angles make deeper cuts.
- Start with gentle mallet taps
- Adjust angle to control depth
- Increase force slowly as needed
Common Carving Strokes
Carvers use different strokes for shapes and textures. Practice these strokes to improve your skill.
- Push Cut:Push the chisel forward to remove thin wood layers.
- Paring Cut:Use a slicing motion for smooth, shallow cuts.
- Stop Cut:Cut straight down to create sharp edges.
Advanced Carving Tips
Carving wood with a mallet requires skill and patience. These tips help improve your technique. Focus on control and precision to create better results.
Understanding how to add depth, work on details, and avoid mistakes will make your carvings stand out. Use these tips to enhance your craft.
Creating Depth And Texture
Use varied chisel angles to create shadows and highlights. Push the mallet gently for shallow cuts. Strike harder for deeper grooves to add contrast.
- Start with rough cuts to remove excess wood
- Use angled cuts for textured surfaces
- Layer your cuts for a three-dimensional effect
- Sand lightly to keep sharp edges clear
Working On Details
Focus on small features last. Use fine chisels and light taps with the mallet. Keep your hands steady to avoid slips.
| Tool | Use | Tip |
| Veiner Chisel | Fine lines and curves | Hold close for control |
| Gouge Chisel | Rounded grooves | Strike lightly for smooth cuts |
| Skew Chisel | Sharp edges and corners | Use angled strokes |
Avoiding Common Mistakes
Do not force the mallet too hard. It may split the wood. Avoid carving against the grain to reduce tear-out. Keep tools sharp for cleaner cuts.
Common errors and fixes:
- Chisel slips:Hold tool firmly and use steady strikes.
- Wood splitting:Check grain direction, adjust mallet force.
- Uneven depth:Mark guidelines before carving.
- Dull tools:Sharpen regularly for smooth work.

Credit: www.reddit.com
Safety Practices
Carving wood with a mallet is fun but requires care. Following safety practices helps prevent accidents.
Understanding how to protect yourself keeps your work safe and enjoyable.
Protective Gear
Wear protective gear to shield your body from flying wood chips and tool slips. This gear reduces injury risk.
- Safety goggles protect your eyes from splinters.
- Gloves protect hands but should fit well to keep control.
- Wear a dust mask to avoid breathing sawdust.
- Use ear protection if working with loud tools nearby.
Safe Tool Handling
Hold your mallet and carving tools firmly. Use tools only for their intended purpose.
Keep your hands away from the cutting edge. Always carve away from your body for safety.
- Check tools before use for damage or dullness.
- Use a sharp chisel; dull tools need more force and slip more easily.
- Store tools safely when not in use.
- Never rush; work slowly and carefully.
Workspace Setup
Set up a clean, well-lit workspace with enough room to work safely. A stable surface helps control your tools.
Keep your workspace free from clutter to avoid tripping or knocking tools over.
- Use a sturdy workbench or table.
- Secure your wood piece with clamps to prevent movement.
- Have good lighting to see fine details clearly.
- Keep first aid supplies nearby for emergencies.
Finishing Touches
Carving wood with a mallet takes skill and care. After shaping the wood, the finishing touches make your work look great. These steps protect the wood and bring out its beauty.
In this guide, we cover sanding techniques, applying finishes, and preserving your work. Each step helps your carving last longer and shine.
Sanding Techniques
Sanding smooths the wood surface and removes rough spots. Use different sandpaper grits for best results. Start with coarse grit and finish with fine grit for a soft feel.
- Begin with 80-grit sandpaper to remove large bumps.
- Move to 120-grit for a smoother surface.
- Finish with 220-grit for a soft, polished feel.
- Sand along the grain to avoid scratches.
- Use a sanding block to keep pressure even.
Applying Finishes
Finishes protect your carving and bring out the wood’s color. You can use oils, waxes, or varnishes. Each finish has its own look and feel.
| Finish Type | Effect | Dry Time |
| Linseed Oil | Deepens color, natural look | 24 hours |
| Beeswax | Soft sheen, smooth touch | 1 hour |
| Varnish | Glossy and hard surface | 6-8 hours |
Preserving Your Work
Keep your carved wood safe from damage. Store it in a dry place away from sunlight and heat. Regular care will keep it looking fresh.
- Dust your carving with a soft cloth.
- Avoid placing it in direct sunlight.
- Keep it away from damp or humid areas.
- Apply wax or oil every few months.
- Handle with clean, dry hands to avoid stains.
Frequently Asked Questions
What Tools Do I Need To Carve Wood With A Mallet?
You need a wooden mallet, sharp chisels, and quality wood. Safety gear like gloves and goggles is essential. Choose chisels based on your carving detail and wood type for best results.
How Do I Hold A Mallet For Wood Carving?
Grip the mallet firmly near its end for control. Keep your wrist relaxed to avoid strain. Use controlled, gentle taps for precision and avoid excessive force to prevent wood damage.
What Wood Types Work Best For Mallet Carving?
Softwoods like basswood and pine are ideal for beginners. Hardwoods like oak or walnut offer durability for advanced carving. Choose wood with a fine grain for smoother cuts and easier shaping.
How Can I Avoid Splitting Wood While Carving?
Use sharp chisels and tap gently with the mallet. Carve along the wood grain, not against it. Avoid deep cuts in one strike; work gradually for cleaner results and fewer splits.
Conclusion
Carving wood with a mallet is both fun and rewarding. It requires patience and practice. Start with basic tools and simple designs. Always prioritize safety while working. Wear safety goggles and gloves. Pay attention to your hand position. Gradually, skills will improve with time.
Enjoy the process and watch your creations take shape. Each project helps build confidence. Share your work with others. Inspire them to try carving too. Remember, practice makes perfect. Happy carving!