Looking for a smart way to organize your tools and keep your workspace tidy? Creating your own DIY tool cabinet is easier than you think, and it can save you time, money, and frustration.
Imagine having all your tools right where you need them, neatly stored and easy to find. In this guide, you’ll discover simple steps to build a sturdy, customized tool cabinet that fits your space and style perfectly. Ready to take control of your tools and boost your productivity?
Let’s get started!
Choosing The Right Materials
Building a DIY tool cabinet needs careful material choice. Good materials make the cabinet strong and last long.
Selecting the right wood and hardware helps you create a cabinet that holds your tools safely. It also makes the building process easier.
Selecting Wood Types
Choose wood that is strong and easy to work with. Hardwood lasts longer but costs more. Softwood is cheaper and lighter but less durable.
- Pine: Softwood, easy to cut, affordable
- Oak: Hardwood, very strong, looks good
- Birch: Hardwood, smooth finish, durable
- Plywood: Stable, resists warping, budget-friendly
- MDF: Smooth surface, good for painting, not very strong
Essential Hardware And Tools
Get the right hardware to keep your cabinet firm. Use tools that make the work simple and safe.
| Hardware | Purpose |
| Screws | Hold wood pieces together |
| Hinges | Attach doors to the cabinet |
| Drawer slides | Allow drawers to open smoothly |
| Handles | Make doors and drawers easy to open |
| Wood glue | Strengthen joints between wood pieces |
Basic tools include a drill, screwdriver, measuring tape, saw, and level. These help you build the cabinet safely and accurately.

Credit: www.anneofalltrades.com
Designing Your Cabinet
Designing a DIY tool cabinet starts with careful planning. You need to know the space you have and how you want to store your tools.
A good design saves time and keeps your workspace neat. Let’s look at two key parts of the design process.
Measuring Your Space
Measure the area where you want to place the cabinet. Note the width, height, and depth. These numbers will guide your cabinet size.
- Use a tape measure for accuracy
- Write down all dimensions clearly
- Check for any obstacles like doors or windows
- Consider how much space you need to move around
Planning Storage Layout
Think about the types of tools you have. Plan shelves, drawers, and hooks to keep tools easy to find.
| Tool Type | Storage Option | Notes |
| Hand Tools | Drawers | Use dividers for small items |
| Power Tools | Open Shelves | Allow space for cords |
| Fasteners | Small Bins | Label each bin |
| Long Tools | Vertical Hooks | Keep upright to save space |
Cutting And Preparing Parts
Building a DIY tool cabinet starts with cutting and preparing the wood parts. Accurate cuts ensure the cabinet fits together well. Taking time to prepare parts carefully saves effort later.
Use the right tools and measure twice before cutting. This step helps you avoid mistakes and keeps the project on track.
Safety Tips For Cutting
Cutting wood can be dangerous without safety measures. Protect yourself by following simple rules. Always wear safety glasses to guard your eyes from dust and chips.
- Wear ear protection to reduce noise damage
- Use a dust mask to avoid breathing sawdust
- Keep fingers away from the blade
- Check that tools are sharp and in good condition
- Secure wood pieces firmly before cutting
- Work in a well-lit and clean area
Sanding And Finishing
Sanding smooths rough edges and surfaces. It makes the wood ready for finishing. Use fine-grit sandpaper and sand in the direction of the wood grain.
| Sandpaper Grit | Use For |
| 80-100 | Removing rough spots and shaping |
| 120-150 | Smoothing surfaces before finishing |
| 220+ | Final sanding for a smooth finish |
After sanding, wipe off dust with a damp cloth. Apply paint or stain evenly for a clean look. Let the finish dry well before assembling parts.

Credit: www.ramblingrenovators.ca
Assembling The Frame
Building a strong frame is key for a DIY tool cabinet. It supports all shelves and drawers. You need to join the wood pieces carefully.
This guide covers joining techniques and how to keep the frame stable. Follow these tips for a lasting cabinet.
Joining Techniques
Choose the right way to join wood pieces. Screws, nails, and glue are common options. Each method has its own strength.
- Use wood glue along edges for a tight bond.
- Drive screws at an angle to hold pieces firmly.
- Add wood dowels for extra strength at joints.
- Clamp parts while glue dries to avoid gaps.
- Pre-drill holes to prevent wood splitting.
Ensuring Stability
Stability keeps the frame from wobbling. Use braces and check for square corners. A stable frame lasts longer and holds weight better.
| Tip | Why It Matters |
| Use corner braces | They stop side-to-side movement |
| Check with a carpenter’s square | Keeps corners at 90 degrees |
| Reinforce joints with screws and glue | Prevents joints from loosening over time |
| Level the frame before fixing | Ensures drawers slide smoothly |
Adding Drawers And Shelves
Building a DIY tool cabinet means adding drawers and shelves for better storage. Drawers keep small tools organized. Shelves hold bigger items and supplies.
This guide helps you install drawer slides and customize shelf heights. These steps make your cabinet more useful and neat.
Installing Drawer Slides
Start by choosing the right drawer slides for your cabinet size. Measure the cabinet and drawer carefully to fit the slides well.
Attach one part of the slide to the drawer side. Attach the matching part inside the cabinet. Test the drawer by sliding it in and out smoothly.
- Use screws that fit the slide holes
- Keep slides level and straight
- Leave small gaps for easy movement
- Check alignment before tightening screws
Customizing Shelf Heights
Decide how tall you want each shelf. Adjusting shelf heights helps fit tools of different sizes. Use shelf pins or brackets for support.
Mark the shelf positions on the cabinet sides. Drill holes or attach brackets at these points. Place shelves and test the height for your tools.
- Measure tool heights before setting shelves
- Use adjustable pins for flexible shelves
- Make shelves strong enough for heavy tools
- Keep space between shelves for easy access
Finishing Touches
Finishing touches make your DIY tool cabinet look complete and last longer. These details add style and help keep tools organized.
Focus on painting, staining, handles, and labels to give your cabinet a neat and practical finish.
Painting And Staining Options
Painting or staining protects wood and improves its appearance. Choose colors or stains that match your workspace or style.
Use a primer before painting to help the paint stick well. Stains soak into the wood and show its natural grain.
- Use spray paint for a smooth, even finish.
- Brush-on paint works well for detailed areas.
- Choose water-based paint for easy cleanup.
- Pick oil-based stains for deep, rich color.
- Apply a clear sealant to protect the finish.
Adding Handles And Labels
Handles make it easy to open drawers and doors on your cabinet. Choose handles that fit the size and style of your tool cabinet.
Labels help you find tools quickly. Label drawers and shelves clearly with names or pictures of the tools inside.
- Use metal or plastic handles for durability.
- Install handles at a comfortable height.
- Use adhesive labels or label holders for easy changes.
- Handwrite or print labels for clear reading.
- Place labels on the front of drawers or shelves.
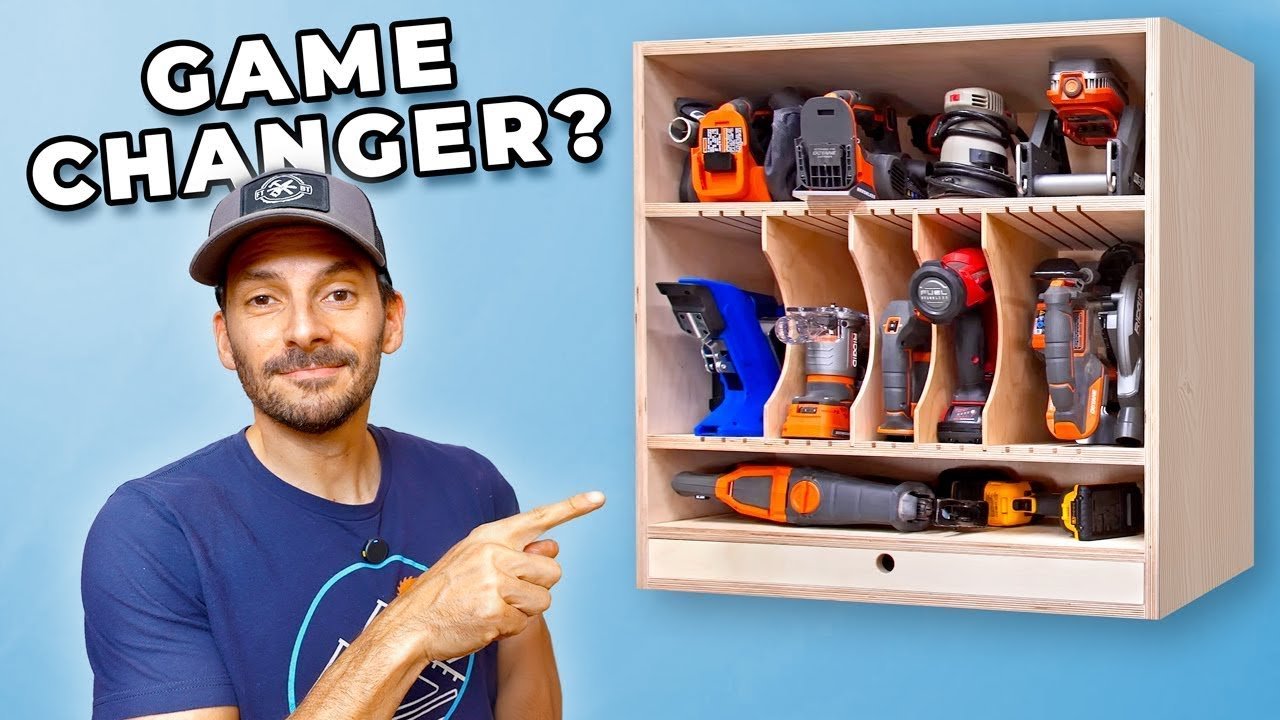
Organizing Your Tools
Keeping your tools organized makes work faster and safer. A well-arranged tool cabinet helps you find items quickly.
Building a DIY tool cabinet lets you design storage that fits your needs. You can sort and store tools neatly and easily.
Tool Categorization Tips
Group your tools by type to keep everything in order. Separate hand tools, power tools, and fasteners for easy access.
Label each section or drawer. Clear labels help you and others find tools fast without searching.
- Sort by tool function (e.g., cutting, measuring)
- Keep frequently used tools at eye level
- Store small items in clear containers
- Use magnetic strips for metal tools
Maximizing Space Efficiency
Use vertical space by adding shelves or pegboards. This frees up drawer and countertop room.
Choose adjustable shelves to fit different tool sizes. This lets you change storage as your collection grows.
- Install hooks for hanging larger tools
- Use drawer dividers to prevent clutter
- Stack clear bins to save space
- Consider fold-out work surfaces if space allows

Credit: www.youtube.com
Frequently Asked Questions
How Do I Start Building A Diy Tool Cabinet?
Begin by planning your design and gathering necessary materials. Use plywood for the structure and add caster wheels for mobility. Assemble the frame, then attach shelves and doors. Finally, sand and paint for a professional finish. This preparation ensures a smooth building process.
What Tools Are Needed For A Diy Tool Cabinet?
Essential tools include a drill, saw, measuring tape, and screwdriver. You’ll also need clamps, a sander, and a level for accuracy. These tools help you cut, assemble, and finish your cabinet efficiently, ensuring it is sturdy and well-constructed.
Can I Customize My Diy Tool Cabinet?
Yes, customizing is encouraged for personal needs. Adjust dimensions, add specialized compartments, or incorporate pegboards. Use drawer organizers and label sections for easy access. This customization ensures your cabinet meets your specific storage requirements and enhances functionality.
What Materials Are Best For A Tool Cabinet?
Plywood is recommended for durability and cost-effectiveness. Use hardwood for a premium look. Consider MDF for budget-friendly options. Choose materials based on the cabinet’s location and expected usage to ensure it withstands wear and tear while maintaining functionality.
Conclusion
Building your own DIY tool cabinet saves money and fits your needs. Start with a clear plan and gather simple materials. Take your time with each step to ensure a sturdy cabinet. Organize tools by size and type for easy access.
Personal touches make your cabinet unique and useful. Enjoy the satisfaction of a tidy, custom storage space. Keep improving your cabinet as your tool collection grows. This project boosts your skills and keeps your workspace neat. Simple, practical, and rewarding.