Imagine having all your essential tools organized and easily accessible wherever you need them. Creating a mobile tool cabinet can transform your workspace and streamline your projects.
If you’ve ever found yourself hunting for the right tool in the middle of a task, you know how frustrating and time-consuming it can be. What if you could eliminate that hassle and boost your productivity? In this guide, you’ll discover how to build your own mobile tool cabinet.
It’s not just about convenience; it’s about efficiency and having everything at your fingertips. By the end of this article, you’ll have the knowledge to create a customized solution that meets your specific needs. So, if you’re ready to take control of your tools and enhance your work environment, read on to learn how you can make it happen.
Planning Your Tool Cabinet
Building a mobile tool cabinet needs good planning. It helps you keep tools safe and easy to find.
Think about size, materials, and how to store your tools before you start building.
Choosing The Right Size
Decide how many tools you have. This helps you pick the cabinet size.
Make sure the cabinet fits in your workspace and can move easily.
- Count your tools and their sizes
- Check the space where you will place the cabinet
- Leave room for future tools
- Think about doorways and paths for moving the cabinet
Selecting Materials
Pick strong materials that last long. Wood and metal are common choices.
Consider weight. Heavy materials may make the cabinet hard to move.
- Wood is easy to work with and looks nice
- Metal is very strong and durable
- Plastic parts can reduce weight
- Use wheels that roll smoothly and lock safely
Designing Storage Layout
Plan where to put your tools inside the cabinet. Use drawers, shelves, and hooks.
Keep often-used tools easy to reach. Store small items in compartments.
- Use drawers for small tools and parts
- Shelves hold larger tools and boxes
- Hooks hang items like wrenches or tape
- Label areas to find tools quickly

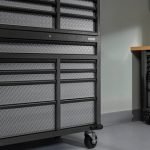
Credit: www.gladiatorgarageworks.com
Gathering Tools And Materials
Building a mobile tool cabinet needs the right tools and materials. Getting everything ready makes the job easier.
Knowing what to gather helps you stay organized and avoid delays during assembly.
Essential Tools For Assembly
You need some basic tools to put the cabinet together. These tools help you cut, join, and secure parts safely.
- Measuring tape for accurate dimensions
- Power drill with drill bits
- Screwdrivers (both Phillips and flathead)
- Hammer for nails and adjustments
- Wood clamps to hold pieces tight
- Level to check even surfaces
- Handsaw or circular saw for cutting wood
- Sandpaper or electric sander for smooth edges
Recommended Wood And Hardware
Choosing strong wood is important for a long-lasting cabinet. Use hardware that fits well and holds everything firmly.
- Plywood or hardwood for the cabinet body
- Solid wood for the frame and shelves
- Wood screws for strong joints
- Casters with locks for easy movement
- Drawer slides for smooth opening
- Handles or knobs for easy grip
- Wood glue for extra strength
Safety Equipment
Protect yourself with safety gear. It reduces the risk of injury while working with tools and wood.
- Safety glasses to protect your eyes
- Work gloves to guard your hands
- Hearing protection if using loud tools
- Dust mask to avoid breathing sawdust
- Closed-toe shoes to protect feet
Building The Frame
Building the frame is the first part of making a mobile tool cabinet. A strong frame holds all parts together and supports the weight of tools.
This section explains how to cut wood, assemble the base and sides, and reinforce the joints.
Cutting Wood Pieces
Start by measuring the size of your tool cabinet. Use a tape measure and mark the wood with a pencil.
Cut the wood pieces carefully using a saw. Make sure cuts are straight and match your measurements.
- Cut pieces for the base, sides, top, and shelves.
- Use plywood or solid wood for strength.
- Sand edges to remove splinters.
Assembling The Base And Sides
Lay out the base and side pieces on a flat surface. Check that all parts fit well before joining them.
Attach the sides to the base using wood screws or nails. Keep the edges flush for a neat frame.
- Use clamps to hold pieces while fastening.
- Pre-drill holes to avoid wood splitting.
- Check corners with a square tool for right angles.
Reinforcing Joints
Reinforce the joints to make the frame stronger. Use wood glue on all contact areas before screwing.
Add corner braces or metal brackets inside the frame for extra support. This keeps the cabinet stable when moved.
- Apply wood glue evenly on all joints.
- Use corner braces on inside edges.
- Tighten screws firmly but do not over-tighten.
Adding Drawers And Shelves
Building a mobile tool cabinet is a smart way to organize your tools. Adding drawers and shelves helps keep everything neat and easy to find.
This guide will show you how to measure and cut drawer parts, install drawer slides, and create adjustable shelves.
Measuring And Cutting Drawer Components
Start by measuring the inside width, depth, and height of the cabinet. These measurements determine the size of your drawers.
Cut the drawer sides, front, back, and bottom using wood or plywood. Make sure all parts fit well before assembling.
- Measure cabinet interior carefully
- Cut drawer sides to match width and height
- Cut drawer front and back to match width and depth
- Use a sturdy material for the drawer bottom
- Sand edges for a smooth finish
Installing Drawer Slides
Drawer slides help drawers open and close smoothly. Choose slides that fit the drawer size and weight.
Attach the slides inside the cabinet and on the sides of each drawer. Make sure they line up for easy movement.
- Pick drawer slides with correct length
- Mount slides inside the cabinet frame
- Attach matching slides to drawer sides
- Test the drawer for smooth operation
- Adjust screws if the drawer sticks or wobbles
Creating Adjustable Shelves
Adjustable shelves give flexibility to store different tool sizes. Use shelf pins or brackets to hold the shelves.
Drill holes evenly on the cabinet sides. This lets you move shelves up or down as needed.
- Mark shelf pin hole locations on cabinet sides
- Drill holes with a drill and proper bit size
- Install shelf pins or brackets in holes
- Place shelves on pins securely
- Test shelf stability before use
Installing Casters And Handles
Adding casters and handles turns a tool cabinet into a mobile unit. This helps you move tools easily around your workspace. Proper installation is key for safety and durability.
Follow simple steps to pick the right parts and fix them well. This guide covers choosing casters, attaching wheels, and adding handles.
Choosing Durable Casters
Durable casters support heavy loads and last longer. Look for materials like steel or heavy-duty plastic. Consider the floor type where you will move the cabinet.
- Check the weight rating to match your cabinet and tools.
- Pick casters with locks to keep the cabinet steady.
- Choose wheels that roll smoothly on your floor surface.
- Select swivel casters for better maneuverability.
Attaching Wheels Securely
Fixing the wheels tightly ensures the cabinet moves safely. Use strong screws or bolts that fit the caster plates well.
| Step | Action | Tip |
| 1 | Mark the caster positions at each bottom corner. | Measure carefully for even placement. |
| 2 | Drill pilot holes for screws or bolts. | Use a drill bit smaller than the screws. |
| 3 | Attach casters with bolts or screws. | Tighten firmly but do not strip the holes. |
| 4 | Test each wheel for smooth rotation and locking. | Adjust if wheels wobble or lock improperly. |
Adding Comfortable Handles
Handles help you push or pull the cabinet easily. Choose handles that feel good in your hand and fit the cabinet style.
Here are some tips for good handle installation:
- Pick handles with smooth grips to avoid hand strain.
- Position handles at a height comfortable for you.
- Use screws or bolts that fit the handle holes.
- Attach handles to solid wood or metal parts for strength.
Finishing Touches
Adding the final details to your mobile tool cabinet makes it both useful and attractive. These finishing touches protect the wood and help organize your tools.
Careful sanding, painting or staining, and adding labels improve the cabinet’s look and function.
Sanding And Smoothing Surfaces
Use fine-grit sandpaper to smooth all surfaces. Sand edges and corners to avoid splinters.
Wipe the dust off with a damp cloth before painting or staining.
Applying Paint Or Stain
Choose paint or stain that suits your style and protects the wood from moisture.
- Apply a primer if using paint to help it stick better.
- Use a brush or roller to apply paint or stain evenly.
- Let the first coat dry completely before adding a second coat.
- Finish with a clear sealant for extra protection.
Adding Labels And Organizers
Labels and organizers keep your tools easy to find. Use tags or stickers to name each drawer or compartment.
| Organizer Type | Purpose |
|---|---|
| Drawer Dividers | Separate small tools and parts |
| Magnetic Strips | Hold metal tools securely |
| Hooks | Hang larger tools like hammers |
| Label Stickers | Identify contents quickly |
Maintenance Tips
Keeping your mobile tool cabinet in good shape makes it last longer. Regular care helps avoid big problems. Follow simple steps to keep it clean and organized.
This guide covers cleaning, fixing damage, and improving storage as time goes by.
Cleaning And Upkeep
Clean your tool cabinet often to stop dust and dirt build-up. Use a soft cloth and mild cleaner. Avoid harsh chemicals that can damage the finish.
- Wipe surfaces weekly with a damp cloth
- Remove all tools before deep cleaning
- Check and clean wheels to keep them rolling smoothly
- Dry the cabinet after cleaning to prevent rust
Repairing Wear And Tear
Fix small damages quickly to stop them from getting worse. Tighten loose screws and replace broken parts as needed. Use rust remover on metal parts.
| Common Issue | Fix | Tools Needed |
| Loose drawer handle | Tighten screws | Screwdriver |
| Rust spots | Apply rust remover and paint | Rust remover, paintbrush |
| Worn wheels | Replace wheels | Wrench, replacement wheels |
Optimizing Storage Over Time
Change your storage setup as your tool collection grows. Group tools by type or use. Label drawers for easy finding. Keep heavy tools in lower drawers.
- Sort tools into categories
- Use drawer dividers or trays
- Label each drawer clearly
- Store heavy items low for safety
- Remove unused tools to free space

Credit: www.reddit.com

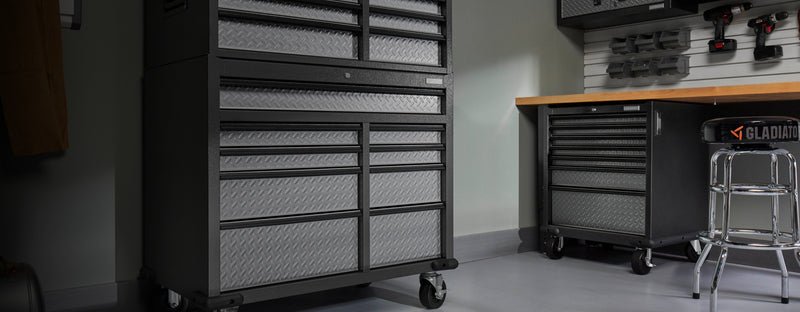
Credit: www.gladiatorgarageworks.com
Frequently Asked Questions
What Materials Are Needed To Build A Mobile Tool Cabinet?
You need plywood or metal sheets, caster wheels, screws, handles, and drawer slides. Quality materials ensure durability and smooth mobility. Choose sturdy wheels for easy movement on different surfaces. Proper materials make your cabinet strong and long-lasting.
How Do I Choose The Right Size For A Tool Cabinet?
Measure your workspace and tools to decide cabinet size. Ensure it fits your tools and moves easily through your workspace. A compact size saves space while a larger one holds more tools. Balance storage needs with mobility.
What Tools Are Essential For Assembling The Cabinet?
Basic tools include a drill, screwdriver, measuring tape, and saw. These tools help in cutting, assembling, and securing parts. Having the right tools makes the build process faster and easier. Proper tools ensure a sturdy cabinet.
How Can I Organize Tools Efficiently In The Cabinet?
Use drawers, dividers, and trays to separate different tools. Label compartments for quick identification and easy access. Organizing tools saves time and keeps your workspace neat. Customize storage based on your tool types and sizes.
Conclusion
Creating a mobile tool cabinet saves time and keeps tools organized. You can build one with simple materials and basic skills. It fits in small spaces and moves easily where you work. Choose sturdy wheels and strong handles for better use.
Store tools by size and type for quick access. Regularly clean and check your cabinet for safety. This project helps keep your workspace neat and efficient. Start building today to enjoy a handy tool storage solution.