Are you tired of searching for your tools every time you need them? Do you find yourself wasting precious minutes, or even hours, looking for that one elusive wrench or screwdriver?
It’s time to put an end to the chaos and start saving time and energy. Imagine having all your tools neatly organized and easily accessible whenever you need them. Creating a tool storage station can transform your workspace and boost your productivity.
In this guide, we’ll walk you through the simple steps to build your own efficient tool storage station. Whether you’re a seasoned DIY enthusiast or just starting out, you’ll discover how easy it is to keep your tools in order and your projects on track. Let’s dive in and see how you can reclaim your workspace!

Credit: m.youtube.com
Choosing The Right Location
Picking the right spot for your tool storage station makes your work easier.
Think about space, access, light, and air before you decide where to put it.
Assessing Workspace Needs
Look around your workspace to see how much room you have for tools.
- Measure the available floor and wall space.
- Note where you usually work most often.
- Check if you need extra space for large tools.
- Consider future tool additions.
Maximizing Accessibility
Place your tool station where you can reach tools fast and safely.
| Location Feature | Benefits |
| Near workbench | Quick access during projects |
| Close to main door | Easy to bring tools in and out |
| Clear pathways | Safe movement without tripping |
| At standing height | Less bending and strain |
Considering Lighting And Ventilation
Good light helps you find tools fast and work safely.
Check these points for lighting and air flow:
- Place the station near a window if possible.
- Use bright overhead lights or task lamps.
- Ensure fresh air circulates to avoid dust buildup.
- Avoid damp or dark corners that can damage tools.

Credit: www.ramblingrenovators.ca
Selecting Storage Solutions
Choosing the right storage solutions helps keep your tools organized. It saves time and keeps your workspace tidy.
Consider the types of storage units, their materials, and whether to buy ready-made or build your own.
Types Of Tool Storage Units
There are many kinds of tool storage units. Each type fits different needs and spaces.
- Toolboxes: Portable and easy to carry.
- Tool chests: Large with many drawers for small tools.
- Wall-mounted racks: Save floor space and keep tools visible.
- Cabinets: Lockable and protect tools from dust.
- Workbenches with storage: Combine workspace and tool storage.
Materials And Durability
Material choice affects how long your storage lasts and how strong it is. Pick materials that match your work needs.
| Material | Durability | Cost | Best Use |
|---|---|---|---|
| Steel | Very High | High | Heavy tools, workshop |
| Plastic | Medium | Low | Light tools, portable cases |
| Wood | Medium | Medium | Custom builds, workbenches |
| Aluminum | High | Medium | Lightweight and rust-resistant |
Custom Vs. Pre-made Options
Decide if you want to build your storage or buy it ready-made. Each choice has pros and cons.
- Custom:Fits your space perfectly and can match your style.
- Pre-made:Saves time and is often cheaper.
- Custom:Can be designed for special tool sizes.
- Pre-made:Comes with warranties and easy returns.
- Custom:Requires tools and skills to build.
Organizing Tools Effectively
Creating a tool storage station helps keep your workspace tidy. It makes finding tools faster and easier.
Organizing tools well saves time and prevents damage. A good system fits your needs and space.
Categorizing Tools By Use
Group tools based on their purpose or task. This way, related tools stay together for quick access.
Sort tools into categories like cutting, measuring, and fastening. Keep frequently used tools easy to reach.
- Hand tools (hammers, screwdrivers)
- Power tools (drills, sanders)
- Measuring tools (tape measures, levels)
- Fastening tools (wrenches, pliers)
Labeling Techniques
Label your storage areas clearly. Labels help you find tools fast and return them correctly.
Use simple labels with large letters. Try color coding for different tool types or categories.
- Use printed labels or write with permanent marker
- Place labels on drawers, bins, or shelves
- Use color stickers for quick category ID
- Update labels if you change the tool setup
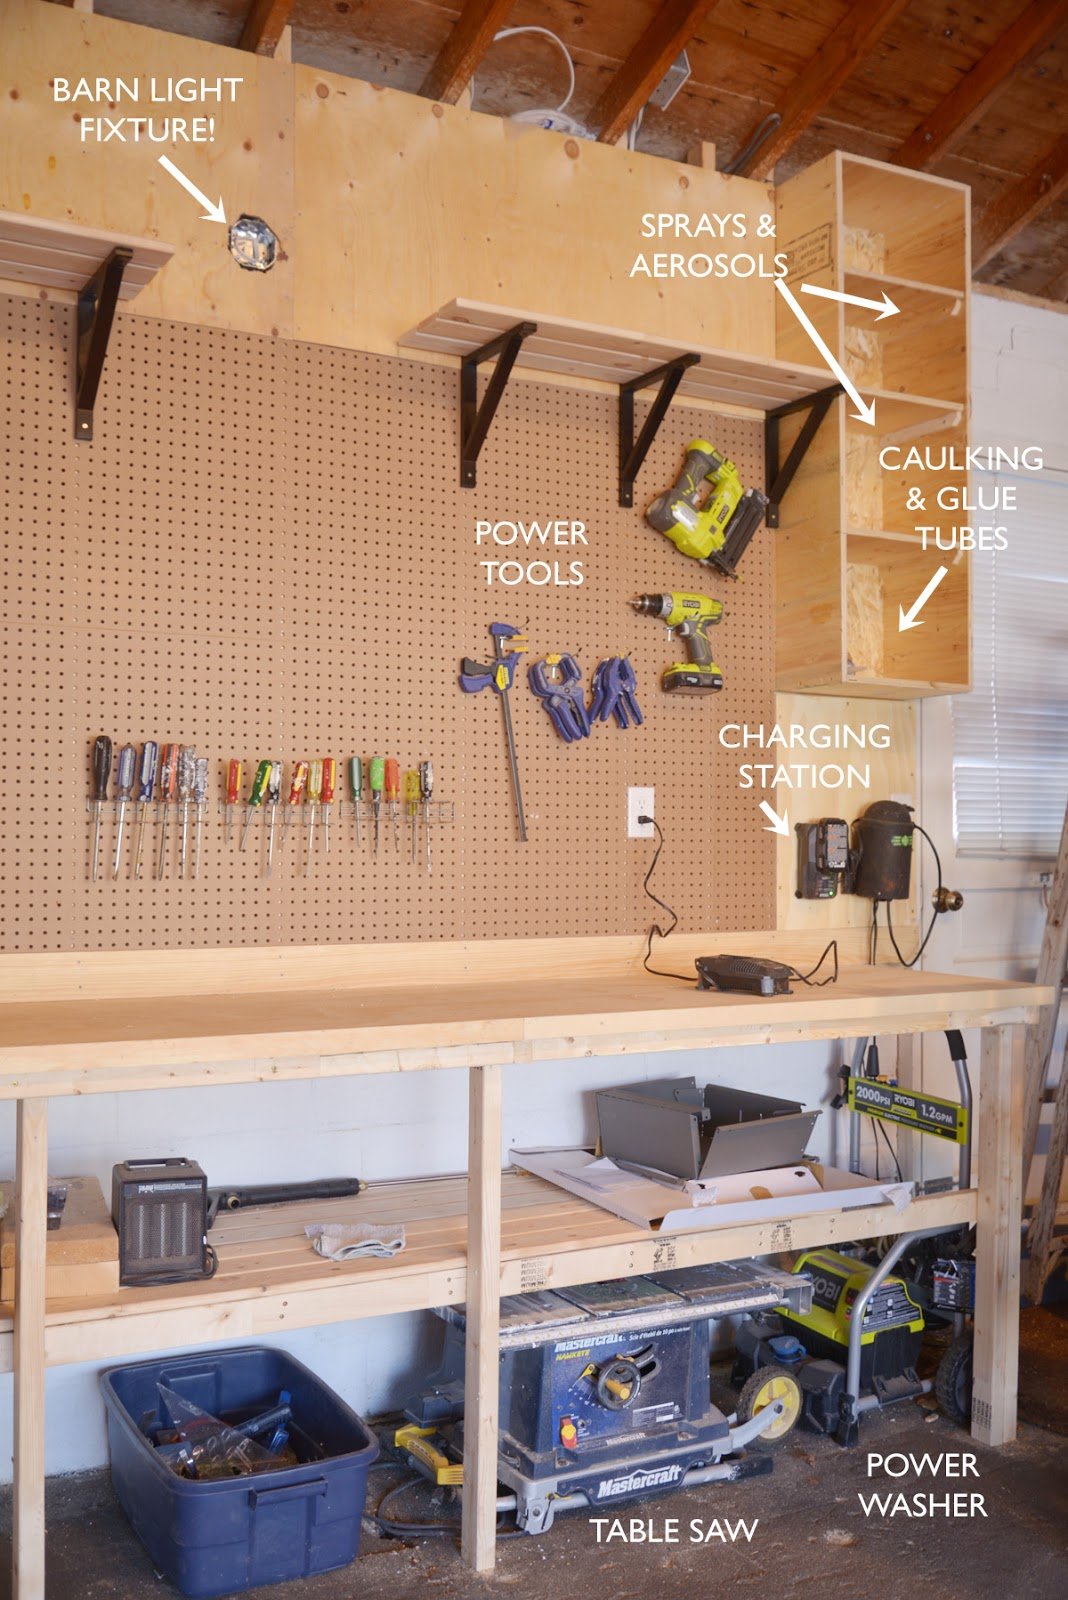
Using Pegboards And Hooks
Pegboards keep tools visible and easy to grab. Hooks hold tools neatly and save drawer space.
Arrange hooks by tool size and shape. Leave space between tools for easy removal and replacement.
- Mount pegboards on walls near your workspace
- Use different hook types for various tools
- Hang tools in order of use or size
- Use bins on pegboards for small parts

Credit: riteacademy.com
Building The Storage Station
Building a tool storage station helps keep your tools organized and easy to find. This guide shows how to build one step-by-step.
Having a dedicated place for your tools saves time and protects them from damage. Let’s start with the materials you need.
Gathering Necessary Materials
Collect all materials before you start building. This makes the process smooth and faster.
- Plywood or wooden boards (for shelves and frame)
- Measuring tape
- Screws and nails
- Hammer and screwdriver
- Wood glue
- Sandpaper
- Paint or wood finish (optional)
- Power drill (for faster assembly)
- Safety glasses and gloves
Step-by-step Assembly
Follow these steps to build your tool storage station. Take your time to ensure accuracy.
- Measure and cut wooden boards to desired size.
- Sand all edges to avoid splinters.
- Assemble the frame using screws and wood glue.
- Attach shelves evenly inside the frame.
- Secure the back panel for stability.
- Paint or finish the wood if desired.
- Let paint or finish dry completely before use.
Safety Precautions
Safety is important when building your storage station. Protect yourself and others.
- Wear safety glasses to protect your eyes.
- Use gloves to avoid splinters and cuts.
- Keep work area clean and free of clutter.
- Handle tools carefully and follow instructions.
- Work in a well-lit space.
- Keep children and pets away while building.
Maintaining Efficiency Over Time
Creating a tool storage station is just the start. Keeping it efficient takes regular work. A well-maintained station saves time and effort.
Organizing tools well helps you find them quickly. This guide covers ways to keep your storage system working smoothly.
Regular Cleanups
Cleanups keep your tool area neat and safe. Dirt and clutter slow you down. Set a schedule to tidy up often.
Remove dust, put tools back in place, and check for broken items. A clean space helps you work better.
- Wipe shelves and surfaces
- Discard broken or unused tools
- Organize tools by type or size
- Clear floor space to avoid accidents
Updating Storage Layout
Tool needs change over time. Update your storage layout to fit new tools or tasks. This keeps the station useful.
Move tools you use often to easy spots. Store less-used tools out of the way. Change shelves or hooks as needed.
- Group tools by frequency of use
- Add extra shelves for new items
- Label sections for quick finding
- Keep heavy tools low for safety
Tracking Tool Inventory
Know what tools you have and where they are. This helps avoid buying duplicates or losing items. Use a simple system to track inventory.
Check your tools regularly and update the list. This keeps your storage accurate and your work smooth.
- Write down all tools and quantities
- Note tool condition and repairs
- Use a notebook or digital app
- Review inventory monthly
Maximizing Workspace Productivity
Creating a tool storage station can help keep your workspace tidy. A well-organized station saves time and effort.
With the right setup, you can work faster and with less frustration. Focus on key elements to improve your workspace.
Incorporating Work Surfaces
Add sturdy work surfaces to your tool station. These surfaces give you space to work on projects and sort tools easily.
- Choose durable materials like wood or metal
- Keep surfaces clear to avoid clutter
- Include adjustable height tables if possible
- Use mats to protect surfaces from damage
Integrating Power Supply
Power supply is key for many tools. Plan your station to include easy access to electricity.
| Power Feature | Benefit |
|---|---|
| Multiple outlets | Plug in several tools at once |
| Surge protection | Protects tools from power spikes |
| Extension cords | Reach difficult areas easily |
| Mounted power strips | Keeps cords organized and off the floor |
Ergonomic Considerations
Ergonomics help you work without strain. Arrange tools and surfaces to reduce bending and stretching.
- Place frequently used tools within arm’s reach
- Use anti-fatigue mats to reduce leg pain
- Adjust work surface height for comfort
- Include seating options for long tasks
- Ensure good lighting to reduce eye strain
Frequently Asked Questions
What Materials Are Needed For A Tool Storage Station?
You need wood, screws, nails, hooks, paint, and storage bins. Tools like a saw, drill, and measuring tape are essential. Quality materials ensure durability and functionality for your storage station.
How Do I Organize Tools Effectively In Storage?
Group tools by type and size. Use labeled bins and hooks for easy access. Keep frequently used tools within reach and store rarely used ones higher up.
What Is The Best Location For A Tool Storage Station?
Choose a dry, well-lit area near your workbench or garage. Ensure enough space for movement and tool access. Proper location improves convenience and tool maintenance.
How Can I Maximize Space In A Tool Storage Station?
Use vertical storage with pegboards and shelves. Stack bins and add drawer organizers. Efficient use of space keeps tools tidy and accessible.
Conclusion
Creating a tool storage station saves time and keeps tools safe. It helps you find tools quickly and work better. Use simple materials and plan your space well. Add hooks, shelves, or bins to fit your needs. Keep your station tidy and check tools often.
A neat space makes projects easier and more fun. Start small and improve your station step by step. Enjoy the order and ease it brings to your work.