If you want to add clean, precise grooves to your woodworking projects, learning how to cut grooves with a router is a skill you can’t skip. Whether you’re building cabinets, shelves, or decorative pieces, grooves help join parts securely and give your work a professional look.
But using a router can feel tricky if you’re new to it. Don’t worry—this guide will show you simple steps and insider tips to make groove cutting easy and accurate. By the end, you’ll have the confidence to create perfect grooves every time, saving you time and frustration.
Ready to take your woodworking to the next level? Let’s dive in.

Credit: www.manasquanfasteners.com
Choosing The Right Router And Bits
Cutting grooves with a router requires the right tools. Picking the correct router and bits makes your work easier and more precise.
This guide covers the types of routers, how to select bits, and what materials affect your choice.
Types Of Routers For Grooves
Routers come in various styles. Each style fits different groove cutting needs and skill levels.
- Fixed-base routers:Good for straight grooves and shallow cuts.
- Plunge routers:Allow you to start cuts in the middle of the wood.
- Trim routers:Small and lightweight, ideal for light groove work.
Selecting The Proper Router Bit
Choosing the right bit is key for clean grooves. Different bits make different groove shapes and sizes.
| Bit Type | Groove Shape | Use |
| Straight bit | Flat-bottomed groove | Common for dadoes and rabbets |
| Round-nose bit | U-shaped groove | Used for decorative edges |
| V-groove bit | V-shaped groove | Good for lettering and chamfers |
Material Considerations
Wood type affects bit choice and router speed. Hard woods need slower speeds and sharp bits.
- Softwood: Use high-speed bits and moderate speed.
- Hardwood: Use carbide bits and slow speed.
- Plywood: Avoid chip out by using sharp bits and slow feed rate.
Preparing Your Workspace
Cutting grooves with a router needs a clean and organized workspace. A good setup helps you work safely and accurately.
Prepare your area before starting. This keeps your tools ready and your work steady.
Setting Up A Stable Work Surface
Use a flat and sturdy surface to hold your workpiece. A shaky table causes mistakes and can be dangerous.
Make sure the surface is clean and free of clutter. This gives you enough space to move the router smoothly.
Safety Gear Essentials
Wear safety glasses to protect your eyes from wood chips. Hearing protection helps reduce noise from the router.
Use a dust mask to avoid breathing sawdust. Wear gloves only if they do not get caught in the router.
- Safety glasses
- Hearing protection
- Dust mask
- Appropriate gloves
Clamping And Securing The Workpiece
Clamp your wood firmly to the work surface. This stops the wood from moving while you cut the grooves.
Use strong clamps and check they are tight before starting. Keep clamps away from the router path.
- Place clamps near the edges
- Check clamp tightness
- Avoid clamp placement on cutting line
- Test stability before routing
Marking And Measuring Groove Layouts
Cutting grooves with a router needs careful marking and measuring. Accurate layout helps you make clean and precise grooves.
Planning your groove lines before cutting avoids mistakes and waste of materials. This guide covers key layout steps.
Accurate Measurement Techniques
Use a ruler or tape measure to mark groove positions clearly. Check measurements twice for accuracy before cutting.
Mark lines with a sharp pencil or marking knife. Thin, clear lines help you follow the layout exactly.
- Measure from a fixed edge or reference point
- Double-check all dimensions
- Use a square to keep lines straight
- Mark both ends of the groove layout
Using Guides And Templates
Guides and templates make routing grooves easier and more consistent. They keep your router on the right path.
Clamp straight guides or use preset templates to follow groove lines perfectly. This prevents slips and uneven cuts.
- Clamp a straight edge as a guide for long grooves
- Use plywood templates for repeated groove shapes
- Check guide position before routing
- Keep guides secure and stable
Planning Groove Depth And Width
Set the groove depth and width before cutting to fit your project needs. Plan these dimensions carefully.
Use the router bit size to determine groove width. Adjust router depth to get the correct groove depth.
- Measure your router bit diameter for groove width
- Set router depth with a depth gauge or ruler
- Test on scrap wood before cutting final piece
- Make shallow passes for deep grooves
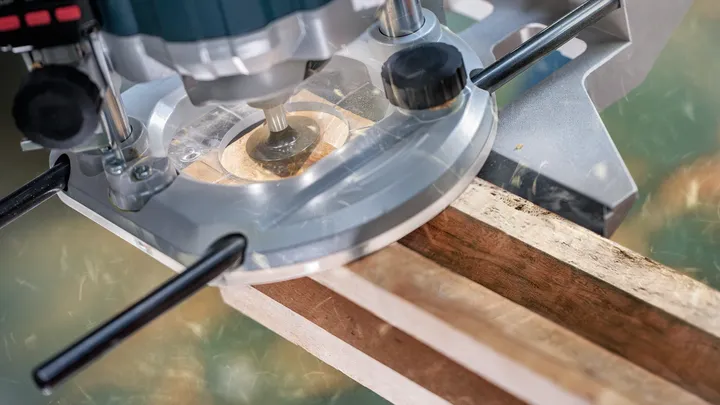
Credit: www.bosch-professional.com
Router Setup And Adjustment
Cutting grooves with a router requires careful setup and adjustment. Proper settings ensure clean and accurate cuts. This guide covers key steps to prepare your router for groove cutting.
Focus on setting the cutting depth, adjusting speed, and attaching guides. Each step helps improve control and results.
Setting Cutting Depth
Set the cutting depth based on the groove size you want. Most routers have a depth adjustment ring or a knob. Start with a shallow cut and increase depth gradually to avoid damaging the material.
- Unlock the depth adjustment mechanism.
- Lower or raise the bit to the desired depth.
- Lock the adjustment securely in place.
- Test the depth on a scrap piece before cutting your workpiece.
Adjusting Speed Settings
Speed affects the quality of the groove and tool life. Use slower speeds for hard materials and larger bits. Faster speeds suit softer wood and smaller bits. Check your router’s manual for recommended speeds.
| Material | Bit Diameter | Suggested Speed (RPM) |
| Hardwood | Up to 1/2 inch | 18,000 – 22,000 |
| Hardwood | Over 1/2 inch | 12,000 – 18,000 |
| Softwood | Up to 1/2 inch | 22,000 – 25,000 |
| Softwood | Over 1/2 inch | 18,000 – 22,000 |
Attaching Edge Guides
Edge guides help keep your router steady and straight while cutting grooves. Most routers have slots or clamps for attaching guides. Align the guide so the bit follows the exact groove line.
- Locate the edge guide slot or clamp on your router.
- Insert or attach the guide securely.
- Adjust the guide distance to match the groove position.
- Tighten all screws to prevent movement during use.
- Test the setup on scrap wood before cutting the main piece.
Cutting Techniques For Clean Grooves
Cutting grooves with a router requires skill to get smooth, clean lines. Using the right techniques helps avoid rough edges and mistakes.
These tips will guide you through the best ways to cut grooves cleanly and accurately with a router.
Starting The Cut Properly
Begin the groove by positioning the router at the edge or marked line carefully. Make sure the bit is not touching the wood before turning the router on.
Switch the router on and gently lower it into the wood to start the cut. This prevents splintering and uneven grooves.
Maintaining Consistent Feed Rate
Move the router along the wood at a steady speed. Going too fast can cause rough grooves, while going too slow may burn the wood.
A consistent feed rate helps the router bit cut cleanly and keeps the groove even from start to finish.
- Keep your hands steady
- Use a guide or fence if possible
- Watch the router’s speed and adjust if needed
Multiple Passes Vs Single Pass
Cutting deep grooves in one pass can strain the router and cause rough edges. Taking multiple shallow passes is better.
Make several passes, each cutting a little deeper. This keeps the groove clean and the router under control.
- Start with a shallow depth
- Check the groove after each pass
- Adjust depth for the next pass
- Finish when you reach the full groove depth
Troubleshooting Common Issues
Cutting grooves with a router can be tricky. Problems like tear-out, bit burning, and uneven depths often happen. Fixing these issues helps get clean, precise grooves.
Below are common problems and simple solutions to improve your routing results. Follow these tips to avoid damage and get smooth cuts.
Avoiding Tear-out And Splintering
Tear-out happens when wood fibers break instead of cutting cleanly. Splintering is similar and makes edges rough. These problems ruin groove edges and weaken your project.
- Use a sharp router bit to reduce splintering.
- Cut with the grain, not against it, to avoid fiber damage.
- Make shallow passes instead of one deep cut.
- Use masking tape on the cut line to hold fibers in place.
- Consider using a backer board under the workpiece for support.
Dealing With Bit Burning
Bit burning leaves dark marks on your wood. It happens when the bit gets too hot or moves too slowly. Burning can ruin the look and weaken the wood.
| Cause | Solution |
| Dull router bit | Sharpen or replace bit |
| Too slow feed rate | Increase speed, keep steady movement |
| High router speed with slow feed | Lower router speed or move faster |
| Bit clogged with resin | Clean bit regularly |
Fixing Uneven Groove Depth
Uneven groove depth makes joints fit poorly and looks unprofessional. This usually happens because of poor setup or inconsistent hand pressure.
Try these tips to fix uneven depth:
- Set the router base firmly on the guide or fence.
- Check the bit height before starting and adjust if needed.
- Keep steady pressure and move the router smoothly along the path.
- Use a depth stop to control cutting depth precisely.
- Test cuts on scrap wood to confirm depth consistency.
Finishing Touches
After cutting grooves with a router, finishing touches make the work clean and strong. These steps help improve the look and durability of your project.
Focus on sanding, cleaning, and sealing the grooves. Each step adds quality and protection.
Sanding And Smoothing Grooves
Sanding smooths the edges inside the grooves. It removes rough spots and splinters left by the router bit.
- Use fine-grit sandpaper for best results.
- Wrap sandpaper around a small block to reach tight grooves.
- Sand evenly to avoid changing the groove shape.
- Clean dust away with a soft brush after sanding.
Cleaning Up The Workpiece
Cleaning removes dust and debris from the workpiece. This step is important before applying any finish.
| Cleaning Method | Use | Notes |
| Soft Brush | Remove loose dust | Good for delicate surfaces |
| Tack Cloth | Pick up fine dust | Leaves no lint |
| Vacuum | Clear deep grooves | Use with brush attachment |
Sealing And Protecting
Sealing protects the wood and keeps grooves clean. Choose a finish that fits your project’s use.
- Apply wood sealer or varnish with a brush.
- Let the first coat dry completely.
- Lightly sand between coats for smoothness.
- Apply two or three coats for best protection.
- Allow final coat to cure before use.

Credit: www.familyhandyman.com
Frequently Asked Questions
What Is The Best Router Bit For Cutting Grooves?
The best router bit for grooves is a straight bit. It offers clean, precise cuts. Choose the size based on groove width needed. Carbide-tipped bits last longer and provide smoother finishes.
How Deep Should I Cut Grooves With A Router?
Cut grooves about one-third the thickness of the wood. This depth ensures strength without weakening the material. Shallow cuts reduce tear-out and improve groove stability.
Can I Cut Grooves Without A Router Guide?
Yes, but a router guide ensures straight, accurate grooves. Without it, freehand cuts may be uneven. Using a fence or edge guide improves control and precision.
What Safety Precautions Are Needed When Routing Grooves?
Always wear safety glasses and hearing protection. Secure wood firmly before routing. Keep hands away from the bit. Use sharp bits and avoid forcing the router.
Conclusion
Cutting grooves with a router can be simple and efficient. Remember, practice makes perfect. Start with basic setups and gradually try complex designs. Choose the right router bit for your project. Keep safety in mind while working. Use clamps to secure your material.
Always double-check your measurements. Clean your router regularly for best performance. With these tips, you’ll enhance your woodworking skills. Enjoy the process and create stunning projects. Grooves add depth and interest to woodwork. Happy crafting!