Are you tired of struggling with uneven, weak joints that ruin your woodworking projects? Cutting perfect joints isn’t as hard as it seems, and once you master the basics, your work will look sharper and last longer.
In this guide, you’ll discover simple tips and tricks that will help you create strong, clean joints every time. Whether you’re a beginner or looking to improve your skills, this article will give you the confidence and know-how to take your craftsmanship to the next level.
Keep reading, and watch your projects transform with flawless joints.

Credit: m.youtube.com
Choosing The Right Joint Type
Cutting perfect joints starts with picking the right type. Different joints suit different woodworking projects. Knowing which joint to use saves time and improves strength.
This guide covers common joint types and the best joints for various projects. It helps you choose the right joint for your needs.
Common Joint Types
There are many joint types, each with unique shapes and uses. Some are easy to cut, while others need more skill and tools.
- Butt Joint:The simplest joint. Two pieces meet at their ends or edges.
- Miter Joint:Two pieces cut at an angle, usually 45 degrees, to form a corner.
- Dovetail Joint:Interlocking wedge-shaped cuts. Very strong and decorative.
- Mortise and Tenon:One piece has a hole (mortise), and the other fits in (tenon).
- Lap Joint:Two pieces overlap each other partially.
Best Joints For Different Projects
Choosing a joint depends on the project type and required strength. Some joints are better for frames, others for drawers or cabinets.
| Project | Recommended Joint | Reason |
| Picture Frames | Miter Joint | Creates clean, sharp corners |
| Drawers | Dovetail Joint | Strong and resists pulling apart |
| Tables and Chairs | Mortise and Tenon | Offers great stability and strength |
| Simple Boxes | Butt Joint | Easy and fast for basic shapes |
| Shelves | Lap Joint | Provides solid surface contact |
Essential Tools For Joint Cutting
Cutting perfect joints requires using the right tools. The tools help ensure clean and accurate cuts.
Choosing between hand tools and power tools depends on the project and skill level. Each tool type has its own advantages.
Hand Tools Vs Power Tools
Hand tools give you more control over the cut. They are good for small or detailed work.
Power tools make cutting faster and easier. They work well for large projects or hard materials.
- Hand Tools: chisels, hand saws, marking gauges
- Power Tools: table saws, routers, power drills
- Hand tools need more skill but give precise results
- Power tools save time and reduce physical effort
Maintaining Sharp Blades
Sharp blades make clean cuts and reduce mistakes. Dull blades can damage wood and joints.
Regularly check blades for dullness. Sharpen or replace blades to keep good cutting quality.
- Clean blades after use to remove resin and dust
- Use sharpening stones or files for hand tools
- Follow manufacturer instructions to sharpen power tool blades
- Store blades safely to avoid damage
Preparing Wood For Joints
Cutting perfect joints starts with good preparation of the wood. Proper preparation ensures the joints fit tightly and look neat.
Taking time to prepare wood carefully helps avoid mistakes and makes your work stronger and cleaner.
Selecting Quality Wood
Choose wood that is straight and free of cracks or knots. These flaws can weaken your joints and cause gaps.
Use dry wood because wet wood can shrink or warp later. This affects joint tightness and appearance.
- Look for wood with a smooth surface
- Avoid wood with splits or insect holes
- Check that the wood is dry and not warped
Measuring And Marking Accurately
Measure twice before cutting to avoid mistakes. Use a sharp pencil or marking knife for clear lines.
Mark your wood on a flat, stable surface. This helps keep your marks straight and easy to follow.
- Use a reliable ruler or tape measure
- Mark all joint parts clearly
- Double-check measurements before cutting

Credit: www.youtube.com
Techniques For Cutting Joints
Cutting joints accurately is key for strong wood connections. Good joints keep furniture stable.
Different joints need different cutting skills. Practice helps you cut clean and tight joints.
Cutting Dovetail Joints
Dovetail joints fit together like puzzle pieces. They are strong and look decorative.
Mark the tails on one board first. Use a saw to cut along the lines carefully.
- Use a sharp dovetail saw for clean cuts
- Chisel out waste wood between tails
- Transfer tail shapes to the pin board
- Cut pins to fit the tails tightly
- Test fit and adjust with a chisel
Cutting Mortise And Tenon Joints
Mortise and tenon joints join two pieces at a right angle. One piece has a hole called mortise.
The tenon is a tongue that fits into the mortise. Both parts must match well for strength.
- Mark the mortise location on the wood
- Drill or chisel out the mortise carefully
- Cut the tenon to match the mortise size
- Use a shoulder plane for smooth tenon edges
- Test fit and shave excess wood if needed
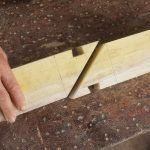
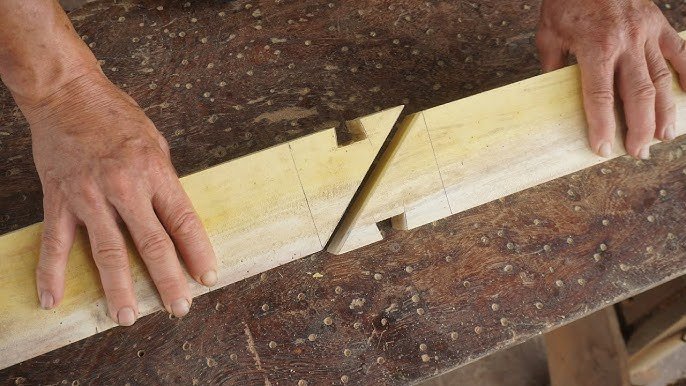
Cutting Box Joints
Box joints have square fingers that fit together. They are easier than dovetails but still strong.
Use a marking gauge to draw the fingers evenly on both boards. Cut slots with a saw or router.
- Set equal spacing for fingers and slots
- Cut all fingers on one board first
- Cut matching slots on the other board
- Clean up edges with a chisel or file
- Check fit and adjust for tight joints
Ensuring Precise Fit
Cutting perfect joints is key for strong and neat woodwork. A precise fit makes the final product sturdy and smooth.
Taking time to check and adjust your joints helps avoid gaps and weak spots in your project.
Test Fitting Parts
Always test fit the parts before gluing or nailing. This step shows if the joint fits well or needs changes.
Dry fitting helps spot uneven cuts and alignment issues early, saving time and wood.
- Assemble parts without glue
- Check for gaps or loose spots
- Look for parts that do not line up
- Mark areas that need trimming or sanding
Adjusting For Tightness
Adjust joints by sanding or trimming to get the right tightness. The joint should fit snug but not too tight.
A joint that is too tight can crack wood. A loose joint will be weak and may fall apart.
- Use sandpaper to remove small amounts of material
- Trim edges carefully with a sharp blade
- Test fit often during adjustments
- A small gap can be filled with wood glue or filler
Gluing And Clamping Tips
Cutting perfect joints needs strong gluing and firm clamping. Good glue holds the parts together tightly. Clamps keep pieces aligned while glue dries.
Using the right adhesive and clamping well are key to neat, long-lasting joints. Learn how to choose glue and apply clamps properly.
Choosing The Right Adhesive
Select glue based on the wood type and joint type. Some adhesives dry fast, others take longer but offer stronger bonds.
- Use PVA glue for most wood joints. It dries clear and is easy to clean.
- Choose epoxy for joints that need extra strength or water resistance.
- Hide glue works best if you want to disassemble joints later.
- Contact cement is good for laminating thin wood layers.
Proper Clamping Techniques
Clamping holds the joint tight until glue fully cures. Use enough clamps to spread pressure evenly.
| Clamping Tip | Purpose |
|---|---|
| Use cauls (protective pads) | Prevent clamp marks on wood surface |
| Apply even pressure | Ensure tight, gap-free joints |
| Check alignment before tightening | Keep joint edges flush and square |
| Don’t overtighten clamps | Avoid squeezing out too much glue |
| Allow full drying time | Ensure glue cures strong |
Common Mistakes To Avoid
Cutting perfect joints is important for strong and neat woodwork. Many people make simple mistakes that cause weak or uneven joints.
Knowing what to avoid helps you get better results and save time. Below are common errors and how to prevent them.
Misalignment Issues
Misalignment happens when the two pieces of wood do not line up correctly. This causes gaps or uneven surfaces in the joint.
It can make the joint weak and ruin the look of your project. Always check your measurements and use clamps to hold pieces steady.
- Measure twice before cutting
- Use a square tool to check angles
- Clamp pieces firmly during glue-up
- Work on a flat surface
Overcutting And Undercutting
Overcutting means cutting too deep or too long. Undercutting means cutting too shallow or too short. Both cause poor fit.
These mistakes make joints loose or too tight. Use sharp tools and mark your cut lines clearly to avoid errors.
- Mark cut lines with a pencil and ruler
- Use a sharp blade for clean cuts
- Cut slowly and check progress often
- Test fit pieces before final assembly
Finishing And Strengthening Joints
Cutting perfect joints is only part of the job. Finishing and strengthening joints help make them last longer. A smooth finish looks better and fits tightly.
Strong joints hold parts together under stress. Use simple techniques to improve both strength and appearance.
Sanding For Smoothness
Sanding removes rough edges and uneven surfaces. It helps joints fit snugly and look clean. Use fine-grit sandpaper for best results.
Sand along the grain to avoid scratches. Check the joint often to keep it even. Smooth joints glue better and stay strong.
- Start with medium-grit sandpaper (120-150 grit)
- Finish with fine-grit sandpaper (220 grit or higher)
- Use a sanding block for flat surfaces
- Sand all joint edges evenly
Adding Reinforcements
Reinforcements make joints stronger and more durable. They help hold the pieces firmly in place. Use nails, screws, or dowels to support glued joints.
Choose reinforcements that suit your project. Avoid over-tightening screws to prevent wood splitting. Reinforcements keep joints stable under weight.
- Use wood glue before adding reinforcements
- Insert dowels or biscuits for hidden strength
- Add screws or nails for extra hold
- Clamp joints while glue dries for best bond

Credit: www.youtube.com
Frequently Asked Questions
What Tools Are Essential For Cutting Perfect Joints?
Essential tools include a sharp saw, chisel, measuring tape, square, and clamps. These ensure accuracy and clean cuts. Using quality tools improves joint fit and stability, making your woodworking projects stronger and more professional.
How Do I Measure Accurately For Perfect Joints?
Use a reliable measuring tape and a square to mark your wood precisely. Double-check measurements before cutting to avoid errors. Accurate marking ensures tight-fitting joints and a polished final product, reducing the need for adjustments.
What Techniques Improve Joint Cutting Precision?
Use slow, steady cuts and maintain consistent pressure. Clamping the wood securely prevents movement during cutting. Practice proper alignment and use guides to achieve clean, precise joints every time.
How Can I Avoid Common Joint Cutting Mistakes?
Avoid rushing and ensure tools are sharp. Measure twice, cut once, and clamp materials firmly. Also, maintain proper angles and check alignment regularly to prevent gaps and weak joints.
Conclusion
Creating perfect joints takes practice and patience. Start with basic tools. Measure twice, cut once. This reduces errors. Use sharp tools for clean edges. Check alignment before final assembly. A steady hand helps achieve precision. Pay attention to detail. Each step improves skill.
Enjoy the process of learning. Practice leads to better results. Soon, you’ll see progress. Keep experimenting with different techniques. Never rush the process. Take your time. The effort pays off in quality joints. Celebrate each small victory. Happy woodworking!