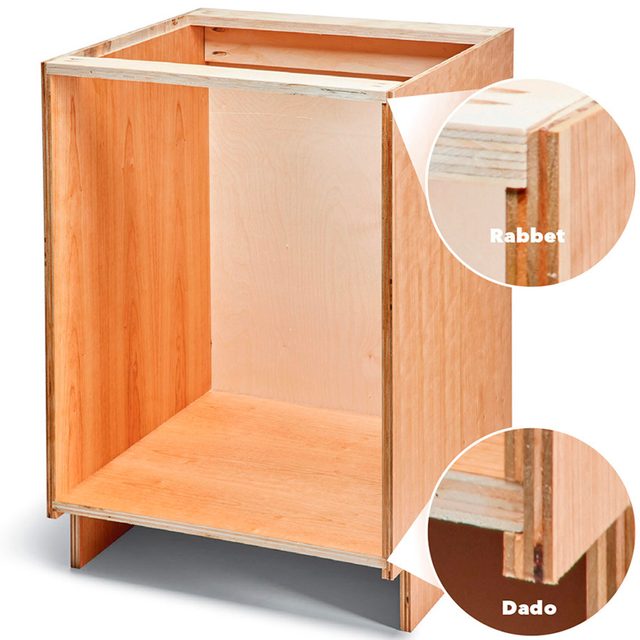
If you want your woodworking projects to look professional and strong, mastering rabbet joints is a must. But cutting rabbet joints accurately can be tricky if you don’t know the right techniques.
Imagine finishing a project only to find your joints don’t fit perfectly—frustrating, right? You’ll discover simple, step-by-step methods to cut rabbet joints with precision every time. Whether you’re new to woodworking or looking to improve your skills, these tips will help you save time, reduce mistakes, and create joints that hold tight and look clean.
Keep reading to unlock the secrets to perfect rabbet joints that will make your work stand out.
Tools For Rabbet Joints
Rabbet joints are common in woodworking. They need precise cuts to fit well. Using the right tools makes cutting rabbet joints easier and accurate.
This guide covers hand tools and power tools for rabbet joints. It also helps you pick the right blade or bit for clean cuts.
Essential Hand Tools
Hand tools are great for small projects or fine work. They give you control and help avoid mistakes.
- Try a hand saw with a fine blade for straight cuts.
- A chisel helps clean up corners and edges.
- A marking gauge sets the cut depth evenly.
- A combination square ensures straight lines and right angles.
Power Tools Options
Power tools speed up making rabbet joints. They work well for bigger or repeated cuts.
- A router with a rabbet bit makes clean grooves quickly.
- A table saw with a dado blade cuts wide rabbets precisely.
- A circular saw with a guide can also cut rabbets accurately.
Choosing The Right Blade Or Bit
Picking the right blade or bit improves cut quality. It also extends tool life and safety.
- Use a fine-toothed blade for smooth edges on wood.
- A carbide-tipped blade or bit lasts longer and cuts cleaner.
- Match blade size to your tool for proper fit and balance.
- Choose a rabbet bit with the right cutting width and depth.
Credit: www.familyhandyman.com
Preparing Your Workpiece
Cutting rabbet joints needs careful preparation. A well-prepared workpiece helps make accurate cuts.
This guide covers measuring, marking, wood selection, and clamping for better results.
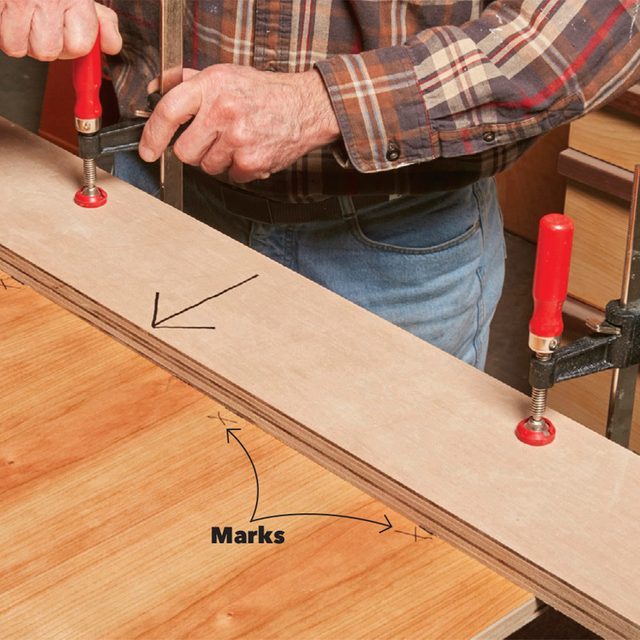
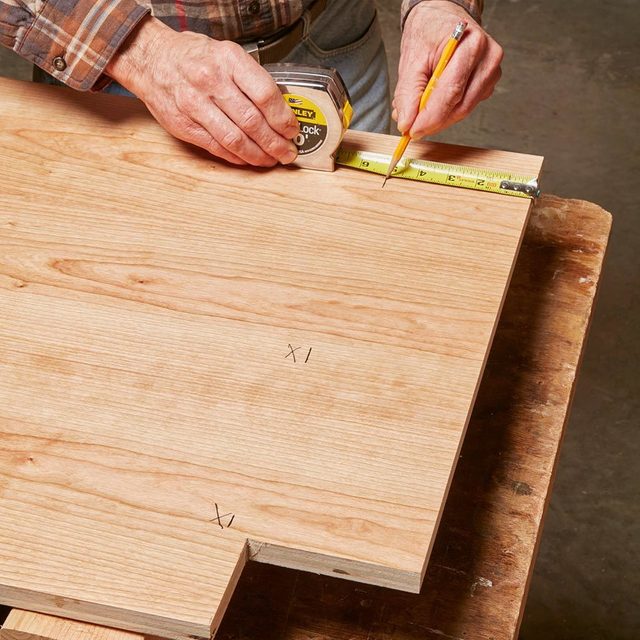
Measuring And Marking
Measure the wood carefully before cutting a rabbet joint. Use a sharp pencil for clear marks.
Mark both the width and depth of the rabbet to avoid mistakes during cutting.
- Use a steel ruler or tape measure for accuracy
- Mark the cut line clearly on the wood
- Double-check measurements before cutting
Selecting Wood Type
Choose wood that suits your project and is easy to work with. Softwoods are easier to cut.
Hardwoods give a strong joint but need more care when cutting.
- Softwoods like pine are good for beginners
- Hardwoods like oak offer durability
- Dry wood reduces the chance of warping
Clamping Techniques
Secure the workpiece firmly before cutting. This keeps the wood still and safe.
Use clamps that fit your wood size and hold tight without damage.
- Place clamps near the cut area for stability
- Use a scrap piece to protect the wood surface
- Check that the wood does not move before starting
Cutting Techniques
Cutting rabbet joints requires precision and the right tools. Accurate cuts ensure strong joints and clean edges.
This guide explains three common methods to cut rabbets: using a router, a table saw, and a hand saw.
Using A Router For Rabbets
A router offers control and smooth cuts for rabbets. Set the router bit depth to match the rabbet size.
- Clamp the wood firmly to avoid movement
- Use a straight edge guide to keep the cut straight
- Make multiple shallow passes instead of one deep cut
- Check the cut depth regularly for accuracy
Table Saw Method
Table saws can quickly cut rabbets with repeatable precision. Adjust the blade height and fence for the rabbet size.
| Tool Setup | Purpose |
| Blade Height | Set to rabbet depth |
| Fence Position | Set to rabbet width |
| Push Stick | For safety and control |
| Multiple Passes | For cleaner cuts |
Hand Saw Approach
Hand saws are useful for small or quick rabbet cuts. Use a backsaw or dovetail saw for better control.
- Mark the rabbet lines clearly with a pencil
- Cut along the shoulder line first
- Remove waste material carefully with a chisel
- Check fit frequently and adjust as needed
Ensuring Precision
Cutting rabbet joints accurately is key to strong woodworking projects. Precision helps parts fit tightly and look clean.
This guide covers ways to ensure exact cuts for rabbet joints every time you work.
Setting Accurate Depths
Set the cutting depth carefully before starting. The depth must match the thickness of the material you join.
Use a depth gauge or ruler to mark the exact depth on your tool. Double-check measurements to avoid mistakes.
Using Guides And Fences
Guides and fences keep your cuts straight and consistent. They prevent the tool from wandering off the mark.
- Attach a fence to your workbench or saw for stable support.
- Use a guide rail to help the saw blade follow the correct path.
- Clamp the workpiece securely to avoid movement during cutting.
Checking For Square And Fit
After cutting, check the rabbet joint for squareness and fit. This step confirms your precision.
| Check | How to Do It | What to Look For |
|---|---|---|
| Square | Use a try square on the joint edges | Edges meet at 90 degrees |
| Fit | Assemble the pieces without glue | Pieces fit snugly without gaps |
| Adjust | Slightly trim or sand if needed | Joint closes tightly and aligns |
Common Mistakes To Avoid
Cutting rabbet joints needs careful attention. Small errors can weaken the joint or ruin the piece.
Knowing common mistakes helps you work smarter and get better results. Avoid these errors for accurate cuts.
Overcutting And Undercutting
Overcutting removes too much wood, making the joint loose. Undercutting leaves the rabbet too shallow.
Both mistakes make the joint weak or ugly. Measure twice and cut carefully to avoid these problems.
- Use sharp blades for clean cuts
- Set depth stops on your tools
- Test cuts on scrap wood before the final piece
Poor Alignment
Poor alignment means the parts do not fit together well. This causes gaps or uneven surfaces.
Mark your lines clearly. Clamp pieces securely and check angles before cutting to keep alignment perfect.
- Use a square to mark right angles
- Clamp workpieces to avoid shifting
- Double-check measurements before cutting
Tool Slippage
Tool slippage happens when the cutting tool moves off the mark. It damages the workpiece and wastes material.
Keep a firm grip and use guides or fences to control the tool. Take your time and keep the tool steady.
- Wear gloves for better grip
- Use clamps to secure the wood
- Use guides or fences to keep straight cuts
Credit: www.familyhandyman.com
Finishing Tips
Finishing rabbet joints carefully helps your project look neat and last longer. Taking time to smooth and secure the joint is very important.
Use the right tools and methods to make your rabbet joints strong and clean. Follow these tips for sanding, gluing, clamping, and inspecting.
Sanding And Smoothing
After cutting the rabbet joint, sand the edges gently to remove rough spots. Use fine-grit sandpaper for a smooth finish that fits well.
- Start with medium-grit sandpaper to remove large bumps
- Use fine-grit sandpaper to smooth the surface
- Sand along the grain to avoid scratches
- Clean dust with a soft brush or cloth before gluing
Glue And Clamp For Strength
Apply a thin, even layer of wood glue inside the rabbet. Clamp the pieces firmly to hold the joint tight while drying. This prevents gaps and strengthens the bond.
| Tip | Reason |
| Use wood glue made for your material | Ensures a strong, lasting hold |
| Clamp with even pressure | Prevents joint movement and gaps |
| Remove excess glue quickly | Keeps the surface clean and smooth |
| Allow full drying time | Maximizes joint strength |
Final Inspection
Check the joint carefully once the glue is dry. Look for any gaps, loose spots, or rough edges. Fix small issues by sanding or adding glue if needed.
- Inspect all sides of the joint
- Test the joint by gently pressing or pulling
- Sand any rough areas for a clean finish
- Touch up with glue if the joint feels weak
Credit: www.familyhandyman.com
Frequently Asked Questions
What Tools Are Best For Cutting Rabbet Joints Accurately?
Using a router with a straight bit or a table saw with a dado blade ensures precise rabbet joints. Clamps and measuring tools enhance accuracy. Proper tool setup is essential for clean, consistent cuts every time.
How Do I Measure Rabbet Joints For A Perfect Fit?
Measure the thickness and width of the mating piece precisely. Mark the rabbet dimensions clearly on your workpiece. Double-check measurements before cutting to ensure a snug, seamless joint without gaps or overlaps.
Can I Cut Rabbet Joints Without A Router Or Table Saw?
Yes, you can use a hand saw and chisel for rabbet joints. This method requires patience and skill for clean results. It’s suitable for small projects or when power tools aren’t available.
What Are Common Mistakes When Cutting Rabbet Joints?
Common errors include incorrect measurements, uneven cuts, and dull blades. These lead to loose or misaligned joints. Always measure twice, use sharp tools, and test cuts to avoid mistakes.
Conclusion
Cutting rabbet joints accurately boosts your woodworking skills. Start with precise measurements. Double-check your tools for sharpness and alignment. Practice patience in every step. Mistakes happen, but learning from them is key. Use scrap wood for trials. Adjust your technique as needed.
Remember, practice makes perfect. A well-cut rabbet joint strengthens your projects. It adds a touch of professionalism. Stay consistent with your approach. The more you work, the better you get. Enjoy the process and see your skills improve over time.
Happy woodworking!