Are you looking to master the art of cutting wood with a handsaw? Whether you’re a DIY enthusiast or just starting out, learning how to use a handsaw effectively is essential.
Imagine the satisfaction of crafting something beautiful with your own hands. With the right techniques, you can cut wood precisely and safely, transforming your projects from ordinary to extraordinary. You’ll discover simple yet powerful tips that will make cutting wood with a handsaw not only manageable but also enjoyable.
Ready to enhance your woodworking skills and unleash your creativity? Let’s dive in and explore how you can become a handsaw pro!
Choosing The Right Handsaw
Cutting wood with a handsaw is simple if you use the right tool. Different handsaws work best for different wood types and projects. Picking the correct saw makes your work easier and safer.
This guide helps you understand the types of handsaws and how to select the best one for your project.
Types Of Handsaws
Handsaws come in many styles. Each style has a specific use. Knowing these helps you pick the best saw for your job.
- Crosscut Saw:Cuts across the grain of the wood. It has small, sharp teeth for smooth cuts.
- Rip Saw:Cuts along the grain. Its teeth are larger and shaped to remove wood chips quickly.
- Back Saw:Has a stiff spine to keep the blade straight. Best for precise cuts and joinery.
- Keyhole Saw:Small and narrow. Used for cutting curves or holes in wood.
- Bow Saw:Has a metal frame and coarse teeth. Good for rough cutting and pruning.
Selecting The Best Saw For Your Project
Choosing the right saw depends on your wood type and the cut you need. Think about the wood’s hardness, grain direction, and the cut’s shape.
| Project Type | Best Saw | Reason |
| Cutting across wood grain | Crosscut Saw | Teeth designed to slice wood fibers cleanly |
| Cutting along wood grain | Rip Saw | Teeth shaped to split wood fibers efficiently |
| Making fine, straight cuts | Back Saw | Rigid blade helps keep cuts precise |
| Cutting curves or holes | Keyhole Saw | Narrow blade fits small shapes |
| Rough cutting or pruning | Bow Saw | Strong frame and large teeth for fast cuts |
Preparing Your Workspace
Cutting wood with a handsaw needs a clean and safe space. Preparing your workspace helps you work faster and safer.
Focus on two main areas: setting up a stable surface and holding the wood firmly. Both are key for good cuts.
Setting Up A Stable Work Surface
Choose a flat, strong table or bench to cut on. The surface must not move or wobble during sawing.
- Clear the area of tools and debris
- Use a workbench or sturdy table
- Place non-slip mats under the wood if needed
- Check the surface for any damage or weak spots
- Make sure you have enough space to move the saw freely
Securing The Wood Properly
Hold the wood steady with clamps or a vise. This stops the wood from shifting and keeps your hands safe.
| Method | Use | Tip |
| Clamps | Hold wood to bench | Place pads to avoid marks |
| Vise | Secure small pieces | Adjust pressure gently |
| Wood Blocks | Support ends | Keep them stable under wood |
Marking Your Cut Line
Marking your cut line is an important first step before cutting wood. It guides your saw and helps you make a straight cut.
Clear and accurate marks reduce mistakes and save wood from being wasted. Use the right tools for the best results.
Using Measuring Tools
Measuring tools help you find the exact spot to cut. Use a tape measure or a ruler to measure your wood piece.
Mark the length with a pencil or chalk. Double-check your measurement before marking to avoid errors.
- Use a tape measure for long pieces
- A ruler works well for smaller cuts
- Mark the wood clearly with a pencil
- Measure twice, mark once
Drawing Clear And Accurate Lines
Draw a straight line where you want to cut. Use a square or a straight edge to guide your pencil.
Make sure the line is thin but dark enough to see. A clear line helps you follow the cut exactly.
- Place a carpenter’s square on the wood edge
- Draw a line along the square’s edge
- Keep your pencil steady for a straight line
- Check the line before you start cutting

Credit: www.youtube.com
Proper Handsaw Grip And Stance
Cutting wood with a handsaw requires the right grip and stance. These help you cut safely and with control.
This guide covers how to hold the saw and position your body for the best results.
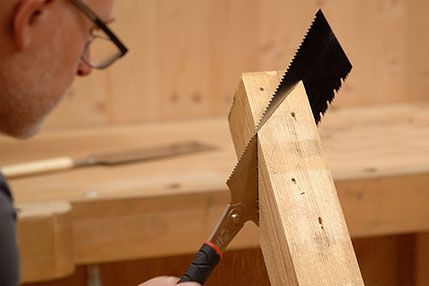
Holding The Saw Correctly
Hold the saw handle firmly but not too tight. Use your dominant hand to grip the handle near the end.
- Wrap your fingers around the handle comfortably.
- Place your thumb on the opposite side of the handle for support.
- Keep your wrist straight to avoid strain.
- Do not grip too tightly; this reduces control and tires your hand.
Positioning Your Body For Control
Stand with your feet shoulder-width apart to stay balanced. Position your body so you can move the saw smoothly.
| Body Part | Position |
| Feet | Shoulder-width apart, one foot slightly forward |
| Knees | Slightly bent for balance |
| Back | Straight but relaxed |
| Arms | Elbows close to your body |
| Head | Aligned with the cut line |
Starting The Cut
Cutting wood with a handsaw needs care and focus. The start of the cut sets the path for a clean finish.
Learn how to begin your cut with control and accuracy to get the best results.
Creating A Guide Groove
A guide groove helps keep your saw on track. It prevents slipping and makes cutting easier.
- Mark the cut line clearly with a pencil or chalk.
- Use a small saw or knife to start a shallow groove along the line.
- Keep the groove straight and even to guide the saw blade.
- Check the groove depth; it should be enough to hold the blade.
Maintaining A Steady Pace
Keeping a steady pace helps you control the saw and avoid mistakes. Fast or uneven cutting can cause the blade to bind or jump.
| Tip | Why It Helps |
| Use smooth, even strokes | Prevents the saw from catching or bending |
| Keep your body steady | Improves accuracy and safety |
| Let the saw do the work | Reduces fatigue and keeps the blade sharp |
| Pause briefly if tired | Maintains control and focus |

Credit: www.youtube.com
Sawing Techniques For Clean Cuts
Cutting wood with a handsaw needs care and attention. Clean cuts help wood fit well in projects.
Good sawing techniques reduce splinters and rough edges. This guide explains how to saw smoothly.
Using Smooth, Controlled Strokes
Saw with steady, even strokes. Let the saw do the work without pushing too hard.
Start slowly to make a guide cut. Keep your hand steady and move the saw back and forth smoothly.
- Hold the saw handle firmly but not too tight
- Use long strokes that follow the line
- Keep the saw angle consistent, usually around 45 degrees
- Maintain a steady speed without rushing
Avoiding Common Mistakes
Many people cut wood with uneven pressure or wrong saw angles. This causes rough cuts and wasted wood.
Do not force the saw or change directions quickly. Keep your eyes on the cut line and check progress often.
- Do not bend the saw blade while cutting
- Avoid starting cuts off the mark
- Do not use short, choppy strokes
- Keep your body balanced and steady
Finishing Touches
Cutting wood with a handsaw is only part of the job. The finishing touches make your work look clean and professional. This section explains how to smooth edges and check your cut for accuracy.
Proper finishing helps your wood pieces fit together well. It also prevents splinters and rough surfaces. Take time to do these steps carefully.
Sanding Cut Edges
After cutting, the edges of the wood will be rough. Sanding makes these edges smooth and safe to handle. Use the right sandpaper grit for the job.
- Start with coarse grit (60-80) to remove large splinters.
- Use medium grit (100-120) to even out the surface.
- Finish with fine grit (150-220) for a smooth touch.
- Sand along the grain to avoid scratches.
- Wipe the dust with a dry cloth before painting or staining.
Checking For Accuracy
Check your cut to make sure it matches your measurements and angles. Accuracy is key for the wood pieces to fit well in your project.
| Check Type | Tool Needed | What to Look For |
| Length | Tape Measure | Cut matches marked length |
| Angle | Speed Square or Protractor | Cut angle matches planned angle |
| Edge Straightness | Straightedge or Ruler | No curves or bumps along the cut |
Credit: www.dictum.com
Safety Tips When Using A Handsaw
Using a handsaw can be safe if you follow important safety tips. Knowing how to protect yourself helps prevent injuries.
This guide covers key safety points about wearing protective gear and keeping your hands away from the blade.
Wearing Protective Gear
Always wear the right protective gear before you start cutting wood. This gear helps protect your eyes, hands, and body.
- Wear safety goggles to protect your eyes from sawdust and wood chips.
- Use gloves to protect your hands but make sure they fit well.
- Wear long sleeves and pants to protect your skin from scratches.
- Use ear protection if you are working in a noisy environment.
Keeping Hands Clear Of The Blade
Keep your hands away from the blade at all times. This is the best way to avoid cuts and serious injuries.
| Safety Tip | How to Do It |
| Hold the wood firmly | Use clamps or a vice to secure the wood before sawing. |
| Use the correct hand position | Keep your hand that is not sawing at least 6 inches away from the blade. |
| Cut slowly and carefully | Do not rush. Control the saw with steady and smooth strokes. |
| Check blade condition | Use a sharp, clean blade to reduce the chance of slipping. |
Frequently Asked Questions
What Type Of Wood Is Best For Handsaw Cutting?
Softwoods like pine or cedar are easier to cut with a handsaw. Hardwood requires more effort and sharper blades. Choose wood based on your project and saw type for smooth cutting.
How Do I Choose The Right Handsaw Blade?
Select a blade with the correct teeth per inch (TPI) for your wood type. Fine teeth suit hardwood, while coarse teeth are better for softwood. The blade length also affects control and cutting depth.
What Safety Tips Should I Follow When Cutting Wood?
Always wear safety goggles and gloves to protect yourself. Secure the wood firmly before cutting. Use smooth, controlled strokes and keep your hands away from the blade path.
How Can I Make Straight Cuts With A Handsaw?
Mark your cut line clearly with a pencil and square. Clamp the wood to prevent movement. Start the cut slowly to create a groove, then saw steadily along the line.
Conclusion
Cutting wood with a handsaw takes practice and patience. Start with a steady grip and slow, even strokes. Keep your eyes on the cutting line. Use the right saw for your wood type. Safety matters—wear gloves and eye protection. Clean cuts make your projects look better.
With time, your skills will improve. Enjoy the process and the results. Woodworking can be simple and fun. Keep practicing, and you will get better each time.