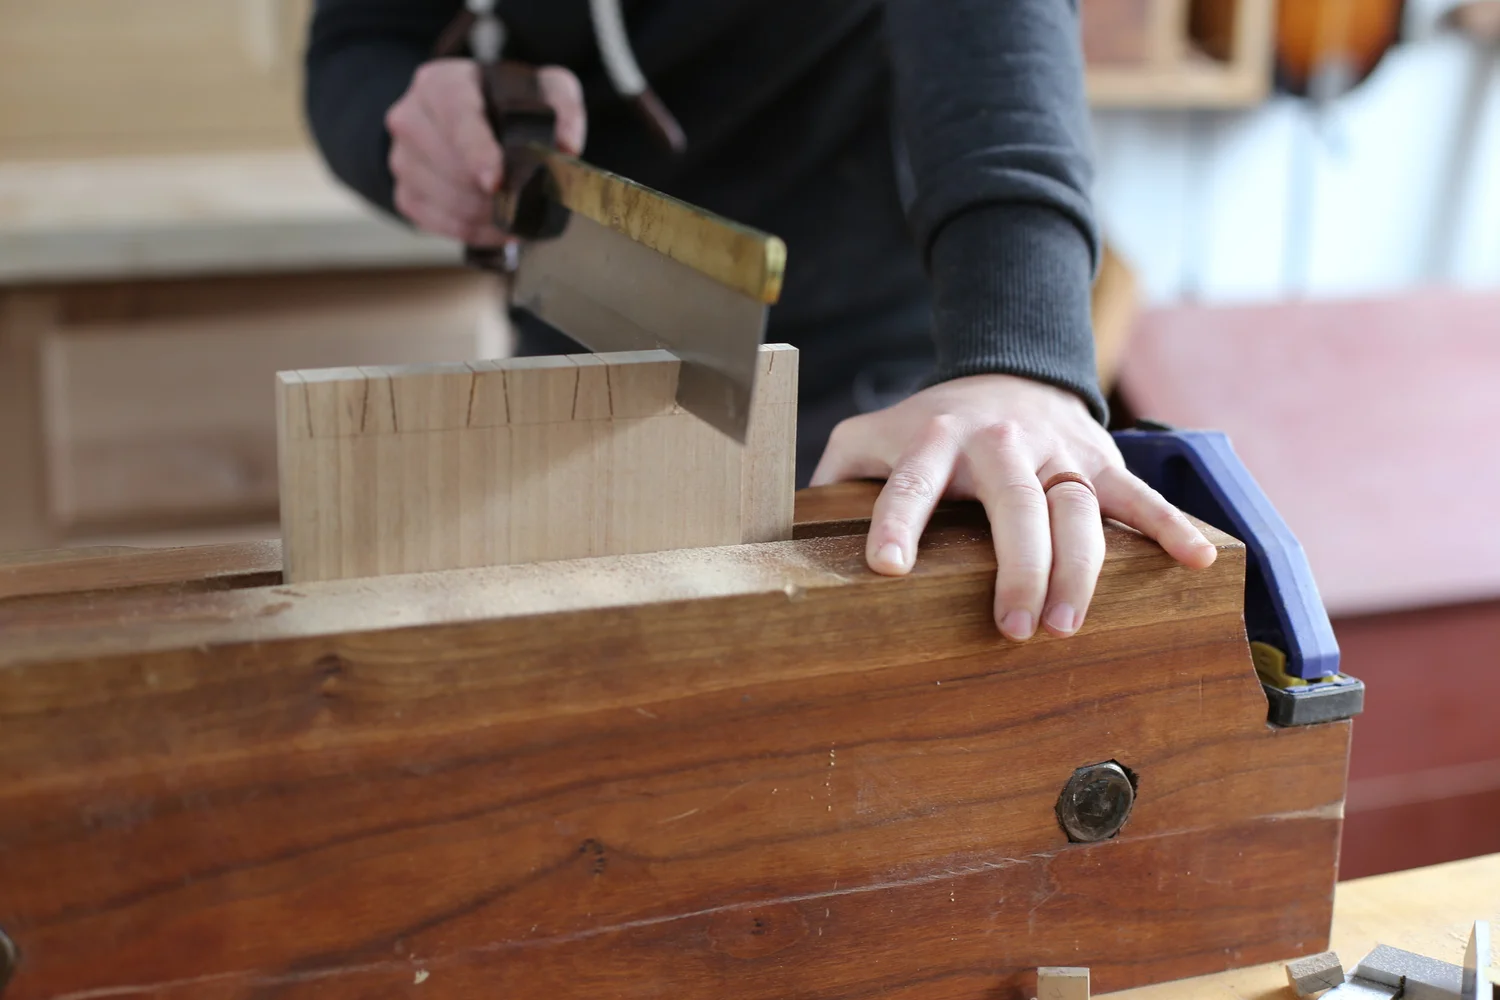
If you want to create strong, beautiful joints for your woodworking projects, learning how to install a dovetail jig is a game-changer. You might think it’s complicated, but with the right steps, you can set it up quickly and start making perfect dovetail joints every time.
Imagine the pride you’ll feel showing off your clean, professional-looking work. This guide will walk you through the installation process in simple, clear steps—no confusing jargon, just straightforward advice to help you get it right. Ready to take your woodworking skills to the next level?
Let’s dive in.
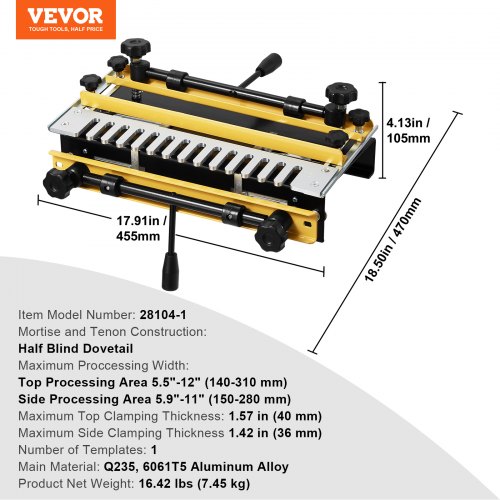
Credit: www.vevor.ca
Choosing The Right Dovetail Jig
Picking the right dovetail jig makes your woodworking easier and more precise. This tool helps you join wood pieces tightly and neatly.
Different jigs work for different projects. Knowing the types and key factors helps you choose well.
Types Of Dovetail Jigs
Dovetail jigs come in several styles. Each type fits certain needs and skill levels.
- Manual Jigs:These require hand adjustment and are good for beginners.
- Pin-Style Jigs:They cut pins on the board ends. Good for standard joints.
- Tail-Style Jigs:These cut tails on the board ends. They offer more control.
- Universal Jigs:These can make both pins and tails. They are flexible and popular.
- Automatic Jigs:These use motors for cutting. They save time but cost more.
Factors To Consider
Choosing the right jig depends on your project and tools. Size, ease of use, and price are key factors.
| Factor | What to Check | Why It Matters |
| Compatibility | Fits your router and workbench | Ensures smooth operation |
| Material Quality | Strong metal or wood parts | Lasts longer and stays accurate |
| Adjustability | Easy to set sizes and angles | Makes different joints possible |
| User Skill | Matches your experience level | Prevents mistakes and frustration |
| Budget | Costs fit your spending plan | Avoids overspending |
Credit: www.vevor.ca
Gathering Essential Tools And Materials
Installing a dovetail jig requires careful preparation. You need the right tools and materials to get started.
This guide helps you gather everything needed before you begin the installation process.
Required Tools
You will need some basic tools to install your dovetail jig properly. These tools help you secure the jig and make precise cuts.
- Drill with drill bits
- Screwdriver or power driver
- Measuring tape or ruler
- Clamps to hold materials
- Level to check alignment
- Allen wrench (usually included with the jig)
- Safety glasses and hearing protection
Material Preparation
Preparing your wood materials before installing the jig makes the process smoother. Cut the wood pieces to the right size and smooth any rough edges.
Check that your wood is dry and free from defects. This ensures the dovetail joints fit well and hold strong.
- Cut wood boards to correct length and width
- Sand edges to remove splinters
- Mark wood where cuts will be made
- Check wood for warping or cracks
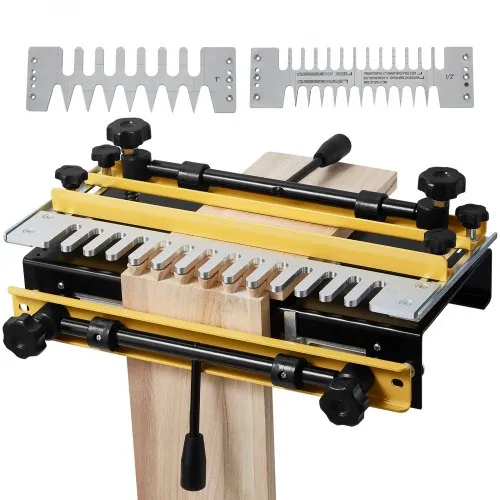
Setting Up The Dovetail Jig
Setting up your dovetail jig correctly is key for accurate joints. This guide covers how to assemble the jig and adjust it for your wood thickness.
Follow these steps carefully to ensure the jig works smoothly and your cuts fit perfectly.
Assembling The Jig
Start by unpacking all parts and checking them against the instruction manual. Assemble the base, guides, and clamps as shown in the manual.
- Attach the base firmly to your workbench for stability.
- Install the guide fence according to the jig’s design.
- Secure all clamps tightly to hold the wood in place.
- Check that the sliding parts move smoothly without play.
Adjusting For Wood Thickness
Adjusting the jig for your wood thickness ensures tight-fitting dovetails. Use the adjustment knob or screws to set the guide fence position.
| Wood Thickness (inches) | Fence Position (mm) | Clamp Tightness |
| 0.5 | 15 | Medium |
| 0.75 | 22 | Firm |
| 1.0 | 30 | Firm |
| 1.25 | 38 | Very Firm |

Credit: www.vevor.ca
Marking And Clamping Workpieces
Proper marking and clamping are key to accurate dovetail joints. These steps help hold your wood pieces steady and aligned.
Take your time to mark the wood clearly and clamp it securely before cutting. This reduces mistakes and improves joint fit.
Aligning The Wood
Start by placing the wood pieces flat on your work surface. Make sure the edges match exactly where you want the joint.
- Check the grain direction to match pieces neatly.
- Use a pencil to mark reference lines on both pieces.
- Mark the waste and the joint areas clearly.
- Double-check measurements before clamping.
Securing The Pieces
Clamping keeps the wood from moving while you work. Use clamps that fit your workpieces well and apply even pressure.
| Clamp Type | Best Use | Tip |
| Bar Clamp | Long boards | Apply pressure evenly across length |
| C-Clamp | Small pieces | Use protective pads to avoid marks |
| Quick-Grip Clamp | Fast adjustments | Check grip strength before cutting |
Routing The Dovetail Joints
Routing dovetail joints is a key step in using a dovetail jig. It shapes the wood to fit tightly together. Careful routing ensures strong and precise joints.
Using the right router bit and following proper techniques helps you get clean cuts. These cuts make assembling your project easier and more secure.
Selecting The Router Bit
Choose a router bit made specifically for dovetail joints. These bits have an angled shape that matches the joint pattern. They come in different sizes to fit your wood thickness.
- Pick a bit with a 7 to 14-degree angle for standard dovetails.
- Use carbide-tipped bits for longer life and cleaner cuts.
- Match the bit size to your jig’s instructions for best results.
- Check that the shank size fits your router collet securely.
Routing Techniques
Follow these steps to route dovetail joints correctly. Proper technique avoids tear-out and uneven cuts. Take your time and work carefully.
| Technique | Description | Tip |
| Set Router Depth | Adjust the router to the depth recommended by your jig. | Use a depth gauge or test on scrap wood. |
| Secure the Workpiece | Clamp the wood firmly to the jig to avoid movement. | Double-check clamps before routing. |
| Make Multiple Passes | Route shallow cuts first, then deeper passes. | Reduce strain on the bit and get cleaner edges. |
| Use Slow, Steady Feed | Move the router smoothly along the jig’s guide. | Keep speed consistent to prevent burn marks. |
| Clean the Bit Often | Remove wood chips from the bit during work. | Prevents clogging and maintains cut quality. |
Cleaning And Testing The Joints
After cutting dovetail joints with a jig, cleaning and testing are important. This ensures your joints fit well and look neat.
Cleaning removes leftover wood bits. Testing helps find any needed adjustments before final assembly.
Removing Burrs And Debris
Wood pieces often have small burrs or rough edges after cutting. These can stop the joint from fitting smoothly. Use these tools to clean the joints:
- A fine file to smooth edges gently
- A small brush to clear sawdust
- Sandpaper with fine grit for a soft finish
- A utility knife to trim tiny wood chips
Work carefully to avoid removing too much material. The goal is a clean, tight fit without gaps.
Fitting And Adjusting
Test the joint by fitting the two wood pieces together. Check for tightness and alignment.
| Fit Issue | Cause | Adjustment |
| Joint too tight | Excess wood or burrs | File or sand edges lightly |
| Joint too loose | Too much material removed | Use wood filler or glue for strength |
| Misaligned pins and tails | Incorrect jig setup | Reposition jig and recut if needed |
Repeat testing until the joint fits snugly without force. Proper fitting improves the strength of your project.
Tips For Perfect Dovetail Joints
Installing a dovetail jig correctly helps you make strong and neat dovetail joints. These joints hold wood pieces tightly, giving your projects a professional look.
Use the right tools and take your time to set up the jig. Careful work leads to perfect fits and smooth edges.
Common Mistakes To Avoid
Many people rush or skip important steps when using a dovetail jig. This causes poor fit and weak joints.
Avoid these mistakes to get better results:
- Not clamping wood pieces firmly in place
- Misaligning the jig before cutting
- Using dull router bits that cause rough cuts
- Setting incorrect depth on the router
- Ignoring the wood grain direction
Maintenance Of Your Jig
Keep your dovetail jig clean and well-maintained. This helps it work smoothly and last longer.
Check these tips to maintain your jig:
- Clean sawdust and debris after each use
- Lubricate moving parts to prevent rust
- Check and tighten screws regularly
- Store the jig in a dry place
- Inspect the fence and guides for damage
Frequently Asked Questions
What Tools Are Needed To Install A Dovetail Jig?
You need a dovetail jig, drill, clamps, measuring tape, pencil, and router. These tools ensure precise and secure installation.
How Do I Align The Dovetail Jig Correctly?
Align the jig by clamping it to the wood edge. Use the guide marks to ensure accurate placement before drilling.
Can I Install A Dovetail Jig On Any Wood Type?
Yes, dovetail jigs work on most hardwoods and softwoods. Ensure the wood is flat and smooth for best results.
How Long Does It Take To Install A Dovetail Jig?
Installation typically takes 30 to 60 minutes depending on your experience and the jig model.
Conclusion
Installing a dovetail jig can seem tricky, but it’s doable. Start by following the steps carefully. Practice makes perfect. Double-check your work for accuracy. Remember, patience is key. Small mistakes can lead to bigger issues. Keep your tools organized and accessible.
This saves time and reduces stress. Safety should always be your priority. Wearing protective gear is important. With these tips, you’ll gain confidence. Soon, dovetail joints will look professional and neat. Enjoy the satisfaction of creating sturdy, beautiful joints. Happy woodworking!
