Are you tired of dealing with a leaky shower or inconsistent water temperature? Installing a new shower valve might just be the solution you need.
It may sound complicated, but with the right guidance, you can tackle this home improvement project with confidence. Imagine the satisfaction of knowing you’ve enhanced your bathroom’s functionality and saved money by doing it yourself. You’ll discover a step-by-step process to install a shower valve, complete with tips to avoid common pitfalls.
Whether you’re a seasoned DIY enthusiast or a first-timer, this guide is tailored just for you. Let’s turn your bathroom woes into a satisfying success story, and soon, you’ll be enjoying the perfect shower experience you’ve always wanted. Ready to dive in?

Credit: www.reddit.com
Tools And Materials Needed
Installing a shower valve requires the right tools and materials. Having everything ready makes the job easier and faster.
This guide lists the essential tools and supplies you need for a smooth installation.
Essential Tools
Using the correct tools helps you install the shower valve safely. Each tool has a specific job.
- Adjustable wrench for tightening nuts and bolts
- Pipe cutter to cut copper or PVC pipes accurately
- Slip-joint pliers for gripping and twisting
- Phillips and flathead screwdrivers for screws
- Tape measure to check pipe lengths and valve placement
- Level to ensure the valve is straight
- Propane torch for soldering copper pipes (if needed)
- Deburring tool to smooth pipe edges after cutting
- Pipe wrench for working on threaded pipes
- Safety glasses to protect your eyes during cutting or soldering
Choosing The Right Valve
Select a valve that fits your shower system and water pressure. Valves come in different styles and sizes.
Consider if you want a single-handle or dual-handle valve. Also, check if the valve works with your pipe type.
- Pressure-balancing valves keep water temperature steady
- Thermostatic valves allow precise temperature control
- Single-handle valves control water flow and temperature together
- Dual-handle valves control hot and cold water separately
- Ensure the valve matches your pipe size (usually ½ inch or ¾ inch)
- Check compatibility with copper, PVC, or PEX pipes
Additional Supplies
You will need extra materials to complete the installation. These help seal and protect connections.
- Plumber’s tape (Teflon tape) to seal threaded connections
- Pipe joint compound for extra leak protection
- Solder and flux if soldering copper pipes
- Replacement pipes or fittings if old ones are damaged
- Shower valve mounting bracket or support if required
- Caulk or silicone sealant to seal around the valve trim
- Rags or towels to clean spills and drips
- Bucket to catch water during valve removal

Credit: www.youtube.com
Preparing The Installation Area
Installing a shower valve requires careful preparation. This ensures the work is safe and effective.
Start by preparing the area well. This includes stopping water flow, removing old parts, and checking pipes.
Shutting Off Water Supply
Before any work, turn off the main water valve. This stops water from flowing to the shower.
Check if water is off by opening the shower handle and seeing no water comes out.
Removing Old Valve
Remove the old shower valve carefully to avoid damage. Use tools like a wrench or screwdriver.
- Remove the handle and trim plate
- Unscrew the valve body
- Pull out the valve from the wall
- Keep screws and parts organized
Cleaning And Inspecting Pipes
Clean the pipes where the valve was. Remove dirt and old sealant for a good fit.
| Pipe Condition | Action Needed |
|---|---|
| Corroded | Replace the pipe section |
| Clean and smooth | Ready for new valve |
| Loose fittings | Tighten or replace fittings |
| Damaged threads | Use pipe thread sealant or replace pipe |
Installing The Shower Valve
Installing a shower valve is an important part of building or fixing a shower. The valve controls water flow and temperature. Proper installation ensures your shower works well and stays safe.
This guide explains how to install the shower valve step by step. You will learn where to place it, how to connect the water lines, and how to secure it firmly.
Positioning The Valve
Place the valve at a height that is easy to reach. Usually, this is about 48 inches from the floor. Make sure it fits inside the wall cavity.
Check that the valve lines up with the shower handle you will use. Avoid placing it too close to electrical wires or other pipes.
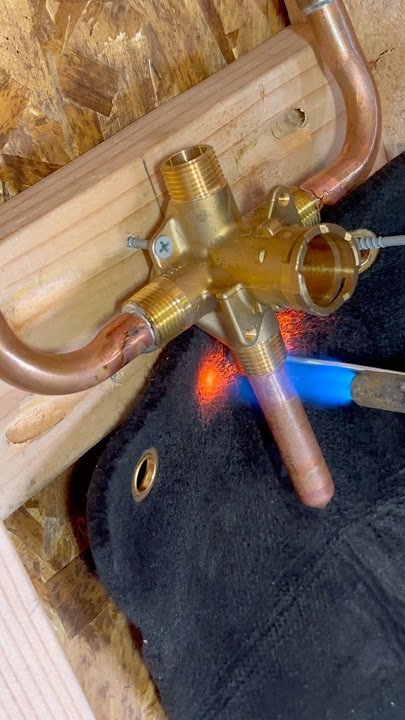
Connecting Water Lines
Turn off the main water supply before starting. Connect the hot water line to the valve’s hot inlet and the cold water line to the cold inlet.
Use proper fittings and tighten them well to avoid leaks. Check the valve instructions for the correct connection type.
- Use a pipe cutter for clean cuts
- Apply plumber’s tape on threads
- Use a wrench to tighten connections
- Check for leaks after connecting
Securing The Valve In Place
Fix the valve securely inside the wall frame. Use screws or mounting brackets provided with the valve. This stops movement when you use the shower handle.
Make sure the valve stays level and does not shift. Double-check all connections before closing the wall.

Credit: www.familyhandyman.com
Testing The Valve
Testing your shower valve is important to ensure it works correctly. You need to check water flow, temperature, and leaks. This helps avoid problems later.
Follow these simple steps carefully to test the valve after installation. This guide covers turning the water on, checking for leaks, and adjusting temperature settings.
Turning Water Back On
Turn on the main water supply slowly to avoid pressure shocks. Open the shower valve to let air escape from the pipes. This allows water to flow smoothly.
- Locate your main water valve.
- Turn the valve counterclockwise to open.
- Open the shower valve to release trapped air.
- Check if water flows steadily from the showerhead.
Checking For Leaks
Look carefully around the valve and pipes for water leaks. Even small drips can cause damage over time. Tighten connections if needed.
| Leak Location | What to Check | Action |
| Valve Connections | Water dripping or wet spots | Tighten fittings with a wrench |
| Pipe Joints | Visible moisture or corrosion | Replace seals or pipe sections |
| Showerhead | Drips when off | Replace washer or tighten head |
Adjusting Temperature Settings
Set the valve to your preferred shower temperature. Test water temperature carefully to avoid burns or cold shocks. Adjust the valve as needed.
Follow this checklist for safe temperature adjustment:
- Turn on hot and cold water fully.
- Mix water slowly to find a comfortable temperature.
- Use a thermometer if possible to check temperature.
- Adjust the valve handle to keep steady temperature.
- Test temperature again after a few minutes of running water.
Finishing Touches
After installing the shower valve, the final steps ensure a clean and functional finish. These steps include putting on the trim and handles, sealing the valve, and cleaning the work area.
Properly finishing these details helps prevent leaks and keeps your shower looking neat and tidy.
Installing Trim And Handles
Attach the trim plate over the valve to cover the opening in the wall. Then, mount the handles to control water flow and temperature.
- Align the trim plate with the valve body.
- Secure the plate with screws provided.
- Attach the handle to the valve stem.
- Tighten any set screws to hold the handle firmly.
- Test the handle for smooth movement.
Sealing Around The Valve
Sealing prevents water from leaking behind the wall. Use waterproof sealant around the trim plate edges.
- Apply a thin bead of silicone caulk around the trim plate.
- Use a caulk smoothing tool or your finger to even out the sealant.
- Wipe away excess caulk with a damp cloth.
- Let the sealant dry fully before using the shower.
Cleaning Up The Work Area
Remove any debris, dust, and tools from the area. Clean the trim and handles to remove fingerprints or smudges.
| Task | Recommended Method |
| Remove dust and debris | Vacuum or sweep the floor |
| Clean trim and handles | Use a soft cloth with mild soap |
| Dispose of waste materials | Follow local disposal rules |
Troubleshooting Common Issues
Installing a shower valve can be simple, but sometimes problems arise. This guide helps you fix common issues you may face.
Read these tips to handle leaks, temperature problems, and low water pressure in your shower valve.
Handling Leaks
Leaks often come from loose fittings or worn parts. Check all connections carefully. Tighten any loose nuts or screws.
- Turn off water supply before working on the valve.
- Inspect the valve cartridge for cracks or damage.
- Replace worn washers or O-rings.
- Use plumber’s tape on threaded connections.
- Test for leaks after reassembly by turning water on slowly.
Fixing Temperature Fluctuations
Temperature changes can happen if the valve is faulty or water pressure is uneven. Check the cartridge and pressure balance.
| Possible Cause | Solution |
| Worn cartridge | Replace the cartridge |
| Uneven water pressure | Adjust pressure balance valve |
| Thermostatic valve failure | Install a new thermostatic valve |
| Mixing valve blocked | Clean or replace mixing valve |
Dealing With Low Water Pressure
Low water pressure can reduce your shower’s flow. Check for clogs or closed valves in your plumbing.
Try these fixes to improve water pressure:
- Remove and clean the showerhead to clear mineral build-up.
- Check the main water valve is fully open.
- Inspect pipes for leaks or blockages.
- Replace old or damaged pipes if needed.
- Consult a plumber if pressure stays low.
Frequently Asked Questions
What Tools Are Needed To Install A Shower Valve?
You need a wrench, screwdriver, plumbing tape, pipe cutter, and a level. These tools ensure accurate and secure installation. Proper tools prevent leaks and damage. Always use quality materials for durability and safety.
How Do You Shut Off Water Before Installation?
Locate the main water supply valve and turn it off. Open a faucet to drain remaining water. This prevents leaks and water damage during installation. Always double-check to ensure water flow has stopped completely.
What Type Of Shower Valve Is Best For Installation?
Choose a pressure-balancing or thermostatic valve for safety and comfort. Pressure-balancing valves control water pressure changes, preventing temperature spikes. Thermostatic valves maintain a consistent temperature. Select based on your plumbing system and personal preference.
How Long Does It Take To Install A Shower Valve?
Installation typically takes 2 to 4 hours depending on experience. Complex plumbing or wall access issues may extend the time. Proper preparation and tools speed up the process. Taking time ensures a leak-free and safe setup.
Conclusion
Installing a shower valve can seem tricky but is doable with care. Follow each step slowly and double-check your work. Use the right tools to avoid damage or leaks. Test the valve after installation to ensure it works well. Taking your time helps you fix problems early.
This guide helps you save money and gain confidence. Enjoy your new shower setup with steady water flow. Simple tasks like this improve your home little by little. Keep learning and trying new projects around your house.
