Are you ready to transform your bathroom into a more functional and efficient space? Installing bathroom supply lines might sound like a daunting task, but it’s actually simpler than you might think.
Whether you’re renovating your bathroom or simply replacing old, worn-out lines, understanding how to install bathroom supply lines can save you time, money, and a lot of frustration. Imagine the satisfaction of completing this task on your own and the peace of mind knowing everything is working perfectly.
In this guide, we’ll walk you through the process step-by-step, ensuring you feel confident and equipped to tackle this project. So, let’s dive in and get your bathroom running smoothly!
Credit: www.homedepot.com
Tools And Materials Needed
Installing bathroom supply lines needs the right tools and materials. This helps you do the job quickly and safely.
Below are the types of supply lines and the essential tools you need for installation.
Types Of Supply Lines
Bathroom supply lines come in different types. Choosing the right one is important for your sink and faucet.
- Braided Stainless Steel:Durable and flexible, common for most bathrooms.
- Plastic Supply Lines:Lightweight and easy to install but less durable.
- Chrome-Plated Copper:Strong and looks good but harder to bend.
- PEX Supply Lines:Flexible and resistant to corrosion.
Essential Tools For Installation
You need specific tools to install supply lines correctly. These tools help prevent leaks and damage.
| Tool | Purpose |
|---|---|
| Adjustable Wrench | Tightens and loosens nuts on supply lines. |
| Pipe Cutter | Cuts supply lines to correct length. |
| Teflon Tape | Seals pipe threads to stop leaks. |
| Basin Wrench | Reaches nuts in tight spaces under the sink. |
| Bucket | Catches water when disconnecting old lines. |
| Rag or Towel | Cleans water spills and dries connections. |

Credit: www.familyhandyman.com
Preparing The Work Area
Before installing bathroom supply lines, you need to prepare the work area well. This makes the task easier and safer.
Proper preparation helps prevent leaks and damage to your plumbing system.
Shutting Off Water Supply
Turn off the main water supply to stop water flow. This avoids spills and flooding during installation.
- Locate the main water shutoff valve in your home.
- Turn the valve clockwise to close it.
- Open a faucet to drain remaining water in the pipes.
- Check the water meter to confirm water is off.
Clearing The Space
Clear the area around the sink and supply lines. This gives you room to work and prevents accidents.
| Task | Reason |
| Remove items under the sink | Creates space for tools and parts |
| Lay down a towel or bucket | Catch drips and protect the cabinet |
| Use a flashlight | Improve visibility in tight spaces |
Removing Old Supply Lines
Removing old bathroom supply lines is an important step before installing new ones. It helps prevent leaks and ensures a good connection.
Make sure to turn off the water supply before starting. This avoids water spills and keeps the area dry.
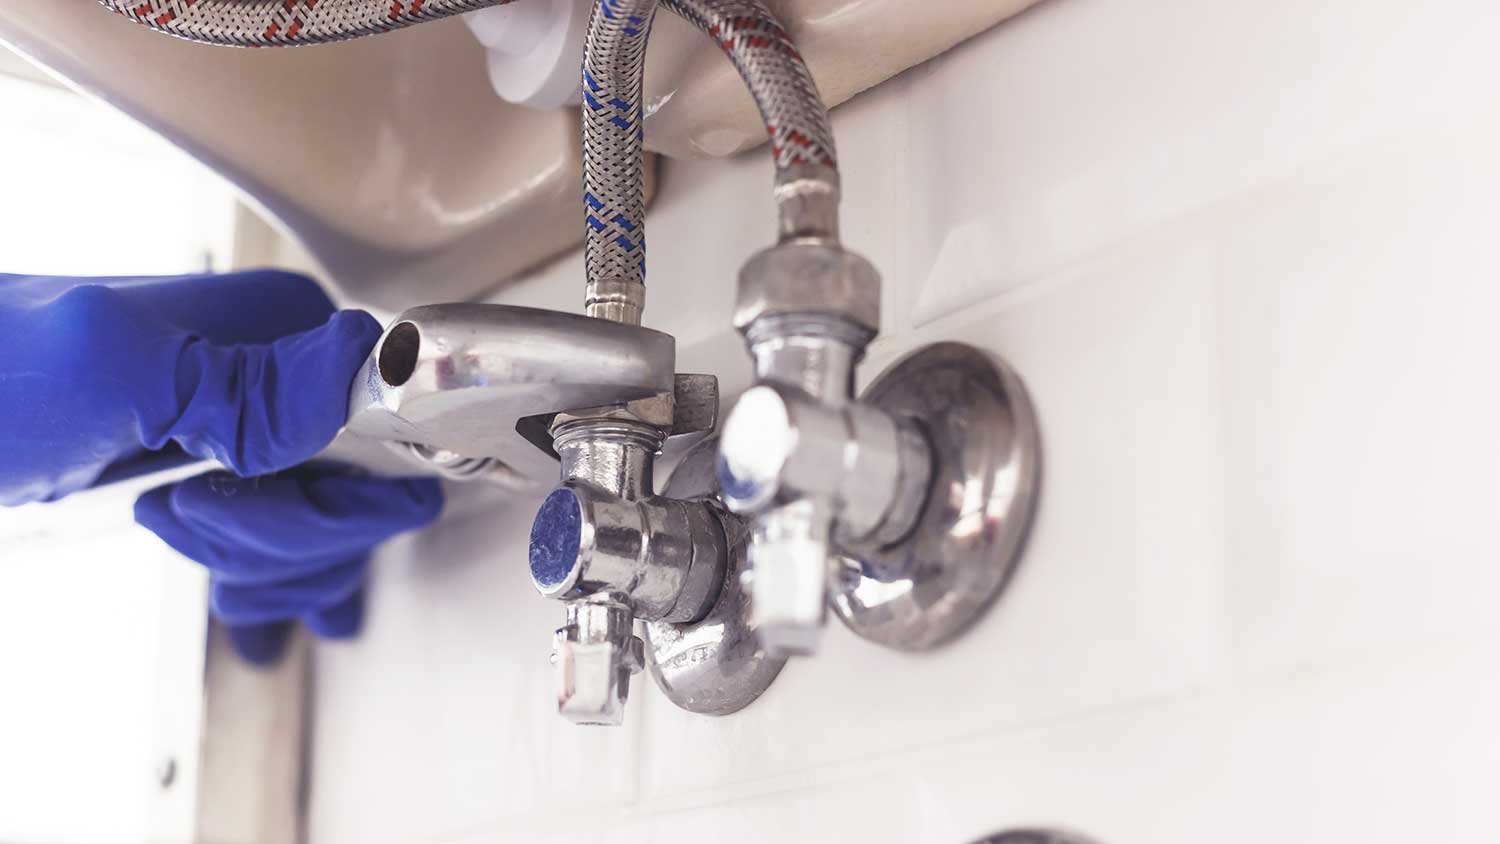
Loosening Connections
Start by loosening the nuts that connect the supply lines to the water valve and faucet. Use an adjustable wrench for this task.
Turn the wrench slowly to avoid damaging the fittings. Keep turning until the connection feels loose enough to remove by hand.
- Place a bucket under the valve to catch any water
- Use a cloth to protect the valve from scratches
- Turn the wrench counterclockwise to loosen
Handling Stubborn Fittings
Old fittings can be stuck due to rust or mineral buildup. Use penetrating oil to help loosen them.
Apply the oil and wait a few minutes. Then try to turn the fitting again with the wrench. Avoid using too much force to prevent damage.
- Spray penetrating oil on the fitting
- Wait 5 to 10 minutes for it to work
- Use a wrench to gently turn the fitting
- Try tapping the fitting lightly with a hammer if needed

Credit: www.amazon.com
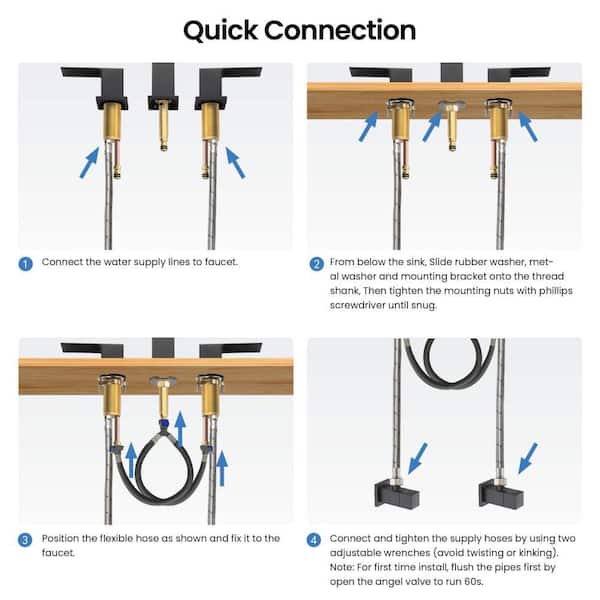
Installing New Supply Lines
Installing new bathroom supply lines is a simple task you can do yourself. It helps ensure water flows properly to your fixtures. You need the right tools and parts before starting.
Follow these instructions carefully to connect supply lines safely and securely. This guide covers connecting to the water valve and attaching to the fixture.
Connecting To Water Valve
First, turn off the main water supply to avoid leaks. Then, disconnect the old supply line from the shutoff valve. Check the valve threads for damage or dirt and clean if needed.
- Wrap plumber’s tape around the valve threads.
- Align the new supply line’s connector with the valve threads.
- Hand-tighten the connector to the valve.
- Use an adjustable wrench to tighten the connection securely.
- Do not overtighten to avoid damaging the valve or line.
Attaching To Fixture
Next, connect the other end of the supply line to the fixture. Make sure the fixture’s water inlet is clean and free from old tape or debris.
| Step | Action | Tip |
|---|---|---|
| 1 | Align supply line connector with fixture inlet. | Ensure a straight fit to avoid cross-threading. |
| 2 | Hand-tighten the connector onto the fixture. | Stop when resistance increases. |
| 3 | Use a wrench to secure connection. | Tighten gently to prevent damage. |
| 4 | Turn on the water supply slowly. | Check for leaks at both ends. |
Checking For Leaks
After installing bathroom supply lines, checking for leaks is important. Leaks can cause water damage and waste water.
Careful inspection helps find leaks early. Fixing leaks right away keeps your bathroom safe and dry.
Turning Water Back On
Turn the main water valve back on slowly. This prevents sudden pressure that can loosen connections.
Watch the supply lines carefully as water flows. Listen for any sounds of dripping or hissing.
- Open valves gently to avoid pressure shock
- Check for water flow in all connected fixtures
- Stop immediately if you see any leaks
Inspecting Connections
Look closely at all connection points on the supply lines. Use a flashlight if needed to see tight spaces.
Feel around the fittings with your hand for any wetness or moisture. Tighten any loose connections carefully.
- Check both ends of the supply lines
- Look for water drips or wet spots
- Tighten fittings with a wrench if loose
- Replace washers if leaks persist
Maintenance Tips
Bathroom supply lines need care to work well. Regular checks can stop leaks and damage. Simple maintenance keeps your plumbing safe and clean.
Learn how to spot problems early and know when to change your supply lines. These tips help avoid costly repairs later.
Regular Inspections
Check your supply lines every few months. Look for cracks, rust, or wet spots. Tighten loose connections carefully to stop drips.
- Feel the hoses for soft spots or bulges
- Look under the sink for water stains
- Listen for dripping sounds
- Check the fittings for rust or corrosion
- Make sure hoses are not kinked or twisted
When To Replace Supply Lines
Replace supply lines if you see damage or leaks. Old lines can burst and cause water damage. Change them every 5 years or sooner if needed.
| Condition | Action |
| Visible cracks or bulges | Replace immediately |
| Leaks or drips | Replace or tighten fittings |
| Rust or corrosion | Replace to prevent failure |
| Lines over 5 years old | Consider replacement |
| Kinks or twisted hoses | Straighten or replace |
Frequently Asked Questions
What Tools Do I Need To Install Bathroom Supply Lines?
You need an adjustable wrench, Teflon tape, and supply lines. A bucket and cloth help catch water drips. These tools ensure a smooth and leak-free installation.
How Long Does It Take To Install Bathroom Supply Lines?
Installing bathroom supply lines typically takes 30 to 60 minutes. Time varies based on experience and faucet type. Proper preparation speeds up the process.
Can I Install Supply Lines Without Shutting Off Water?
No, always shut off the main water valve before installation. This prevents leaks and water damage during the process. Safety first is crucial.
What Type Of Supply Lines Work Best For Bathrooms?
Flexible braided stainless steel lines are durable and easy to install. They resist corrosion and last longer than plastic lines. Choose sizes matching your faucet fittings.
Conclusion
Installing bathroom supply lines can be simple with the right steps. Always turn off the water before starting. Use proper tools to avoid leaks or damage. Check all connections carefully for tightness. Take your time and work safely. A well-installed supply line prevents water problems later.
This small task can save you money and stress. Follow the guide, and you will do fine. Ready to enjoy a properly working bathroom?