Are you ready to take control of your outdoor plumbing and save money on expensive repairs? Installing outdoor plumbing lines might sound tricky, but with the right steps, you can do it yourself with confidence.
Imagine having fresh water right where you need it—whether for your garden, outdoor kitchen, or washing your car. This guide will walk you through everything you need to know, making the process simple and stress-free. Keep reading, and you’ll discover how to install outdoor plumbing lines like a pro, avoiding common mistakes and ensuring your setup lasts for years.
Your next DIY success starts here!

Credit: www.familyhandyman.com
Planning Your Outdoor Plumbing
Installing outdoor plumbing lines needs careful planning. Good planning helps avoid problems later.
You should think about materials, layout, and local rules before starting the work.
Choosing The Right Materials
Select materials that last in outdoor weather. Pipes should resist sun, cold, and moisture.
Common choices include PVC, PEX, and copper. Each has benefits and costs.
- PVC:Affordable and easy to work with
- PEX:Flexible and resistant to freezing
- Copper:Durable but more expensive
Mapping The Layout
Draw a clear map of where pipes will go. Mark water sources and endpoints like faucets.
Plan pipe routes to avoid obstacles like trees and rocks. Keep pipes straight and short.
- Locate main water supply
- Mark all outdoor fixtures
- Avoid underground utilities
- Plan for easy access and repairs
Checking Local Codes
Local building codes control outdoor plumbing work. Follow rules to stay safe and legal.
Contact your city or county office to learn about permits and inspections.
- Permit requirements
- Depth and materials allowed
- Distance from property lines
- Inspection schedules
Credit: www.familyhandyman.com
Gathering Tools And Supplies
Installing outdoor plumbing lines needs the right tools and supplies. Getting these ready helps the work go smoothly.
This guide covers the essential tools and how to pick the right pipes and fittings.
Essential Tools
You need specific tools to install outdoor plumbing lines. These tools help cut, join, and secure pipes.
- Pipe cutter or hacksaw for cutting pipes
- Adjustable wrench for tightening fittings
- Measuring tape to measure pipe lengths
- Shovel for digging trenches
- Pipe deburring tool to smooth cut edges
- Pipe threader if using threaded pipes
- Teflon tape to seal threaded joints
- Level to ensure pipes slope correctly
Selecting Pipes And Fittings
Choose pipes and fittings based on water type and pressure. Outdoor lines often use durable materials to prevent damage.
Common pipe types include PVC, PEX, and copper. Each has benefits depending on your needs and budget.
| Pipe Type | Best Use | Notes |
|---|---|---|
| PVC | Cold water lines | Affordable and easy to cut |
| PEX | Flexible outdoor plumbing | Resists freezing and cracking |
| Copper | Durable and long-lasting | More expensive, needs soldering |
Pick fittings that match your pipe type and size. Common fittings include elbows, tees, and couplings.
Preparing The Site
Installing outdoor plumbing lines needs careful site preparation. This helps avoid problems during digging and pipe laying.
Good preparation makes the job safer and easier. Follow these steps before you start digging.
Marking The Path
Mark the exact path where the pipes will go. Use spray paint or flags to show the trench line clearly.
Check the path twice to avoid mistakes. This helps you plan the digging and pipe placement well.
- Choose the shortest, most direct route
- Avoid tree roots and large rocks
- Mark both ends and the middle of the path
Digging Trenches Safely
Dig trenches carefully to protect yourself and the pipes. Use the right tools and wear safety gear like gloves and boots.
Keep the trench walls stable to prevent collapse. Dig the trench wide and deep enough for the pipes and any insulation needed.
- Use a shovel or trenching tool
- Wear gloves, boots, and eye protection
- Keep soil away from trench edges
- Check trench depth matches pipe size
Avoiding Underground Utilities
Check for underground utilities like gas, electric, and water lines before digging. Hitting these can cause damage and danger.
Call your local utility location service to mark lines on your property. Respect their marks and keep a safe distance while digging.
- Contact utility companies before digging
- Wait for all utility lines to be marked
- Keep at least 12 inches away from marked lines
- Use hand tools near utility lines to avoid damage
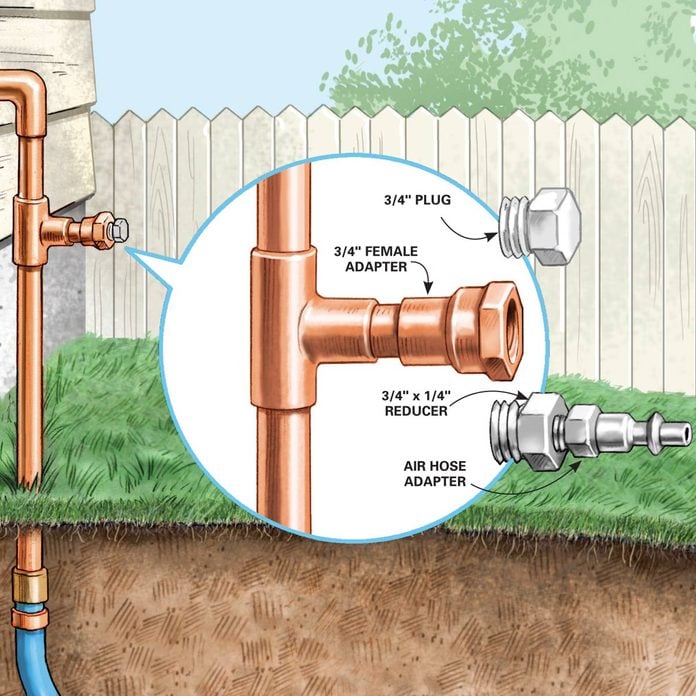
Installing The Pipes
Installing outdoor plumbing lines needs careful work to avoid leaks. You must follow proper steps to fit the pipes securely.
This guide covers cutting, connecting, sealing, and securing pipes for a strong outdoor plumbing system.
Cutting And Connecting Pipes
Start by measuring where the pipes will go. Use a pipe cutter or saw to make clean cuts. Make sure the edges are smooth to avoid leaks.
Fit the pipes together by pushing or threading them, depending on the pipe type. Check that connections are tight but do not force them too much.
- Use a pipe cutter for straight cuts
- Remove burrs with a deburring tool or sandpaper
- Dry fit pipes before gluing or sealing
- Align pipes properly to avoid stress on joints
Using Proper Sealants
Apply the right sealant to joints to stop water from leaking. Use pipe cement for PVC or ABS pipes. Use thread tape for threaded metal pipes.
Spread glue evenly on pipe ends and fittings. Hold the pipes together for a few seconds to set the bond. Do not touch the joint until it dries.
- Use PVC cement for plastic pipes
- Use Teflon tape on metal pipe threads
- Follow product instructions for drying time
- Wear gloves to protect your hands
Securing Pipes In Place
Secure pipes to prevent movement and damage. Use pipe straps, clamps, or hangers designed for outdoor use. Space them evenly along the pipe run.
Make sure pipes are above ground or buried with protection. Avoid sharp bends or pressure points that can cause breaks.
- Attach pipe straps every 3 to 4 feet
- Use anchors for buried pipes
- Keep pipes away from heavy foot traffic
- Allow slight pipe movement for temperature changes
Testing The System
After installing outdoor plumbing lines, testing the system is important. It ensures everything works well and is safe to use.
Testing helps find problems early so you can fix them before regular use.
Checking For Leaks
Check all joints and connections for leaks. Small leaks can cause big problems over time.
Turn on the water and watch for drips or wet spots around pipes and fittings.
- Look closely at pipe joints
- Feel for moisture on pipe surfaces
- Use a dry cloth to spot wet areas
- Check valves and faucets carefully
Ensuring Proper Water Flow
Make sure water flows smoothly through all outdoor lines. Slow flow may mean a blockage or wrong pipe size.
Open all faucets and valves to test the water pressure and flow rate.
- Open each faucet fully
- Check if water flows steadily
- Listen for strange noises in pipes
- Note any drops in water pressure
Finishing Touches
After installing outdoor plumbing lines, you need to complete some final steps. These steps help protect your pipes and keep everything secure.
Proper finishing ensures your plumbing works well for a long time without problems.
Backfilling Trenches
Backfilling means putting the soil back into the trench after laying the pipes. Do this carefully to avoid damage.
Fill the trench in layers and pack the soil gently. This supports the pipes and stops them from moving.
- Start by adding a few inches of soil over the pipes.
- Compact the soil lightly with your hands or a tool.
- Keep adding soil in small layers and compact each one.
- Do not use big rocks or sharp objects near the pipes.
- Finish by leveling the ground to match the surrounding area.
Protecting Pipes From Weather
Outdoor pipes face weather changes like cold, heat, and rain. Protecting them stops leaks and breaks.
Use insulation and covers to keep pipes safe from freezing and sun damage.
- Wrap pipes with foam insulation sleeves.
- Use waterproof tape or sealant on joints.
- Cover exposed pipes with weatherproof boxes or shields.
- Check pipes regularly for cracks or wear.

Credit: www.youtube.com
Frequently Asked Questions
How Deep Should Outdoor Plumbing Lines Be Buried?
Outdoor plumbing lines should be buried at least 18 to 24 inches deep. This prevents freezing and protects pipes from damage. Depth may vary by local codes and climate conditions. Always check local regulations before installation to ensure proper depth.
What Materials Are Best For Outdoor Plumbing Pipes?
PVC and PEX pipes are ideal for outdoor plumbing. They resist corrosion, are flexible, and easy to install. Copper pipes are durable but costlier and prone to freezing. Choose materials based on climate, budget, and water pressure needs.
How Do I Prevent Outdoor Pipes From Freezing?
Insulate outdoor pipes with foam sleeves or heat tape. Bury pipes below the frost line and seal any gaps in walls or foundations. Shut off and drain exterior faucets before winter to avoid freezing and bursting.
Can I Install Outdoor Plumbing Lines Myself?
Yes, with proper tools and knowledge, DIY installation is possible. Follow local codes, use correct materials, and ensure proper pipe slope for drainage. However, consider hiring a professional for complex systems or unfamiliar plumbing tasks.
Conclusion
Installing outdoor plumbing lines can seem challenging, but it’s manageable. Follow each step carefully. Use the right tools and materials. Safety should always be a priority. Check local regulations before starting your project. This ensures compliance and avoids future issues.
Consider professional help if needed. Proper installation prevents leaks and costly repairs. Regular maintenance keeps your system running smoothly. With patience and attention, you can successfully complete this task. Enjoy the benefits of your new outdoor plumbing. It adds convenience to your home and garden activities.