When you’re ready to cut wood, the first step is marking it correctly. If your marks are off, your cuts won’t be precise, and your project could suffer.
But don’t worry—marking wood for cutting doesn’t have to be tricky. With the right tools and simple techniques, you can make clear, accurate marks every time. You’ll discover easy ways to mark wood that save you time and frustration. Keep reading, and you’ll gain the confidence to start cutting with precision and ease.

Credit: www.wikihow.com
Choosing The Right Tools
Marking wood accurately helps you make clean and precise cuts. Using the right tools is key to good results.
This guide explains the types of marking tools, pencils, markers, and gauges you can use for woodwork.
Types Of Marking Tools
There are several tools for marking wood, each suited for different tasks. Common tools include pencils, markers, knives, and scribes.
- Pencils:Easy to use and erase, ideal for most woodworking.
- Markers:Show bold lines but may bleed on some wood types.
- Marking knives:Create thin, precise cuts in the wood surface.
- Scribes:Scratch lines into wood for high accuracy.
Selecting The Best Pencil Or Marker
Choosing the right pencil or marker depends on the wood type and the cut precision needed.
| Tool | Best For | Notes |
| Carpenter Pencil | Softwood and rough surfaces | Wide lead, easy to see lines |
| Mechanical Pencil | Hardwood and fine details | Thin, precise lines |
| Permanent Marker | Dark or oily wood | Bold lines, not erasable |
| Chalk Marker | Wet or dusty surfaces | Temporary and easy to clean |
Using Marking Gauges
A marking gauge helps you draw parallel lines to edges. It improves accuracy and repeatability in cuts.
- Set the gauge to the desired measurement.
- Hold it firmly against the wood edge.
- Slide the gauge along the edge to mark a straight line.
- Use a sharp marking knife or pencil with the gauge.
Preparing The Wood Surface
Marking wood for cutting requires a clean and smooth surface. Dirt and rough spots can cause mistakes. Preparing the wood helps you make clear, accurate lines.
This guide covers how to clean and smooth the wood and how to avoid surface damage before marking.
Cleaning And Smoothing
Start by removing dust, dirt, and grease. Use a dry cloth or a soft brush. For sticky spots, lightly dampen the cloth with water. Avoid soaking the wood.
- Use fine-grit sandpaper to smooth rough areas.
- Sand along the grain to avoid scratches.
- Wipe off sanding dust with a tack cloth.
- Check for knots or raised grain that may affect marking.
Avoiding Surface Damage
Protect the wood surface from dents and scratches before marking. Handle the wood gently and use soft tools. Avoid using metal objects that can leave marks.
| Do | Don’t |
| Use a soft pencil or marking knife | Use sharp or heavy tools that gouge |
| Place wood on a padded surface | Set wood on rough or hard surfaces |
| Keep the work area clean | Let debris build up on the wood |
| Store wood flat to avoid warping | Store wood leaning in tight spaces |
Measuring Accurately
Measuring wood correctly is key to cutting it the right size. Careful measuring helps avoid mistakes and wasted wood.
Use the right tools and methods to get exact measurements before marking your wood for cutting.
Using Tape Measures And Rulers
Tape measures and rulers are common tools for measuring wood. Choose one that fits the size of your wood piece.
Keep the tape or ruler straight and tight against the wood. Avoid bending it to get a true measurement.
- Place the tape or ruler at the edge of the wood.
- Read the measurement at the desired cut point.
- Note the measurement clearly before marking.
Marking Reference Points
Mark points clearly where you want to cut. Use a sharp pencil or marking tool for thin lines.
Mark from the same edge you measured from. This keeps your marks consistent and accurate.
- Make small marks at each measurement point.
- Draw a straight line between marks using a square or straight edge.
- Label marks if you have multiple cuts to avoid confusion.
Double-checking Measurements
Always check your measurements twice before cutting. This reduces errors and saves wood.
Measure from the same edge both times. Confirm your marks match the measurements exactly.
- Measure once and mark.
- Measure again to verify the mark.
- Fix any differences before cutting.
Marking Techniques For Precision
Marking wood accurately helps you make clean and precise cuts. Using the right techniques saves time and reduces mistakes.
Different tools and methods can guide your cutting lines. Good marking improves the overall quality of your woodworking project.
Drawing Straight Lines
Use a sharp pencil or marking knife to draw straight lines. Always keep your hand steady for a clear line.
Draw lines along a ruler or straight edge. This keeps your marks even and easy to follow when cutting.
- Place the ruler firmly on the wood surface
- Hold the pencil at a slight angle
- Draw the line slowly for accuracy
- Check the line for straightness before cutting
Using Squares And Angles
Squares help you mark perfect right angles on wood. They ensure your cuts fit together tightly.
Use a combination square or try square to check angles. Mark the wood along the square’s edge for best results.
- Place the square’s base flush against the wood edge
- Align the blade or ruler part where you want the cut
- Draw a line along the square’s edge to create a 90-degree mark
- For other angles, use an adjustable bevel square or protractor
Creating Cutting Guides
Cutting guides help you follow your marked lines easily. They improve your cutting speed and precision.
Clamp a straight piece of wood along your line to use as a guide. This keeps your saw steady and prevents slips.
- Secure the guide wood with clamps to avoid movement
- Make sure the guide is exactly on your cutting line
- Use the guide’s edge to guide your saw blade
- Check the guide’s position before each cut
Common Mistakes To Avoid
Marking wood for cutting needs care and attention. Mistakes can cause wrong cuts and waste material.
Knowing what to avoid helps you work faster and safer. Below are common errors and how to prevent them.
Misreading Measurements
Reading measurements wrong leads to cuts that do not fit or meet the project needs. Always double-check numbers and units.
- Use a clear tape measure or ruler.
- Note if measurements are in inches or centimeters.
- Measure twice before marking.
- Keep your eyes level with the scale to avoid parallax errors.
- Write down measurements immediately to avoid confusion.
Using Faded Or Incorrect Marks
Faded or wrong marks cause wrong cuts and material loss. Use a pencil that shows clearly and avoid smudging the lines.
| Common Marking Issues | Solutions |
| Light pencil marks | Use a sharp, dark pencil for better visibility |
| Smudged lines | Hold the pencil steady and avoid rubbing the mark |
| Wrong marking side | Mark the side that will be cut or shaped |
| Marks fade over time | Mark just before cutting and avoid handling the wood too much |
Not Securing The Wood Properly
Wood that moves while marking or cutting can cause mistakes. Use clamps or a stable surface to hold the wood in place.
Follow these tips to secure your wood:
- Use clamps to hold wood tight on the workbench.
- Check that the wood does not wobble before marking.
- Keep your hands clear of the cutting line for safety.
- Choose a flat and stable surface for better control.
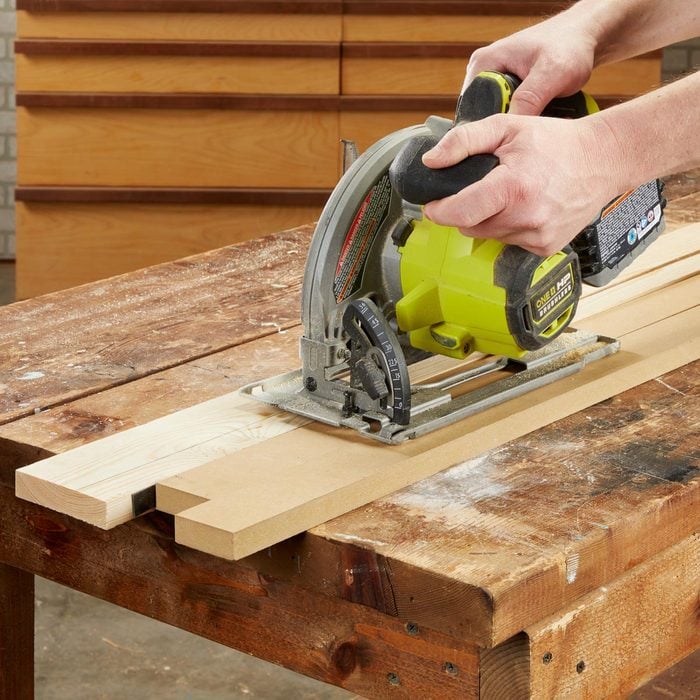
Credit: www.familyhandyman.com
Tips For Different Types Of Wood
Marking wood correctly is important for clean and accurate cuts. Different woods require different marking tools and methods. Knowing how to mark each type saves time and reduces mistakes.
Softwoods, hardwoods, veneers, and plywood all have unique textures and surfaces. This guide gives simple tips for marking each kind of wood before cutting.
Marking Softwoods
Softwoods like pine and cedar have softer surfaces that can dent easily. Use a sharp pencil or a fine-tipped marker to avoid smudging. Light pressure works best to keep marks clear but gentle.
- Use a sharp pencil for thin, precise lines.
- A mechanical pencil helps keep marks fine and clean.
- Try a marking knife for very sharp edges.
- Mark lightly to avoid pressing dents into the wood.
Marking Hardwoods
Hardwoods like oak and maple have dense surfaces that resist pencil marks. Use a harder pencil or a fine marker for visibility. A marking knife works well to score the surface for precise cuts.
| Tool | Best Use | Notes |
| Hard pencil (H or 2H) | Clear, sharp lines | Does not smudge easily |
| Fine permanent marker | Visible on dark woods | Use on unfinished wood only |
| Marking knife | Score precise cut lines | Helps guide saw blades |
Working With Veneers And Plywood
Veneers and plywood have thin, delicate surfaces. Avoid heavy pressure that can dent or tear the top layer. Use a light pencil or a sharp knife for scoring. Tape edges before marking to keep layers intact.
- Apply painter’s tape over the cut line to protect the surface.
- Use a sharp utility knife to score the cut line gently.
- Mark the tape lightly with a pencil or pen.
- Cut slowly to prevent splintering.
Maintaining Marking Tools
Keeping your marking tools in good shape helps you mark wood clearly. It makes your cutting work easier and more accurate.
Regular care of pencils and blades keeps them sharp and ready to use. This saves time and avoids mistakes.
Sharpening Pencils And Blades
Sharpen pencils often to keep the tip fine for precise lines. Use a sharpener made for carpenter pencils if possible.
Blades on marking knives or cutters must be sharp to cut clean lines. Replace or sharpen blades regularly for best results.
- Use a pencil sharpener or a small knife carefully
- Sharpen blades with a whetstone or blade sharpener
- Check blade edges before starting work
Cleaning Tools After Use
Clean your pencils and blades after each use to remove dust and wood particles. This keeps them working well for longer.
Wipe blades with a dry cloth and store tools in a dry place. Avoid moisture to stop rust and damage.
- Use a dry cloth to clean blades and pencil tips
- Remove wood dust from tool surfaces
- Store tools in a toolbox or case
- Keep tools away from damp areas

Credit: www.familyhandyman.com
Frequently Asked Questions
How Do I Mark Wood Accurately?
To mark wood accurately, use a reliable measuring tape or ruler. Ensure your tools are straight and stable. Mark your lines clearly with a sharp pencil or marking knife. Double-check measurements before marking. Consider using a square for precise right angles.
What Tools Are Best For Marking Wood?
The best tools for marking wood include a sharp pencil, marking knife, and a reliable measuring tape. A carpenter’s square or combination square is excellent for ensuring straight lines. For intricate work, consider a marking gauge for precision.
Can I Use Chalk To Mark Wood?
Yes, chalk can be used to mark wood temporarily. It’s ideal for rough or outdoor projects where precision isn’t critical. Chalk marks are easily removable, making them suitable for large-scale measurements. However, for precise work, a pencil or marking knife is recommended.
Why Is A Marking Knife Better Than A Pencil?
A marking knife is better because it creates precise, thin lines. These lines are more accurate than pencil marks and less prone to smudging. They also help guide saws more effectively. The knife’s incision can prevent wood tear-out during cutting, ensuring cleaner edges.
Conclusion
Marking wood clearly helps you cut with confidence and accuracy. Use the right tools and measure twice to avoid mistakes. Simple steps make your work easier and safer. Practice marking on scrap pieces before cutting real wood. This habit saves time and reduces waste.
Keep your lines straight and visible for the best results. With patience and care, your wood projects will look neat and professional. Remember, careful marking is the first step to a great finish.