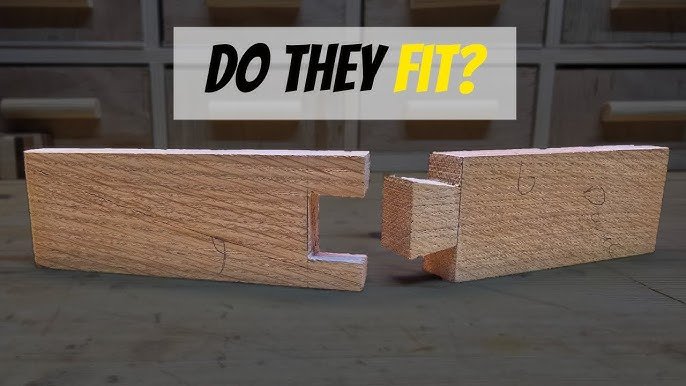
If you want to create strong, beautiful dovetail joints, the first step is marking your wood correctly. Getting this right can make all the difference between a perfect fit and a frustrating mess.
In this guide, you’ll learn simple, clear methods to mark your wood so your dovetail joints come out precise every time. Whether you’re new to woodworking or looking to sharpen your skills, these tips will save you time and help you build pieces you’ll be proud of.
Keep reading to discover how to mark wood for dovetail joints like a pro.
Choosing The Right Tools
Marking wood accurately is important for good dovetail joints. Using the right tools helps you make clear and precise marks. This guide explains the best tools to use for marking wood.
Choosing quality tools saves time and improves your woodworking results. Let’s look at the essential marking tools and how to use them well.
Essential Marking Tools
You need a few basic tools to mark wood for dovetail joints. These tools help you draw lines and measure parts accurately. The main tools include pencils, marking knives, marking gauges, and squares.
- Sharp marking knife for clean lines
- Marking gauge to measure consistent distances
- Try square or combination square for right angles
- Good pencils or markers for visible lines
Selecting Quality Pencils And Markers
Use pencils that make clear, thin lines. A sharp pencil point helps you mark precise lines without smudging. Mechanical pencils or hard graphite pencils work well for this.
Markers can make bold lines but may be too thick for fine work. Choose fine-tip markers if you want stronger lines. Avoid markers that bleed or run on wood surfaces.
- Hard graphite pencils (H or 2H) for fine lines
- Mechanical pencils for consistent sharpness
- Fine-tip permanent markers for dark lines
- Avoid soft pencils that smudge easily
Using Marking Gauges Effectively
Marking gauges help you measure and scribe parallel lines. They keep your marks consistent across all pieces. Adjust the gauge to the needed distance before marking.
Hold the gauge firmly and move it smoothly along the wood edge. A sharp marking pin or knife on the gauge creates a clean line. Check the gauge setting often for accuracy.
- Set gauge to the exact width needed
- Hold gauge firmly against wood edge
- Move the gauge smoothly without rocking
- Use a sharp pin or knife for clear scribing
- Double-check measurements before marking
Preparing The Wood
Marking wood for dovetail joints starts with good preparation. Proper wood preparation helps create tight, accurate joints.
Taking time to prepare wood pieces makes cutting and joining easier. It ensures your project looks clean and strong.
Selecting Suitable Wood Pieces
Choose wood with straight grain and no cracks. Avoid pieces with knots or warping as they weaken joints.
Use hardwoods like maple, cherry, or oak for strong dovetails. Softwoods can work but may not last as long.
- Straight grain wood is easier to cut
- Hardwoods provide better joint strength
- Avoid pieces with cracks or knots
- Check wood for flatness and stability
Surface Preparation Techniques
Start by planing the wood faces flat and smooth. This helps you mark clear lines for the dovetail cuts.
Use a sanding block or sandpaper to remove rough spots. Clean surfaces give better pencil or marking knife marks.
- Plane wood faces flat and square
- Sand surfaces smooth for clear markings
- Remove dust before marking lines
- Check edges for straightness
Ensuring Proper Wood Alignment
Align wood pieces so their edges meet perfectly. Good alignment helps make tight dovetail joints.
Use clamps or a flat surface to hold pieces steady while marking. This prevents mistakes from shifting wood.
- Match edges carefully before marking
- Use clamps to hold wood steady
- Check alignment from different angles
- Keep pieces flat on the workbench
Setting Up For Accuracy
Marking wood for dovetail joints needs precision. Setting up correctly helps you cut clean, tight joints. This guide covers the basics for accurate marking.
Focus on measuring, marking, and adjusting for your wood’s size. These steps ensure the pieces fit well together.
Measuring And Planning Layout
Start by measuring the wood carefully. Plan the layout of your dovetail joints before marking. Good planning saves time and wood.
- Use a ruler or a marking gauge for exact measurements.
- Decide the number of tails and pins to fit your project.
- Mark the overall length and width clearly on the wood.
- Double-check your measurements before moving on.
Marking Baselines And Reference Lines
Baselines and reference lines guide your cuts. Mark these lines firmly with a pencil or marking knife to avoid mistakes.
| Line Type | Purpose | Tool to Use |
| Baseline | Shows joint depth | Marking knife or pencil |
| Pin Line | Outlines pins on wood | Marking gauge |
| Tail Line | Outlines tails on wood | Square and pencil |
Adjusting For Wood Thickness
Wood thickness affects how your joints fit. Adjust your markings to match the exact thickness of each piece.
Follow these tips to adjust for thickness:
- Measure the thickness of each board with calipers.
- Mark the baseline at the same thickness depth on both boards.
- Account for any uneven surfaces by sanding or planing before marking.
- Use a marking gauge set to the board thickness for consistent lines.
Marking The Pins And Tails
Marking pins and tails is a key step in making dovetail joints. Clear marks guide your cuts for a tight fit.
Use precise tools and steady hands to mark the wood well. This helps avoid mistakes later.
Techniques For Marking Pins
Start by setting the baseline for the pins on the wood edge. This line shows the joint depth.
Use a marking gauge to draw the baseline evenly. Then, mark the pin layout with a pencil or knife.
- Use a marking knife for sharp, clear lines
- Draw pin outlines with a fine pencil
- Check measurements twice before marking
- Keep lines visible but thin
Approaches For Marking Tails
Tails usually have a wider shape than pins. Mark the tails on the matching board carefully.
Transfer the pin marks onto the tails board using a marking knife or pencil. Make sure the lines match perfectly.
- Use a sharp marking knife for clear edges
- Align boards firmly when transferring marks
- Mark the waste areas outside the tails
- Double-check the layout before cutting
Common Mistakes To Avoid
Marking errors can ruin a dovetail joint. Avoid these common mistakes for better results.
- Marking too lightly, causing unclear lines
- Mixing up pins and tails boards
- Not checking line depth with a gauge
- Rushing and making uneven marks
- Failing to transfer marks accurately
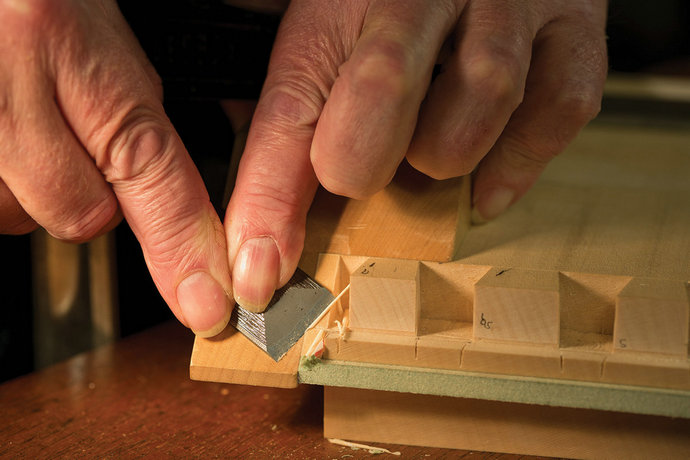
Using Templates And Jigs
Marking wood for dovetail joints needs precision and care. Templates and jigs help make this process easier and more accurate.
These tools guide your marking and cutting, saving time and reducing mistakes. They are helpful for both beginners and experienced woodworkers.
Benefits Of Templates
Templates give you a clear pattern to follow for each joint. They help keep the size and shape of your dovetails consistent.
- Save time by repeating the same design easily
- Reduce errors by using a fixed guide
- Improve the fit of the joint with precise markings
- Allow beginners to learn accurate layout techniques
Creating Custom Jigs
Custom jigs are made to match your specific dovetail style and wood size. You can build them using scrap wood or buy ready-made kits.
These jigs hold your wood steady and guide your marking tools. This helps you place pins and tails exactly where they belong.
- Measure your wood and joint dimensions carefully
- Cut base and fence pieces to hold the wood firmly
- Add marking guides that match your dovetail size
- Test the jig on scrap wood before use
Maintaining Consistency With Tools
Using the right tools keeps your dovetail marks consistent across many pieces. This leads to tight-fitting joints and a professional look.
| Tool | Purpose | Tip |
| Marking Gauge | Marks baseline for pins and tails | Set the gauge once and keep it steady |
| Dovetail Marker | Helps draw angled lines accurately | Use one with the angle that fits your joint style |
| Custom Jig | Holds wood and guides marking tools | Check alignment regularly for accuracy |
Credit: hoolnn.com
Tips For Enhancing Precision
Marking wood for dovetail joints needs careful attention. Small mistakes can cause poor fits.
Using good habits helps make your marks clear and exact. This saves time and material.
Double-checking Measurements
Measure twice before marking the wood. This reduces the chance of cutting errors.
Use reliable tools like a steel ruler or calipers for accuracy. Check your numbers carefully.
- Mark the measurement on both pieces of wood.
- Compare marks to your plans or templates.
- Re-measure if anything looks off.
Working In Controlled Lighting
Good lighting helps you see fine lines and details. Avoid shadows or glare on your work.
Use natural light or bright lamps that do not flicker. Position lights to shine evenly on the wood.
- Use a daylight bulb for true color visibility.
- Adjust your workspace to reduce reflections.
- Keep your eyes close to the wood when marking.
Keeping Tools Sharp And Clean
Sharp marking tools give clear and thin lines. Dull tools create thick or uneven marks.
Clean your pencils, knives, and marking gauges often. Remove dust and wood chips to keep marks precise.
- Sharpen pencils with a fine point.
- Wipe blades before each use.
- Store tools in a dry place to avoid rust.
Practice And Troubleshooting
Marking wood for dovetail joints takes skill and patience. Small mistakes can cause gaps or weak joints. Practicing helps you avoid these problems and improve your work.
This guide covers common challenges, how to fix errors, and ways to practice for better results. Use these tips to get more precise marks and stronger joints.
Common Challenges In Marking
Many woodworkers face similar problems when marking dovetail joints. These include uneven lines, unclear marks, and incorrect angles. These errors affect the fit and strength of the joint.
- Lines that are too thick or faint
- Marks that shift during cutting
- Wrong angles causing gaps
- Mixing up tails and pins
- Not marking enough reference points
Correcting Errors
Fixing mistakes quickly saves wood and time. Use these tips to correct common marking errors and keep your project on track.
| Error | Cause | Fix |
| Uneven lines | Dull pencil or poor pressure | Sharpen pencil and use steady hand |
| Shifted marks | Moving wood before marking | Clamp wood firmly before marking |
| Wrong angle | Incorrect bevel gauge setting | Check and adjust bevel gauge carefully |
| Confused tails and pins | No clear labeling | Label tails and pins before marking |
| Missing reference points | Rushing the marking process | Take time to mark all needed points |
Improving Skills Through Practice
Practice is the best way to get better. Use scrap wood and follow these tips for steady progress.
- Start by drawing simple lines with a sharp pencil.
- Use a bevel gauge to mark correct angles every time.
- Mark both tails and pins clearly on scrap pieces.
- Cut along your marks slowly and check the fit.
- Repeat the process until your joints fit snugly.

Credit: m.youtube.com

Credit: m.youtube.com
Frequently Asked Questions
What Tools Are Needed To Mark Wood For Dovetail Joints?
You need a marking gauge, dovetail marker, pencil, and square. These tools ensure precise lines and angles for accurate dovetail joints.
How Do You Measure And Mark Dovetail Angles Accurately?
Use a dovetail marker or protractor to set angles. Mark the tails first, then transfer measurements to pins for perfect fit.
Why Is Marking Wood Important For Dovetail Joints?
Accurate marking guides cutting, ensuring tight-fitting joints. It prevents mistakes, saves wood, and improves the joint’s strength and appearance.
Can Beginners Mark Wood For Dovetail Joints Easily?
Yes, with practice and proper tools, beginners can mark wood accurately. Starting with simple layouts builds confidence and skill over time.
Conclusion
Marking wood for dovetail joints seems complex but becomes simple with practice. Precision is key. A sharp pencil ensures clear lines. Remember, patience leads to better results. Take your time. Measure twice, mark once. Your efforts result in strong, beautiful joints.
Practice regularly to improve skills. Mistakes happen, learn from them. Soon, marking wood will feel like second nature. With practice, dovetail joints enhance your woodworking projects. Stay dedicated and enjoy the process. Happy woodworking!