
Do you often find yourself frustrated with joints that don’t fit quite right? Or perhaps you’re looking to elevate your woodworking skills to the next level?
Understanding how to mark wood for joinery is the secret sauce that can transform your projects from amateur to professional. This skill is crucial, ensuring each piece fits together seamlessly like a puzzle. Imagine the satisfaction of seeing your work come together perfectly, with no gaps or misalignments.
You’ll discover practical tips and techniques that make the marking process easy and precise. Stick around, because mastering this skill will not only boost your confidence but also impress anyone who sees your work. Let’s get started!
Essential Tools For Marking Wood
Marking wood accurately is key for precise joinery. Using the right tools helps create clean and clear lines.
This guide covers common marking tools that every woodworker should have.
Choosing The Right Pencil And Markers
Pencils and markers are basic tools for marking wood. Choose ones that suit your work type and wood surface.
- Carpenter pencils have a flat shape to prevent rolling and make bold lines.
- Mechanical pencils offer fine, consistent lines for detail work.
- Wax-based markers show up well on rough or oily surfaces.
- Chalk markers are easy to erase and good for temporary marks.
Using Marking Gauges And Squares
Marking gauges and squares help make straight, precise lines and measurements on wood.
| Tool | Purpose | Use Tip |
| Marking Gauge | Marks consistent distance from edge | Keep the fence tight to avoid slipping |
| Try Square | Checks and marks right angles | Press firmly against wood edge for accuracy |
| Combination Square | Measures and marks angles and depths | Adjust the ruler securely before marking |
Benefits Of Knife And Scratch Awl
Knives and scratch awls create fine, permanent lines. These marks guide saws and chisels well.
Knives cut slightly into the wood grain, reducing tear-out. Scratch awls score thin lines for layout.
- Use a sharp knife for clean, clear lines.
- Scratch awls are good for marking curves and small details.
- These tools last longer than pencils on rough wood.
- They help prevent errors during cutting and fitting.
Preparing Wood For Accurate Marking
Marking wood correctly is important for good joinery. Preparing the wood well helps you make precise marks.
Start by getting the surface ready. This makes it easier to see lines and measure accurately.
Cleaning And Smoothing The Surface
Remove dirt and dust from the wood surface before marking. Clean wood lets your pencil or knife mark clearly.
Smooth the surface using sandpaper or a plane. A flat surface helps lines stay straight and visible.
- Use a soft brush or cloth to clean the wood
- Sand with fine-grit sandpaper for a smooth finish
- Check for bumps or rough spots and smooth them out
Identifying Grain Direction
Look closely to find the wood grain direction. Grain runs along the length of the wood fibers.
Marking along the grain helps prevent splintering. It also improves the strength of the joints.
- Check the surface for lines or patterns showing grain
- Run your hand along the wood to feel the grain direction
- Plan your cuts and marks to follow the grain
Setting Reference Edges
Choose a straight edge on the wood as your reference point. This edge guides all your measurements.
Use a square or ruler to mark right angles from this edge. Consistent reference edges ensure accuracy in joinery.
- Find the straightest edge or face on the wood
- Use a try square to check for right angles
- Mark light guide lines from the reference edge
Techniques For Precise Marking
Marking wood carefully is key to making strong joints. Precise marks guide your cuts and fits. Using the right tools and methods saves time and reduces errors.
Learn how to measure, set layout lines, use combination squares, and transfer measurements. These steps help keep your joinery accurate and clean.
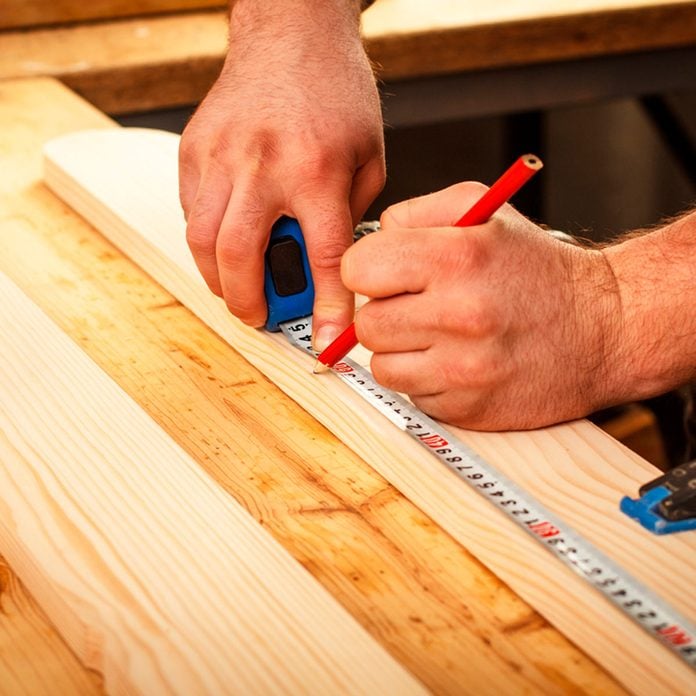
Measuring And Setting Layout Lines
Always measure twice before marking. Use a sharp pencil or marking knife for clear lines. Set layout lines from a fixed edge for consistent results.
- Use a steel ruler or tape measure for accuracy
- Hold the wood firmly to avoid movement
- Mark lightly at first, then darken lines if needed
- Check measurements against your plans
Using Combination Squares Effectively
A combination square helps mark perfect right angles and depth lines. Adjust the ruler to the needed length and lock it in place. Slide it along the wood edge to draw straight lines.
| Part | Use |
| Blade | Measure and mark lengths |
| Head | Set 90° or 45° angles |
| Level vial | Check horizontal or vertical alignment |
Transferring Measurements Accurately
Transferring measurements from one piece to another must be exact. Use a marking gauge or dividers to copy distances. Check your marks before cutting.
- Set the marking gauge to the desired width
- Run the gauge along the wood edge to scribe a line
- Use dividers to copy distances between points
- Compare marks on both pieces for matching
- Adjust marks if needed before cutting

Credit: www.youtube.com
Marking Different Types Of Joints
Marking wood correctly is important for good joinery. Each joint type needs different marks.
Clear marks help you cut and fit wood pieces well. Use the right tools for each joint.
Marking For Mortise And Tenon
Mortise and tenon joints fit together by one piece fitting into a hole in another. Mark the tenon on the end of one piece.
Mark the mortise as a matching hole on the other piece. Use a marking gauge to set the width and length. Use a pencil or knife to score the lines clearly.
- Set marking gauge to tenon thickness
- Mark tenon shoulders and cheeks
- Mark mortise edges using the tenon as a guide
- Score lines to avoid wood tear-out
Laying Out Dovetail Joints
Dovetail joints have interlocking tails and pins. Marking them needs careful layout for tight fit.
Start by marking the tails on one board. Use a dovetail marker or bevel gauge to get the angle. Transfer the tail marks to the pin board.
- Mark baseline with marking gauge
- Draw tail shapes on the end grain
- Cut tails first, then mark pins by fitting tails over the pin board
- Score all lines with a sharp knife
Preparing Lap And Butt Joints
Lap and butt joints are simple but need accurate marks. Lap joints overlap wood pieces, butt joints join edges or ends.
Mark the overlap or edge clearly. Use a square to draw straight lines. Mark depth and width for lap joints. For butt joints, mark the exact edges to align.
- Use a marking gauge for lap joint depth
- Mark edges with a try square
- Ensure lines are clear and visible
- Double-check measurements before cutting
Avoiding Common Marking Mistakes
Marking wood accurately is key for good joinery. Mistakes can cause poor fits and weak joints.
Learn simple ways to avoid common marking errors. These tips save time and improve your work.
Preventing Smudges And Inaccurate Lines
Smudges make your lines unclear and hard to follow. Use sharp pencils or marking knives for clean marks.
Keep your hands clean and dry to stop smudging. Mark wood on a stable surface to avoid slips.
- Use a sharp pencil or marking knife
- Mark on a flat, stable surface
- Keep hands clean and dry
- Make fine, clear lines
Double-checking Measurements
Always measure twice before marking. This reduces errors and wasted wood.
Check your marks against your plans. Confirm all measurements match before cutting.
- Measure twice before marking
- Compare marks with your plans
- Use a reliable measuring tool
- Mark the same spot from different angles
Maintaining Tool Calibration
Tools like squares and rulers must be accurate. Check them regularly for wear or damage.
Calibrate your tools to keep marks precise. Replace worn tools to avoid errors in your work.
- Inspect tools for damage before use
- Calibrate squares and rulers regularly
- Replace worn or bent tools
- Store tools properly to keep accuracy
Tips For Marking On Difficult Wood Surfaces
Marking wood accurately is important for good joinery. Some wood surfaces can be tricky to mark clearly. Rough, oily, dark, or dense wood needs special care for precise lines.
Use the right tools and tricks to make your marks stand out. This helps you cut and join wood pieces with confidence and accuracy.
Handling Rough Or Oily Wood
Rough wood has uneven surfaces that can break pencil tips. Oily wood can make marks fade or smudge. Clean the wood first to remove dirt and oil.
Use a sharp pencil or a marking knife for better results. A white pencil or chalk can show marks on oily wood better than regular pencils.
- Wipe wood with a clean cloth before marking
- Try a mechanical pencil for fine, sharp lines
- Use chalk for oily or very rough surfaces
- Mark gently to avoid breaking the tip on rough spots
Marking On Dark Or Dense Wood
Dark woods hide pencil marks easily. Dense wood can resist marks because of its hard surface. Use bright or contrasting colors to see your lines clearly.
A silver or white pencil works well on dark wood. You can also use colored markers that do not bleed or rub off easily.
- Choose pencils with light or bright colors
- Use fine-tip paint markers for precise lines
- Test your marking tool on a scrap piece first
- Work in good light to see marks better
Using Temporary Guides And Tapes
Temporary guides help keep marks straight and clear on tough surfaces. Masking tape can create a smooth area to mark on rough or oily wood.
Place tape along the line you want to mark. Then draw your lines on the tape. This keeps marks neat and easy to follow.
- Use painter’s tape for easy removal
- Apply tape smoothly without wrinkles
- Mark on the tape, not directly on wood
- Remove tape carefully after marking
Maintaining Marking Tools For Longevity
Marking tools are essential for accurate wood joinery. Keeping them in good shape helps you work better and saves money.
Regular care and simple fixes keep your tools sharp and reliable for many projects.
Sharpening And Storing Blades
Sharp blades make clear and precise marks on wood. Dull blades cause mistakes and rough lines.
Use a fine sharpening stone or blade sharpener to keep edges smooth. Store blades in a dry place to stop rust.
- Sharpen blades regularly with a sharpening stone
- Wipe blades dry after use to prevent rust
- Keep blades in a protective case or dry toolbox
Replacing Worn Pencils And Leads
Pencils and leads lose sharpness and break over time. This makes marking less clear and harder to read.
Replace worn pencils or refill leads often. Use hard leads for fine lines and softer leads for darker marks.
- Keep several pencils or leads ready for replacement
- Choose the right lead hardness for your project
- Sharpen pencil tips carefully for clean lines
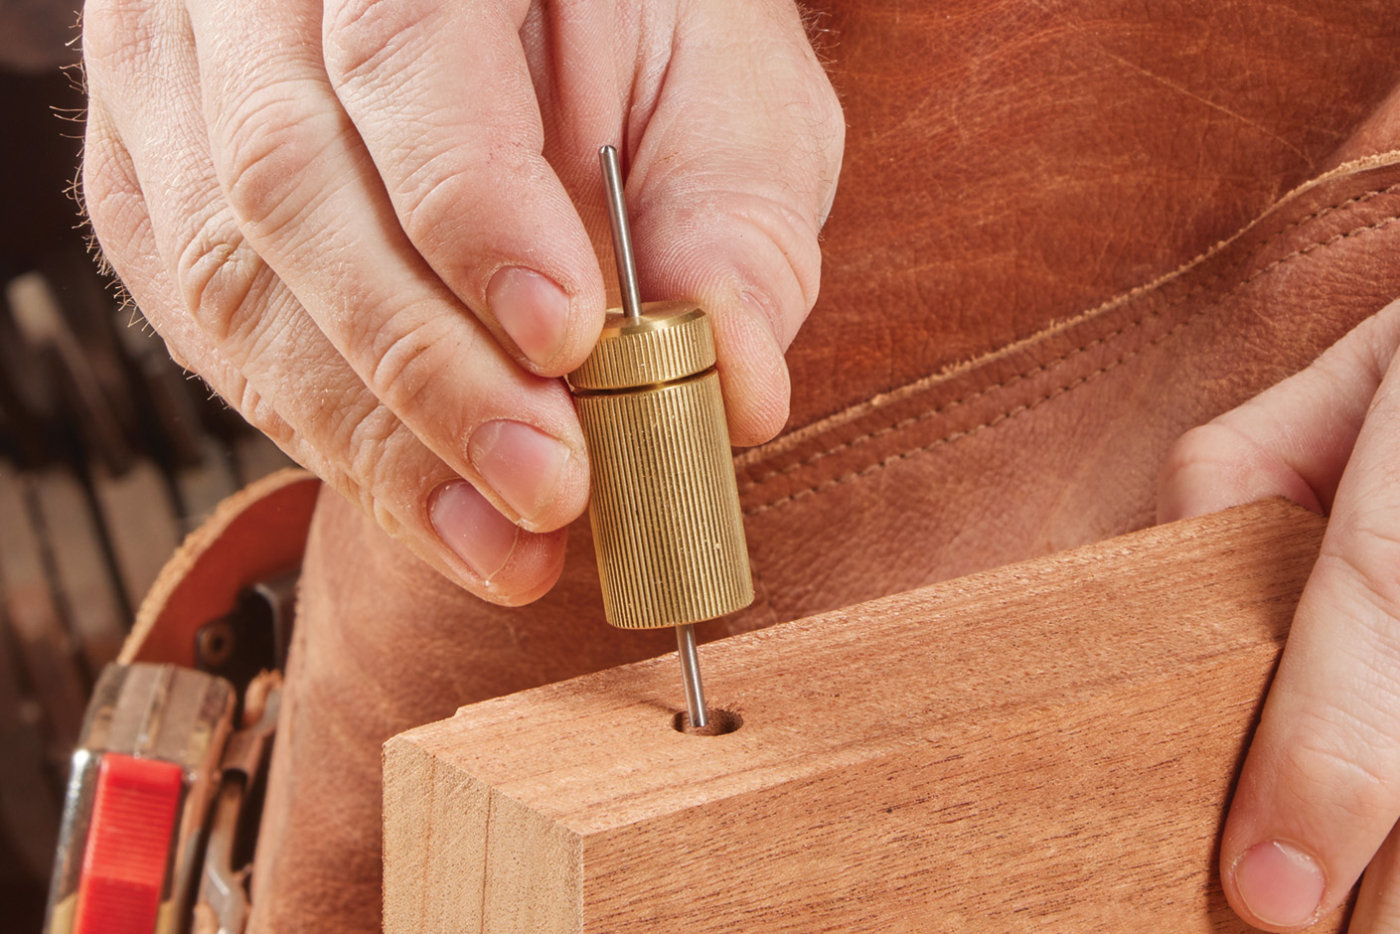
Cleaning And Adjusting Gauges
Marking gauges help you make even and repeatable lines. Dirt and dust can affect their accuracy.
Clean gauges after each use and check their settings. Tighten screws and adjust parts to keep marks precise.
- Wipe gauge surfaces clean with a dry cloth
- Check and tighten screws regularly
- Adjust the fence and pin for accurate marking
Credit: www.popularwoodworking.com
Credit: www.familyhandyman.com
Frequently Asked Questions
What Tools Are Essential For Marking Wood Accurately?
Essential tools include a marking gauge, pencil, try square, and marking knife. These tools ensure precise and clear joinery lines. Using quality tools improves accuracy and reduces measurement errors during joinery preparation.
How Do I Mark Wood For Different Joinery Types?
Marking varies by joint type: for dovetails, mark tails first; for mortise and tenon, mark shoulders and cheeks precisely. Clear, consistent markings guide accurate cuts and fitment, ensuring strong, clean joints.
Why Is Marking Wood Before Cutting Important?
Marking wood prevents mistakes by guiding cuts and measurements. It ensures joints fit perfectly and reduces material waste. Proper marking saves time and improves the quality of your woodworking project.
Can I Use Pencils Instead Of Marking Knives?
Pencils are common but less precise than marking knives. Marking knives create fine, exact lines that guide saws better. For clean joinery, knives are preferred, but pencils work for rough layouts.
Conclusion
Marking wood for joinery needs care and attention. Use clear lines and proper tools for best results. Take your time to measure twice and mark once. Clean, accurate marks help create strong joints. Practice makes your marking more precise and confident.
Good marking leads to better fitting wood pieces. Keep your workspace organized to avoid mistakes. This simple step improves your woodworking projects greatly.