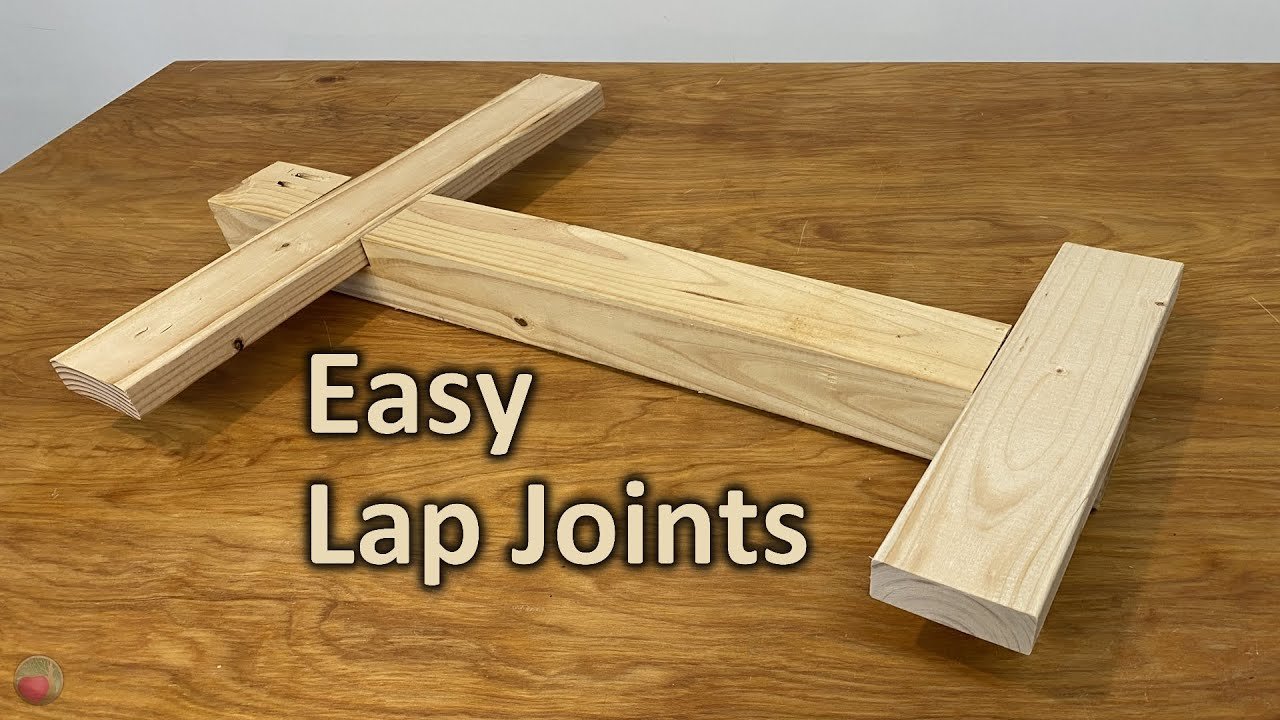
Are you tired of your woodworking projects not fitting together as seamlessly as you’d like? When it comes to creating precise lap joints, accuracy is key.
Imagine the satisfaction of perfectly aligned joints that enhance both the strength and appearance of your creations. In this guide, we’re diving into the essential techniques you need to mark wood for lap joints with pinpoint accuracy. By mastering these methods, you’ll transform your woodworking skills and take your projects to a whole new level.
Ready to achieve flawless joints every time? Let’s get started!
Choosing The Right Tools
Marking wood correctly is key for strong lap joints. Using the right tools helps you make accurate marks.
Good tools save time and reduce mistakes. This guide covers the best marking tools for lap joints.
Essential Marking Tools
A sharp pencil is basic for marking wood. Use a pencil with a fine tip for clear lines.
A marking knife makes thin, precise cuts on the wood surface. This helps guide saws or chisels.
- Sharp pencil for clear lines
- Marking knife for fine cuts
- Combination square for straight edges
- Try square for right angles
- Marking gauge for consistent lines
Benefits Of Precision Measuring Instruments
Precision measuring tools improve your marking accuracy. They help you measure and mark exact points.
Tools like calipers and rulers reduce guesswork. They ensure your lap joints fit tightly together.
- Measure wood thickness accurately
- Mark exact lengths and depths
- Ensure consistent joint dimensions
- Help avoid gaps or loose fits
Preparing The Wood Surface
Marking wood for lap joints needs a clean, smooth surface. This helps create clear, accurate lines.
Preparing the wood properly saves time and avoids mistakes during assembly.
Cleaning And Smoothing
Start by cleaning the wood to remove dirt and dust. Use a soft brush or cloth for this task.
Smooth the surface by sanding it lightly. Use fine-grit sandpaper to avoid scratches.
- Remove sawdust and debris with a brush
- Wipe the surface with a damp cloth
- Sand with 120 to 150 grit sandpaper
- Check for rough spots and smooth them
Avoiding Common Surface Issues
Wood surfaces may have knots, splinters, or uneven areas. These can cause inaccurate marks.
Inspect the wood carefully. Fix any problems before marking your lap joints.
- Fill small holes or cracks with wood filler
- Remove loose splinters with a knife or sandpaper
- Choose wood pieces without large knots for joints
- Ensure the surface is flat and even
Measuring Techniques For Lap Joints
Measuring wood for lap joints needs care and accuracy. A lap joint is where two pieces of wood overlap to create a strong connection.
Using the right tools helps mark the wood correctly. This guide shows how to measure and mark wood for lap joints.
Using A Combination Square
A combination square is a tool with a ruler and a movable head. It helps mark straight and even lines for lap joints.
To use it, set the ruler to the thickness of the wood. Place the head firmly against the wood edge. Draw a line along the ruler edge. This line shows where to cut the lap joint.
- Adjust the ruler to wood thickness
- Hold the head tight against the wood edge
- Draw a clear line along the ruler
- Repeat on all pieces for matching cuts
Marking With A Marking Gauge
A marking gauge has a sharp pin and a fence. It helps mark lines parallel to the edge of the wood. This is useful for lap joints.
Set the fence to the wood thickness. Hold the gauge so the fence rests on the wood edge. Slide the pin along the wood to make a clean mark. This line guides your cut for the joint.
- Set fence to match wood thickness
- Place fence firmly on wood edge
- Slide pin smoothly to mark the line
- Check marks before cutting
Marking Methods For Accuracy
Marking wood accurately is key for strong lap joints. Precise lines guide your cuts and fits. Choosing the right marking method helps you avoid mistakes and saves time.
This guide explains two marking methods. Learn how knife lines and pencil marks compare. Discover scribing for even finer precision.
Knife Lines Vs Pencil Marks
Knife lines cut into the wood surface, giving a clear edge to follow. Pencil marks sit on top and can smudge or fade. Each method has its use depending on the project and tools.
- Knife Lines:Offer precise cutting guides that don’t erase.
- Pencil Marks:Easy to apply but can blur or be removed.
- Durability:Knife lines last longer through sanding and handling.
- Visibility:Pencil marks are more visible on rough wood.
For lap joints, knife lines help you cut exactly on the edge. Pencil marks work if you plan to remove the marks later with sanding or finish.
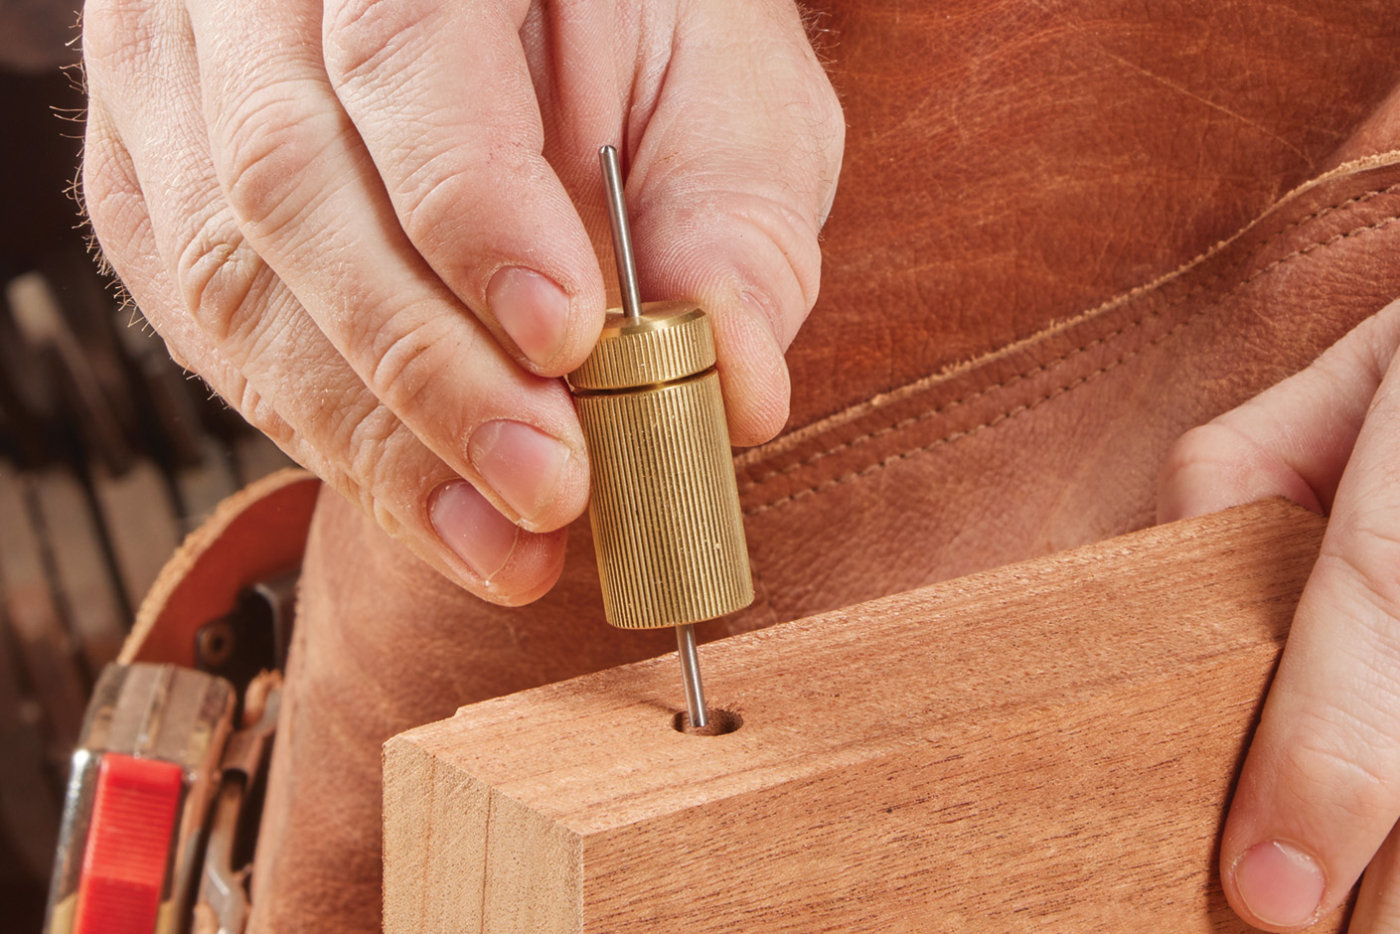
Scribing For Precision
Scribing transfers exact measurements from one piece of wood to another. It uses a marking gauge or a scriber tool to copy lines perfectly.
| Tool | Purpose | Benefit |
| Marking Gauge | Set distance from edge | Consistent, repeatable lines |
| Scriber | Trace exact joint lines | Highly precise fit |
| Knife | Score wood surface | Clear cutting guide |
Use scribing to mark matching lap joint parts. This reduces gaps and ensures tight joints. It is especially useful on uneven or irregular wood pieces.
Transferring Measurements Between Pieces
Making lap joints needs precise marking. Transferring measurements from one wood piece to another helps keep joints tight and accurate.
Careful transfer prevents gaps and weak joints. You can use simple tools to copy measurements exactly.
Using A Story Stick
A story stick is a flat piece of wood used to copy measurements. Mark the joint points on the stick instead of the wood directly.
Then press the story stick against the second wood piece to mark the same points. This avoids mistakes from measuring twice.
- Mark all joint locations on the story stick
- Hold the stick firmly against the wood edge
- Use a sharp pencil to mark points clearly
- Double-check marks before cutting
Employing Calipers For Consistency
Calipers measure the exact distance between two points. Use them to copy thickness or width between wood pieces.
Set the calipers on the first piece, then transfer the same measurement to the second. This keeps joint parts even and fitting well.
- Adjust calipers to match the first piece
- Lock the calipers to keep the size
- Mark the measurement on the second piece
- Repeat for all needed points

Credit: www.reddit.com
Common Mistakes To Avoid
Marking wood for lap joints needs careful attention. Small errors can cause poor fits and weak joints.
Avoiding common mistakes helps make your lap joints accurate and strong. Focus on proper marking techniques.
Misalignment Issues
Misalignment happens when marks do not match the cutting lines on both wood pieces. This causes gaps or uneven joints.
Check your marks carefully before cutting. Use a square tool to keep lines straight and aligned on both boards.
- Always double-check measurements on both pieces
- Use a marking gauge for consistent lines
- Keep the wood firmly clamped when marking
- Verify alignment with a try-square
Inconsistent Marking Depth
Marking depth varies when you press too hard or too light with your pencil or knife. This can confuse your cutting depth.
Keep your marking tool pressure steady. Use shallow marks to guide cutting, not deep cuts that affect the wood.
- Use a sharp pencil for clear but light lines
- Avoid deep scratches that mislead the saw blade
- Practice steady hand pressure when marking
- Test your marks on scrap wood first
Tips For Checking Accuracy Before Cutting
Marking wood for lap joints takes care and attention. Checking accuracy before cutting saves wood and effort.
Use simple methods to make sure your marks and cuts will fit well. This guide covers two key tips.
Dry Fitting The Joint
Dry fitting means putting the joint parts together without glue. It checks if the marks and cuts match.
- Cut the wood pieces roughly along your marks.
- Fit the pieces together without forcing them.
- Look for gaps or tight spots in the joint.
- Mark any problem areas for correction.
- Adjust your marks or cuts as needed before final cutting.
Using Clamps To Test Alignment
Clamps hold the joint tightly to test if parts align well. This helps check if your marks are accurate.
| Clamp Type | Use | Check |
| Bar Clamp | Hold long pieces together | See if joint edges line up |
| C-Clamp | Apply pressure on small areas | Test if joint fits without gaps |
| Corner Clamp | Keep pieces at right angles | Verify proper square alignment |

Credit: www.reddit.com
Credit: www.popularwoodworking.com
Frequently Asked Questions
How Do I Measure Wood For Lap Joints Precisely?
Use a ruler or caliper to measure wood thickness accurately. Mark the joint lines with a sharp pencil for clear visibility. Double-check measurements before cutting to ensure precision and avoid errors.
What Tools Are Best For Marking Lap Joints?
A combination square and marking knife work best for lap joints. They help create straight, fine lines that guide your cuts. Avoid thick pencils to maintain accuracy in marking.
How Can I Ensure Lap Joint Marks Align Perfectly?
Use a marking gauge set to the wood’s thickness for consistent lines. Transfer marks from one piece to another using a square. This ensures both pieces fit tightly without gaps.
Why Is Accurate Marking Important For Lap Joints?
Accurate marking guarantees a strong, tight joint and improves the wood’s structural integrity. It prevents gaps and misalignment, leading to a cleaner, professional finish.
Conclusion
Marking wood for lap joints takes care and attention. Use clear lines and measure twice before cutting. Simple tools like a pencil, square, and ruler work best. Accurate marks help pieces fit tightly and hold strong. Practice these steps to improve your skills.
Good marking leads to better woodworking results. Keep your workspace clean and well-lit for best accuracy. Small details make a big difference in your project. Take your time and enjoy the process.
