When it comes to woodworking, getting your measurements right can make all the difference between a perfect fit and a frustrating mistake. If you want your projects to look professional and save time and materials, learning how to measure and mark wood accurately is a skill you can’t afford to skip.
You’ll discover simple yet powerful techniques that will boost your confidence and precision every time you pick up your tools. Ready to stop guessing and start creating with exactness? Keep reading, because mastering these tips will change the way you work with wood forever.
Choosing The Right Tools
Measuring and marking wood accurately is key to good woodworking. Using the right tools helps you cut and join wood with precision.
Choosing tools designed for accuracy saves time and reduces mistakes. This guide covers essential measuring and marking tools.
Essential Measuring Tools
Good measuring tools give you exact dimensions. Tape measures, rulers, and squares are common choices for woodwork.
- Tape Measure:Use one with clear markings. It helps measure long pieces of wood.
- Combination Square:This tool checks angles and measures short distances.
- Steel Ruler:A rigid ruler offers precise straight-edge measurements.
- Caliper:Useful for measuring thickness and small parts accurately.
Marking Tools For Precision
Marking tools show where to cut or drill. Sharp and clear marks prevent errors during work.
| Tool | Purpose | Tip |
| Marking Knife | Creates fine, thin lines | Use sharp blades for clean marks |
| Pencil | Draws visible guide lines | Use a hard pencil (2H) for fine lines |
| Scratch Awl | Scratches wood surface for exact points | Press lightly to avoid deep gouges |
| Marking Gauge | Marks consistent lines parallel to edges | Set carefully to match measurements |

Credit: www.familyhandyman.com
Preparing The Wood Surface
Accurate wood measurement starts with a clean and smooth surface. Dirt and roughness can cause wrong markings. Preparing the wood well helps you get better results.
Securing the wood is also important. If the wood moves, your marks will be off. Holding the wood steady makes measuring easier and precise.
Cleaning And Smoothing
Remove dust and dirt before measuring. Use a soft brush or cloth to wipe the surface. Sand the wood if it feels rough or has splinters.
- Start with medium-grit sandpaper to smooth rough areas
- Use fine-grit sandpaper for a smooth finish
- Wipe the dust off after sanding
- Check for knots or cracks that may affect your marks
Securing The Wood
Keep the wood stable to avoid errors. Clamps hold the wood in place. A flat surface prevents wobbling during marking.
| Tool | Purpose |
| Clamps | Hold wood steady |
| Workbench | Flat, stable surface |
| Non-slip pads | Prevent wood from sliding |
Measuring Techniques
Measuring wood accurately is important for any woodworking project. Good measuring helps you cut and fit pieces correctly.
Using the right tools and methods improves your accuracy and saves materials from waste.
Using Tape Measures Effectively
Hold the tape measure tight against the wood edge. Make sure it is straight and not twisted.
Read the tape at eye level to avoid mistakes. Mark the wood clearly with a pencil at the exact measurement.
- Lock the tape to keep it from moving
- Use the tape’s hook for outside or inside measurements
- Double-check measurements before marking
- Measure twice, cut once to reduce errors
Calipers And Squares For Accuracy
Calipers measure small distances and thicknesses precisely. They help check wood size before cutting.
Squares help mark perfect 90-degree angles. They ensure corners and edges are straight and even.
- Use calipers for fine measurements under 1 inch
- Place squares firmly against edges to mark lines
- Check for gaps when placing squares to avoid errors
- Use both tools to confirm measurements for better results
Marking Methods
Measuring and marking wood are key skills for good woodworking. Accurate marks help cuts and joints fit well. Choosing the right marking method depends on the task and tools.
This guide covers two common marking methods: pencil marks and marking gauges. Each has strengths for different projects.
Pencil Marks And Alternatives
Pencil marks are the easiest way to mark wood. Most woodworkers use a sharp pencil to draw lines or points. Pencil marks are visible and easy to erase or sand off.
- Use a sharp pencil or mechanical pencil for fine lines.
- Try colored pencils for better contrast on dark wood.
- Chalk can mark rough or dusty surfaces clearly.
- Wax pencils resist moisture and work well outdoors.
- Mark lines lightly to avoid deep grooves in the wood.
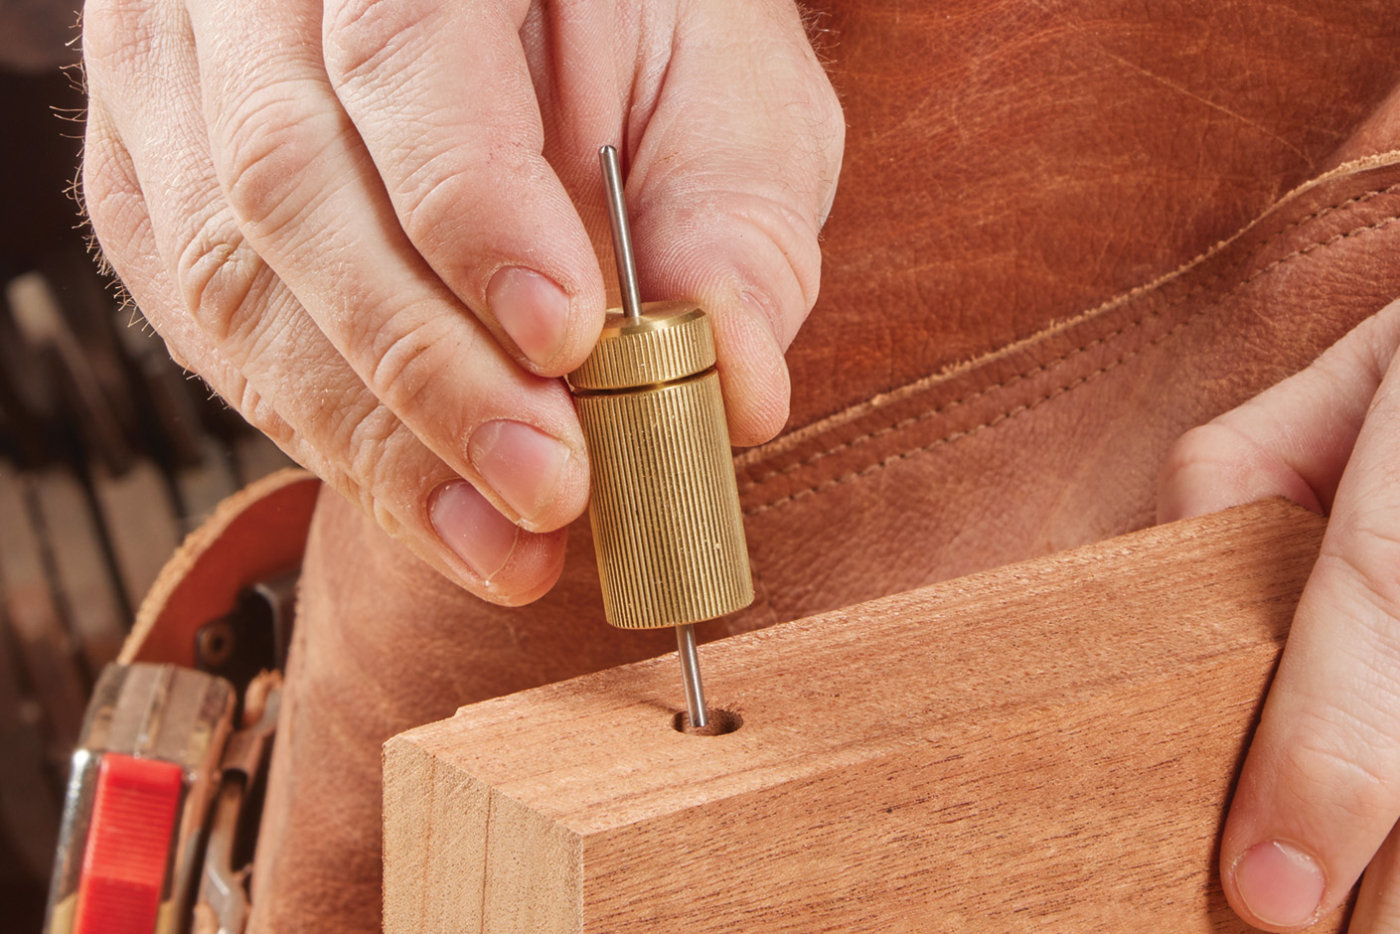
Using Marking Gauges
Marking gauges help make precise lines parallel to an edge. They use a sharp pin or blade to scribe a line. This method offers more accuracy than pencil marks.
| Part | Function |
| Beam | Holds the scale and pin |
| Pin or Blade | Scribes the wood surface |
| Headstock | Locks the beam in place |
| Thumb Screw | Adjusts and tightens the gauge |
To use, set the gauge to the desired distance from the edge. Lock the headstock. Then, drag the pin along the wood edge. This leaves a clear, thin line for cutting or chiseling.
Tips For Consistent Marking
Measuring and marking wood accurately is key to good woodworking. Small errors can cause big problems later.
Use clear methods to keep your marks precise and consistent. This helps your project fit together well.
Double-checking Measurements
Always check your measurements twice before marking the wood. This reduces mistakes and saves wood.
- Measure the length carefully with a reliable tape or ruler.
- Mark the point lightly with a pencil.
- Measure again from the start to the marked point.
- If both measurements match, make a clear, firm mark.
- Repeat this for every important measurement.
Maintaining Steady Hands
Steady hands help make clean, straight marks. Unsteady hands cause uneven lines and errors.
- Hold the pencil close to the tip for better control.
- Rest your hand or wrist on a solid surface.
- Use slow, deliberate strokes instead of fast ones.
- Keep your workpiece clamped or stable to avoid movement.
Credit: www.popularwoodworking.com
Common Mistakes To Avoid
Measuring and marking wood correctly is key for a good project. Many people make errors that cause problems later. Avoiding common mistakes saves time and materials.
Below are two frequent mistakes to watch for. Learning about these will help you improve your woodworking skills and results.
Misreading Measurements
One common mistake is reading the tape measure or ruler wrong. This can happen if you rush or do not look closely. Even small errors add up and ruin your cuts.
- Check the measuring tool for clear markings.
- Double-check the number you read before marking.
- Use a magnifier if the numbers are small or hard to see.
- Measure twice to avoid mistakes.
- Make sure you start measuring from the correct point, not the end of the tool if it has a hook.
Marking On Uneven Surfaces
Marking on curved or rough wood can cause inaccurate lines. The pencil or marker may slip or not touch the wood evenly. This leads to crooked cuts and wasted wood.
| Problem | Effect | How to Fix |
|---|---|---|
| Wood surface uneven | Mark slips or curves | Use a straightedge or clamp a guide |
| Rough surface | Mark unclear or broken | Sand the area lightly before marking |
| Using thick marker | Line too wide | Use a sharp pencil for fine lines |
Advanced Techniques
Measuring and marking wood with precision is key for good woodworking. Advanced methods improve accuracy and save time.
Using special tools and techniques helps transfer measurements and create guides. This reduces errors and ensures repeatability.
Transferring Measurements
Transferring measurements from one piece of wood to another requires care. Use tools like calipers, dividers, or marking knives.
- Use a marking knife to scribe lines for sharper edges.
- Calipers help copy exact distances between points.
- Dividers transfer measurements by setting a span and marking it.
- Check measurements twice before cutting or drilling.
Using Templates And Jigs
Templates and jigs guide your tools for consistent shapes and sizes. They speed up repetitive tasks with high precision.
| Type | Purpose | Material |
| Template | Copy shapes or curves | Thin plywood or MDF |
| Router Jig | Guide router for edges or joinery | Hardwood or plastic |
| Drill Jig | Position holes accurately | Metal or wood |
| Marking Gauge | Mark parallel lines | Wood or metal |
Credit: medium.com
Frequently Asked Questions
How Do I Measure Wood Accurately For Cutting?
Use a reliable tape measure or ruler. Mark measurements clearly with a sharp pencil. Double-check your marks before cutting to avoid mistakes.
What Tools Help Mark Wood Precisely?
Use a marking knife or sharp pencil for fine lines. A combination square ensures straight, accurate marks on wood surfaces.
How To Avoid Measurement Errors In Woodworking?
Always measure twice and mark once. Use consistent units and stable measuring tools. Work in good light to see marks clearly.
Why Is Marking Wood Important Before Cutting?
Marking guides your cuts and ensures pieces fit properly. It reduces waste and improves overall project accuracy and quality.
Conclusion
Accurate wood measurement and marking enhance your woodworking projects. Simple tools like rulers and squares ensure precision. Double-check your measurements to avoid errors. Measure twice, cut once. Consistency in marking leads to better outcomes. A clear plan saves time and materials.
Practicing these methods improves your skills over time. Woodworking becomes more enjoyable and rewarding with accuracy. Take your time and focus on each step. Accuracy builds confidence and satisfaction in your work. Keep refining your techniques for better results. Happy woodworking!