Are you tired of your DIY projects falling short due to inaccurate angle cuts? You’re not alone.
Whether you’re crafting a new piece of furniture or installing kitchen cabinets, precision is key. The difference between a professional-looking finish and a frustrating redo often lies in how accurately you measure your angles before cutting. Imagine the satisfaction of perfect cuts every time, saving you both time and materials.
In this guide, we’ll unveil the secrets to mastering angle measurements with confidence and ease. Get ready to transform your projects from mediocre to masterpiece. Let’s dive into the art of measuring angles accurately, ensuring your next cut is your best cut yet.

Credit: www.familyhandyman.com
Essential Tools For Angle Measurement
Measuring angles accurately is important for precise cutting. Using the right tools helps you get the correct angle every time.
Many tools can measure angles. Each tool has a special use depending on the job and material.
Types Of Protractors
Protractors are common tools for measuring angles. They come in different types for various tasks.
A simple protractor has a half-circle shape with degree markings. It measures angles up to 180 degrees.
- Half-circle protractor: Good for basic angle measurement.
- Full-circle protractor: Measures 360-degree angles.
- Adjustable protractor: Has a movable arm for transferring angles.
Using Combination Squares
Combination squares are multi-use tools. They measure angles and check straight edges.
This tool has a ruler and an adjustable head. You can set it to 90 or 45 degrees easily.
- Use the ruler to measure length.
- Adjust the head to check angles.
- Great for marking and verifying cuts.
Digital Angle Finders
Digital angle finders show angles on a screen. They are easy to read and very precise.
These tools can measure angles quickly. They often have a lock to hold the angle for transfer.
- Provides digital readout of the angle.
- Can measure both internal and external angles.
- Useful for complex or awkward cuts.
Bevel Gauges And Their Uses
Bevel gauges, or sliding bevels, measure and transfer angles. They have an adjustable blade.
You can set the blade to any angle and lock it. Then use it to mark or check the angle on your workpiece.
- Adjustable blade for any angle measurement.
- Locks in place for easy transfer.
- Ideal for copying angles from one piece to another.
Preparing For Accurate Angle Measurement
Measuring angles accurately is important for clean and precise cuts. Good preparation helps you avoid mistakes.
Before cutting, prepare your workspace and tools carefully. This makes angle measurement easier and more exact.
Choosing The Right Surface
Pick a flat and stable surface to measure angles. Uneven surfaces can change your angle readings.
Use a workbench or table that does not move. Make sure it is clean and free of debris.
Calibrating Your Tools
Check your measuring tools before use. Tools like protractors or angle finders must be accurate.
Reset or zero your tools if needed. This step ensures your tool shows the correct angle.
- Inspect tools for damage or wear
- Use a known angle to test accuracy
- Adjust settings on digital tools
Marking Reference Points
Mark clear reference points on your material. These points guide your measurements and cuts.
Use a pencil or fine marker to make small, visible marks. Avoid thick lines that can cause errors.
- Mark the starting edge of the cut
- Note the angle point clearly
- Double-check marks before measuring
Techniques For Measuring Angles Precisely
Cutting materials at the right angle is important for a clean finish. Accurate angle measurement helps avoid mistakes and waste. Using the right tools and methods improves your results.
This guide covers three key techniques to measure angles correctly. Follow these steps to ensure your cuts are precise and fit well.
Aligning Tools Correctly
Place your protractor or angle finder firmly on the surface before measuring. Make sure it does not move while you read the angle. Proper alignment reduces reading errors.
- Clean the surface to remove dirt or dust
- Hold the tool steady and flat
- Use clamps if needed to keep the tool in place
- Check that the tool’s zero mark lines up with the edge
Reading Measurements Accurately
Look directly over the angle scale to avoid parallax errors. Read the measurement at eye level. Use clear markings for better precision.
| Tool | Accuracy | Tip |
| Protractor | ±1° | Line up zero correctly |
| Angle Finder | ±0.5° | Hold steady during reading |
| Digital Angle Gauge | ±0.1° | Calibrate before use |
Double Checking Angles
Always measure twice before cutting. This reduces mistakes and material waste. Check your angle from different points to confirm accuracy.
- Measure the angle and note the reading
- Reposition the tool and measure again
- Compare both readings for consistency
- If different, measure a third time for confirmation
Cutting With Measured Angles
Cutting angles correctly is important for many projects. Accurate angle cuts help pieces fit well together.
Measuring and cutting angles carefully saves time and material. It also makes your work look professional.
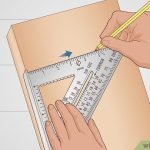
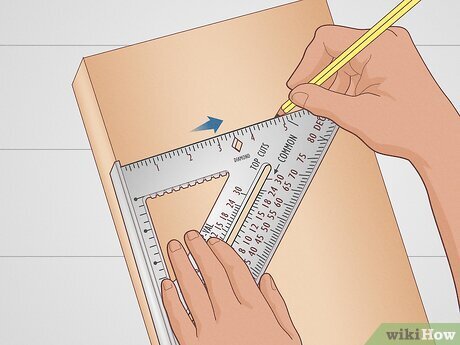
Transferring Angles To Material
First, measure the angle you need to cut. Use a protractor or angle finder for this task.
Mark the angle clearly on your material. Use a pencil and straight edge to draw the cutting line.
- Place the angle tool on the material edge
- Draw a line along the tool’s edge
- Double-check the angle before cutting
Setting Up Saws For Angle Cuts
Adjust your saw blade to match the angle you marked. Most saws have an angle gauge for this.
Secure the material firmly to avoid movement. Use clamps or a stable work surface for safety.
- Set the saw blade to the correct angle
- Check blade alignment before starting
- Clamp the material tightly to the workbench
Common Cutting Mistakes To Avoid
Cutting angles can be tricky. Some mistakes cause poor fits and wasted material.
Watch out for these errors to improve your cuts and save time.
- Not measuring the angle twice before cutting
- Failing to secure the material firmly
- Using a dull or wrong blade for the material
- Cutting too fast, causing rough edges
- Ignoring saw blade alignment and angle settings
Advanced Tips For Complex Angles
Cutting complex angles accurately requires special techniques and tools. These tips help you measure and cut angles with precision.
Understanding how to handle compound angles, use digital tools, and adjust for material thickness will improve your cutting results.
Measuring Compound Angles
Compound angles have two tilt directions: bevel and miter. Measuring these angles needs careful setup and calculation.
- Use a protractor or angle finder to measure the bevel angle on your saw.
- Measure the miter angle on your workpiece or saw table.
- Mark the angles clearly on your material before cutting.
- Double-check both angles with a square or angle gauge.
- Practice cuts on scrap wood to verify measurements.
Using Digital Tools For Precision
Digital angle finders and laser measuring tools increase accuracy. They help you read and transfer angles quickly.
| Tool | Purpose | Benefit |
| Digital Angle Finder | Measures angles between surfaces | Shows angle in degrees instantly |
| Laser Distance Measurer | Measures length and helps calculate angles | Reduces human error in measurements |
| Digital Protractor | Measures miter and bevel angles | Improves cutting precision |
Adjusting For Material Thickness
Material thickness affects angle cuts, especially on thick wood or metal. You must adjust your saw settings accordingly.
Follow these tips to adjust for thickness:
- Measure the thickness with a caliper or ruler.
- Set the saw blade height to match thickness plus a small margin.
- Account for saw blade kerf in your measurements.
- Cut a test piece to check fit and angle accuracy.
- Make small adjustments to bevel and miter angles if needed.

Credit: www.wikihow.com
Maintaining And Storing Measurement Tools
To cut angles accurately, keep your measuring tools in good shape. Proper care helps tools last longer and stay precise.
This guide covers cleaning, storage, and when to replace your tools for the best results.
Cleaning And Calibration
Clean your tools after each use to remove dust and debris. Dirt can cause wrong readings or damage the tool.
Calibrate tools regularly to keep measurements accurate. Use a known angle or calibration block for this.
- Wipe tools with a soft, dry cloth
- Use mild soap and water for stubborn dirt
- Dry tools completely before storing
- Check calibration against a standard angle
- Adjust settings if the tool allows
Safe Storage Practices
Store measurement tools in a dry, clean place to avoid rust and damage. Avoid stacking heavy items on top.
| Storage Tip | Reason |
| Use tool cases or pouches | Protects from dust and impacts |
| Keep tools away from moisture | Prevents rust and corrosion |
| Store tools flat or hanging | Keeps them from bending or warping |
| Label storage areas | Easier to find and organize |
When To Replace Tools
Replace tools if they become damaged or lose accuracy. Using worn tools leads to poor cuts and mistakes.
- Inspect tools for cracks, bends, or loose parts
- Test accuracy with a known angle regularly
- Replace any tool that cannot be calibrated properly
- Buy new tools if measurements vary by more than one degree
- Keep track of tool age and condition

Credit: www.wikihow.com
Frequently Asked Questions
How Do I Measure Angles Accurately For Cutting?
Use a protractor or digital angle finder for precise measurement. Ensure the tool aligns with the cutting surface. Double-check angles before marking and cutting to avoid errors.
What Tools Help Measure Angles For Cutting Wood?
Common tools include protractors, digital angle finders, bevel gauges, and combination squares. These tools offer accuracy and ease when marking cutting angles on wood.
How To Ensure Angle Accuracy Before Cutting?
Always verify the measured angle twice. Use reliable tools and secure the workpiece to prevent movement. Mark clear, visible lines for precise cutting guidance.
Why Is Angle Measurement Important In Cutting Projects?
Accurate angle measurement ensures clean joints, proper fitting, and professional results. It prevents material waste and reduces the need for rework or adjustments.
Conclusion
Measuring angles correctly helps you cut materials with confidence. Use tools like protractors and angle finders carefully. Double-check your measurements before cutting to avoid mistakes. Take your time and work slowly for best results. Accurate angle measurement saves material and time.
Practice often to improve your skills. With patience, your cuts will look neat and fit well. Keep these tips in mind for all your projects. Accurate cutting makes your work stronger and more professional. Simple steps lead to better results every time.