Measuring angles accurately is one of the most important skills you need for successful woodworking. Whether you’re building a simple shelf or a complex piece of furniture, getting your angles right can make the difference between a perfect fit and wasted materials.
If you’ve ever struggled with uneven joints or shaky frames, this guide will change how you approach your projects. You’ll learn clear, step-by-step methods to measure angles quickly and precisely, even if you’re new to woodworking. Keep reading, and you’ll save time, reduce errors, and create stronger, cleaner results every time you pick up your tools.

Credit: www.wikihow.com
Choosing The Right Tools
Measuring angles correctly is key for good woodworking. Using the right tools helps you get exact cuts and fits. This guide covers common tools to measure angles for your projects.
Each tool fits different needs. Learn about protractors, combination squares, and digital angle gauges to find what works best for you.
Protractors And Angle Finders
Protractors and angle finders help you measure angles quickly. They come in many styles, like manual and digital. Protractors show angles on a dial, while angle finders can clamp onto wood.
- Manual protractors are simple and easy to use.
- Digital angle finders give precise readings on a screen.
- Both tools help check existing angles or mark new ones.
- Choose one that fits your project size and accuracy needs.
Combination Squares
Combination squares are versatile tools for measuring angles and marking lines. They include a ruler and a movable head that locks at 90 or 45 degrees. Some models allow you to adjust the angle for custom measurements.
| Feature | Use | Benefit |
|---|---|---|
| Ruler | Measures length and depth | Accurate marking and cutting |
| Adjustable Head | Set angles at 45° or 90° | Quick angle checks |
| Locking Mechanism | Holds angle steady | Precision in repeated cuts |
Digital Angle Gauges
Digital angle gauges provide fast, accurate angle measurements with a digital display. They attach to your workpiece and measure angles from 0 to 360 degrees. Some models save measurements for later use.
Advantages of Digital Angle Gauges:
- Easy to read digital screen
- High accuracy for detailed work
- Can measure complex angles
- Useful for both beginners and pros

Credit: www.youtube.com
Preparing Your Workspace
Measuring angles accurately is key for woodworking. Setting up your workspace correctly helps you get precise results.
A tidy, stable area makes it easier to work safely and efficiently. Let’s look at how to prepare your workspace.
Ensuring A Flat Surface
A flat surface keeps your wood steady and your measurements true. Uneven surfaces cause mistakes and uneven cuts.
- Clear the workspace of any debris or tools.
- Use a level tool to check the surface flatness.
- Place a flat board or sheet if the surface is uneven.
- Ensure the surface is stable and does not wobble.
- Keep the area well-lit for better visibility.
Securing Your Wood Pieces
Holding wood firmly stops it from moving while you measure angles. This keeps your angles accurate and your cuts clean.
| Method | Purpose |
| Clamps | Hold wood tight without damage |
| Workbench Vise | Secure wood firmly for detailed work |
| Double-sided Tape | Temporary hold on small pieces |
| Non-slip Mats | Prevent sliding on smooth surfaces |
Basic Angle Measuring Techniques
Measuring angles correctly is important in woodworking projects. It helps ensure pieces fit together well. This guide covers simple ways to measure and mark angles.
Using the right tools and methods makes your cuts accurate. Let’s look at common techniques used by woodworkers.
Marking Common Angles
Many woodworking projects require marking angles like 45°, 90°, or 30°. You can mark these angles easily with a protractor or angle finder.
- Place the protractor on the wood edge.
- Find the angle you need on the scale.
- Draw a line along the protractor edge at the angle.
- Use a pencil for clear, thin lines.
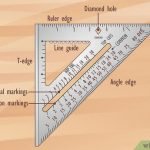
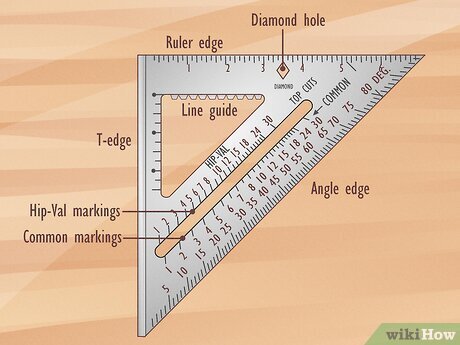
Using A Speed Square
A speed square is a small, triangular tool for quick angle measurements. It helps mark common angles and check squareness fast.
| Angle | Use on Speed Square |
| 90° | Align with wood edge and mark vertical line |
| 45° | Place pivot at corner and mark along diagonal edge |
| Other Angles | Use angle markings on the tool for precise lines |
Transferring Angles Between Pieces
Sometimes you need to copy an angle from one wood piece to another. This keeps your cuts consistent and parts fit well.
Follow these steps to transfer angles:
- Place the two wood pieces next to each other at the angle.
- Use a marking knife or pencil to trace the angle from one piece.
- Check with a square or protractor to confirm accuracy.
- Adjust if needed before cutting the second piece.
Measuring Complex Angles
Woodworking often requires precise angle measurements. Complex angles can be tricky without the right tools.
Knowing how to measure these angles ensures your pieces fit perfectly. This saves time and material waste.
Using An Adjustable Bevel
An adjustable bevel helps copy and measure angles easily. You can set it to any angle and transfer it to your wood.
To use it, loosen the wing nut and move the blade to match the angle. Then tighten the nut to hold the position.
- Place the bevel on the angle to measure
- Adjust the blade until it aligns with the angle
- Tighten the wing nut to lock the blade
- Use the bevel to mark or set your saw
Measuring Inside And Outside Angles
Inside angles are found where two surfaces meet inward. Outside angles are where surfaces meet outward.
Use a protractor or an adjustable bevel to measure these angles. Place the tool carefully to get an accurate reading.
- For inside angles, place the tool inside the corner
- For outside angles, place the tool on the outer edge
- Read the angle measurement or transfer it using the bevel
Tips For Accuracy
Measuring angles correctly is key for good woodworking. Even small mistakes can affect the whole project. Use these tips to get your angles right every time.
Accuracy saves time and materials. Taking care with your tools and methods makes your work look better and last longer.
Double-checking Measurements
Always check your angle measurements twice before cutting. This helps avoid errors and wasted wood. Use a protractor or digital angle finder to confirm your angles.
- Measure the angle once and mark the wood.
- Measure the same angle again to confirm.
- Compare your marks to ensure they match.
- If possible, ask someone to verify your measurements.
Calibrating Your Tools
Tools can lose accuracy over time. Calibrate your angle measuring tools regularly. This keeps your readings true and reliable.
| Tool | Calibration Method |
| Protractor | Check with a known 90° angle |
| Digital Angle Finder | Zero the tool on a flat surface |
| Bevel Gauge | Tighten locking screw and test on square |
Avoiding Common Mistakes
Woodworking angles can be tricky. Avoid these mistakes to keep your project on track.
- Do not rush measuring or cutting.
- Keep your tools clean and free from dust.
- Use sharp pencils or marking knives for clear lines.
- Do not rely on estimates or guesses.
- Check for squareness before cutting angled joints.

Credit: www.youtube.com
Cutting And Verifying Angles
Measuring angles accurately is key to good woodworking. Cutting the right angle helps pieces fit well.
Checking angles after cutting ensures your project looks neat and strong. Let’s learn how to do this.
Setting Your Saw Blade
Start by adjusting the saw blade to the angle you need. Use the saw’s angle gauge or a protractor.
Double check the angle setting before cutting. This prevents mistakes and wasted wood.
- Loosen the blade adjustment knob
- Move the blade to the desired angle
- Tighten the knob securely
- Use a protractor to confirm the angle
Test Fitting Pieces
After cutting, fit the pieces together without glue. This shows if the angle is correct.
Look for gaps or misalignments. These signs mean the angle needs adjusting.
- Place the cut pieces together
- Check edges and corners closely
- Note any gaps or overlaps
- Mark areas needing correction
Adjusting Cuts For Perfect Fit
If the fit is not perfect, adjust your saw blade slightly. Small changes improve the angle.
Trim the edges carefully and test fit again. Repeat until the pieces fit snugly.
- Loosen the blade adjustment
- Make small angle changes (1 or 2 degrees)
- Cut a new test piece
- Fit pieces and check again
Frequently Asked Questions
What Tools Are Best For Measuring Angles In Woodworking?
The best tools include protractors, angle finders, and combination squares. Digital angle meters offer precision and ease. Choose based on your project’s complexity and accuracy needs. Proper tools ensure accurate cuts and better fitting joints.
How Do I Measure An Angle Without A Protractor?
Use a combination square or create a paper template. Align edges carefully and mark the angle. You can also use digital angle finders or smartphone apps for approximate measurements. This method helps when tools are unavailable.
Why Is Accurate Angle Measurement Important In Woodworking?
Precise angle measurement ensures tight joints and a professional finish. It prevents gaps and structural weaknesses in your project. Accurate angles save time and material by reducing errors and rework. Consistency in measurements improves overall project quality.
Can I Use A Smartphone To Measure Angles?
Yes, many smartphone apps use built-in sensors to measure angles. They offer convenience but may lack the precision of dedicated tools. For rough measurements or quick checks, smartphones are useful. Always verify critical angles with proper tools.
Conclusion
Measuring angles precisely is crucial for successful woodworking projects. Accurate angles ensure all pieces fit perfectly. Start by choosing the right tool for your needs. Protractors, angle finders, and combination squares are great options. Practice makes perfect. Take time to measure carefully.
Double-check your work to avoid mistakes. Always align your tools properly. This will help maintain accuracy. Keep your tools clean and in good condition. Proper care extends their life and reliability. Remember, mastering these skills will enhance your woodworking projects.
Happy building!