Have you ever found yourself puzzled by the angles in a geometry problem or needed to measure an angle for a DIY project? A protractor might be the tool you need.
With its simple design and ease of use, the protractor is essential for anyone looking to measure angles accurately. But how exactly do you use it? In this guide, you’ll discover the straightforward steps to mastering angle measurement with a protractor.
Whether you’re a student tackling math homework or a hobbyist working on precise projects, learning this skill can save you time and frustration. Let’s dive in and explore how you can become confident in measuring angles with a protractor. This could be the game-changer you need to boost your efficiency and accuracy.
Choosing The Right Protractor
Measuring angles is easy with the right protractor. Picking the best one helps you get accurate results.
There are different types and materials for protractors. Knowing these helps you choose the right tool.
Types Of Protractors
Protractors come in many shapes and sizes. The most common are semicircular and circular types.
Some protractors have extra features like built-in rulers or adjustable arms. These can help with complex measurements.
- Semicircular:Measures angles up to 180 degrees. Easy to use for most tasks.
- Circular:Measures full 360 degrees. Good for detailed work and rotations.
- Adjustable:Has a movable arm for precise angle readings. Useful for engineers and architects.
- Digital:Shows angle readings on a screen. Offers quick and clear measurements.
Materials And Durability
Protractors are made from plastic, metal, or wood. Each material affects how long it lasts and how easy it is to use.
Plastic protractors are light and cheap but can break easily. Metal ones are strong and last longer but cost more. Wooden protractors are less common but provide a classic feel.
- Plastic:Lightweight, affordable, but less durable.
- Metal:Strong, long-lasting, and precise edges.
- Wood:Traditional look, sturdy but may wear over time.
Credit: www.elearningcampus.io
Preparing For Measurement
Measuring angles correctly starts with good preparation. Using a protractor properly helps you get accurate results.
Before placing the protractor, you need to set it up carefully. This makes the measurement clear and easy.
Positioning The Protractor
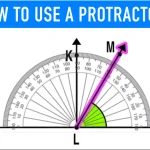
Place the protractor on the paper so the center hole or midpoint is over the angle’s vertex. The vertex is where the two lines meet.
- Make sure the protractor lies flat and does not tilt.
- Hold the protractor steady to prevent slipping.
- Check that the entire angle is visible inside the protractor’s scale.
Aligning The Baseline
Next, align the baseline of the protractor with one side of the angle. This side acts as the reference line for measuring.
| Step | Action | Reason |
| 1 | Line up the zero degree mark on the protractor with one angle side. | Ensures the measurement starts from zero degrees. |
| 2 | Check that the baseline is straight and matches the angle’s side. | Keeps measurement accurate and easy to read. |
| 3 | Hold the protractor firmly to avoid movement. | Prevents errors while reading the angle. |
Reading The Angle
Measuring angles with a protractor is a simple skill. It helps you find the size of an angle in degrees.
To read the angle correctly, you need to know how to use the protractor parts. This guide explains key steps.
Identifying The Vertex
The vertex is the point where two lines meet to form an angle. It is the center of the protractor.
Place the protractor’s center hole exactly on the vertex. This helps you measure the angle accurately.
Using Inner And Outer Scales
Protractors have two sets of numbers: inner and outer scales. These scales measure angles from 0 to 180 degrees.
Use the scale that starts with zero on the line you align with the protractor’s baseline. This scale shows the angle size.
- If the baseline points right, use the bottom (inner) scale.
- If the baseline points left, use the top (outer) scale.
- Read the number where the second line crosses the scale.
Common Mistakes To Avoid
Measuring angles with a protractor is easy if done correctly. Many people make simple errors that cause wrong results. Avoiding these mistakes saves time and improves accuracy.
Focus on the small details when using a protractor. This helps you get the right angle measurement every time.
Misreading The Scale
A protractor has two sets of numbers going in opposite directions. This can be confusing. People often pick the wrong scale and get incorrect readings.
Check which scale starts at zero near the baseline of the angle. Use only that scale to measure the angle size.
- Find the zero line on the protractor that matches your angle’s baseline.
- Read the numbers that increase from zero in the direction of the angle’s other arm.
- Ignore the numbers on the opposite side to avoid mistakes.
Improper Alignment
Aligning the protractor wrong causes bad measurements. The center hole or midpoint must be exactly on the angle’s vertex.
The baseline of the protractor should line up with one side of the angle. If it is off even slightly, the angle will be wrong.
- Place the protractor’s center hole on the angle’s vertex point.
- Line up the protractor’s baseline with one side of the angle perfectly.
- Hold the protractor steady to prevent shifting while reading.
Measuring Angles In Different Scenarios
Using a protractor helps to find the size of angles. It is useful in many situations.
We will look at how to measure acute, obtuse, and reflex angles with a protractor.
Acute And Obtuse Angles
Acute angles are less than 90 degrees. Obtuse angles are between 90 and 180 degrees.
- Place the protractor’s center hole on the angle’s vertex.
- Align the baseline of the protractor with one side of the angle.
- Read the number on the protractor where the other side crosses the scale.
- If the angle is less than 90 degrees, it is acute.
- If the angle is more than 90 but less than 180, it is obtuse.
Reflex Angles
Reflex angles are greater than 180 degrees but less than 360 degrees. They are harder to measure.
| Action | Explanation |
| Place Protractor | Center the hole on the angle’s vertex. |
| Align Baseline | Match the zero line with one side of the angle. |
| Measure Smaller Angle | Note the acute or obtuse angle measurement. |
| Calculate Reflex | Subtract this number from 360 degrees. |

Credit: www.youtube.com
Tips For Accurate Measurements
Measuring angles with a protractor needs care and attention. Small mistakes can change your results. Follow these tips to get the best accuracy.
Using the right tools and checking your work helps you measure angles correctly every time.
Using A Sharp Pencil
A sharp pencil marks the exact point on the paper. This helps align the protractor correctly. A dull pencil can make thick lines that are hard to read.
- Sharpen your pencil before measuring.
- Use a light but clear mark.
- Keep the pencil tip steady while marking.
- Avoid pressing too hard to prevent smudges.
Double Checking Results
Always check your measurements twice. This reduces errors and confirms your angle is correct.
| Check Method | Why It Helps |
| Re-measure the angle | Confirms the first reading is correct |
| Compare with a known angle | Validates your measurement tool |
| Use a different protractor | Rules out tool defects |
| Ask someone to verify | Gets a fresh perspective |
Alternative Tools For Angle Measurement
Measuring angles accurately is important in many tasks. A protractor is a common tool, but other tools can help too.
These alternative tools can be easier to use or offer digital readings for better precision.
Digital Protractors
Digital protractors show the angle measurement on a screen. They are easy to read and very accurate.
Users place the tool on the angle and the digital display shows the degrees quickly.
- Can measure angles in degrees and sometimes radians
- Often include a hold function to save the reading
- Useful for woodworking, metalworking, and construction
- Battery-powered and lightweight
Angle Finders
Angle finders help measure angles between two surfaces. They often have two arms connected by a hinge.
You place the arms along the surfaces. The tool shows the angle between them, either on a dial or digital screen.
- Can be manual or digital
- Good for measuring corner angles and slopes
- Many models include locking features for accuracy
- Portable and easy to use on site

Credit: www.teacherspayteachers.com
Frequently Asked Questions
How Do You Use A Protractor To Measure Angles?
Place the protractor’s center hole on the angle’s vertex. Align the baseline with one side. Read the number where the other side crosses the protractor scale to find the angle measurement.
What Are The Common Types Of Protractors?
The most common protractors are semicircular and circular. Semicircular protractors measure angles up to 180 degrees. Circular protractors measure full 360-degree angles for more complex measurements.
How Can I Measure An Angle Accurately?
Ensure the protractor is properly aligned with the angle’s vertex and baseline. Read the correct scale on the protractor carefully. Avoid parallax errors by viewing the scale straight on.
Can A Protractor Measure Reflex Angles?
Yes, a protractor can measure reflex angles. Measure the smaller angle first, then subtract it from 360 degrees to get the reflex angle.
Conclusion
Measuring angles with a protractor is simple and useful. Place the protractor carefully, align it with the angle’s base line, and read the correct number. Practice helps you get better and faster. This skill works well in school, crafts, and many jobs.
Keep your protractor clean and handle it gently. Try measuring different angles to build confidence. Soon, you will find it easy to measure angles anytime. Understanding this tool opens doors to learning more about shapes and math. Keep practicing, and measuring angles will become second nature.