Measuring angles might seem tricky at first, but once you know how to use a protractor, it becomes simple and even fun. Imagine being able to accurately find the exact angle in any shape or object around you.
Whether you’re working on a school project, fixing something at home, or just curious, learning this skill puts you in control. You’ll discover easy, step-by-step instructions that anyone can follow. By the end, you’ll feel confident measuring angles like a pro—no guesswork needed.
Ready to unlock this handy skill? Let’s get started!
Tools Needed
Measuring angles accurately needs the right tools. A protractor is the main tool used for this task.
Some extra tools help you get precise results and make the process easier.
Protractor
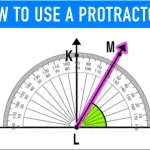
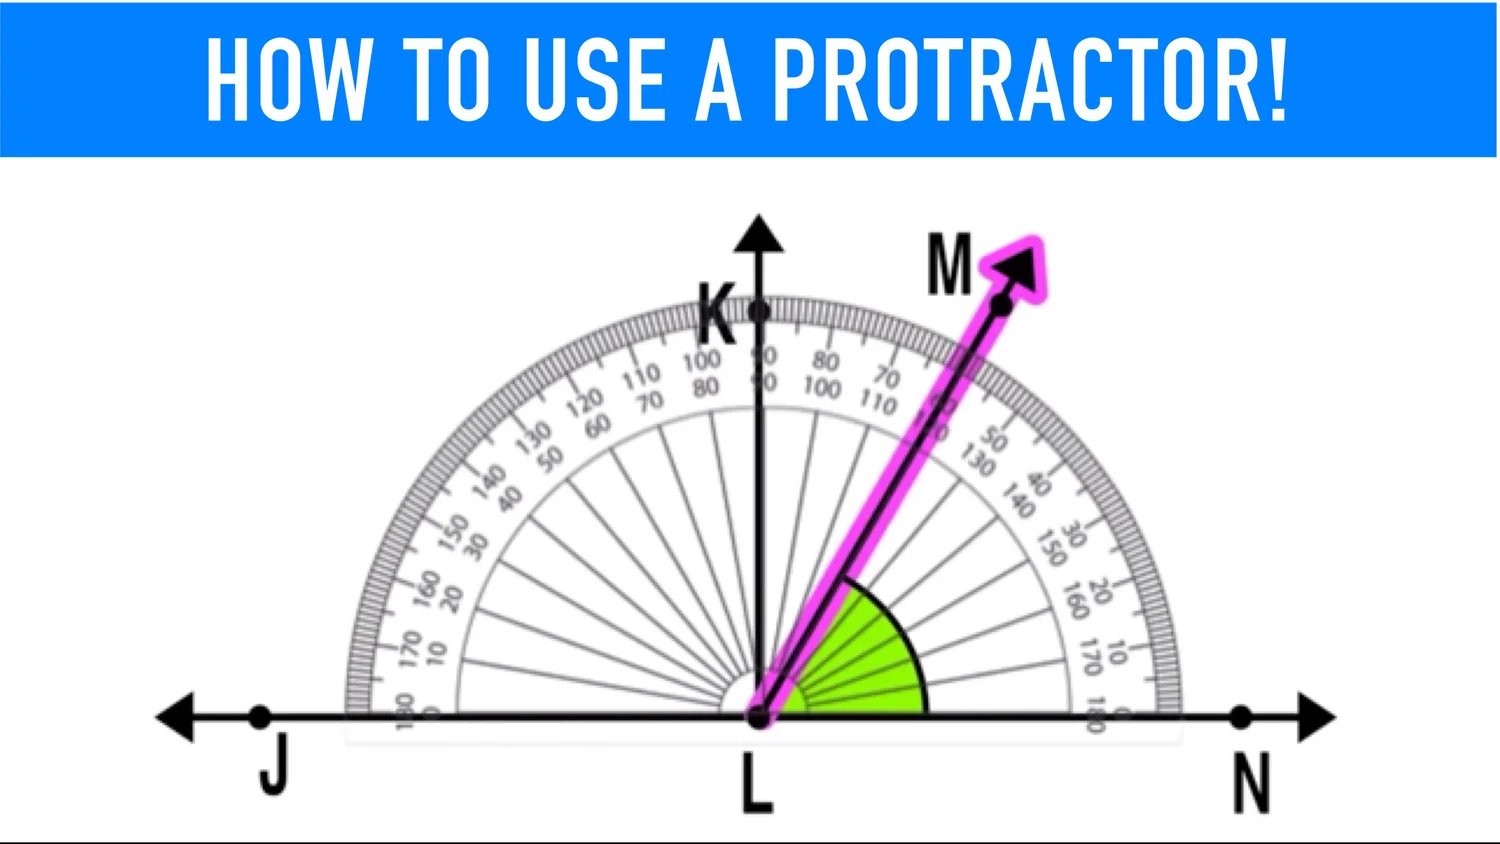
A protractor is a semicircular or circular tool marked with degrees from 0 to 180 or 360.
It lets you measure and draw angles by aligning it with the lines or edges you want to measure.
Ruler
A ruler helps you draw straight lines to form the angle or extend its arms.
It also helps to position the protractor correctly along the base line of the angle.
Pencil
Use a pencil to mark points and draw lines. Pencil marks are easy to erase if needed.
Sharp pencils make clear and thin lines, which help in accurate measurement.
Paper
You need paper as the surface to draw the angle and place the protractor.
Plain or graph paper works well for neat and precise angle drawing and measuring.

Credit: www.youtube.com
Types Of Protractors
Protractors are tools used to measure angles. They come in different shapes and styles. Each type serves a unique purpose.
Knowing the types helps you pick the right one for your task. Below are common protractor types you may use.
Semi-circular Protractor
This is the most common type. It looks like a half-circle with degree markings from 0 to 180.
It is easy to use and good for general angle measuring. The flat edge aligns with one side of the angle.
Circular Protractor
This protractor is a full circle. It has degree marks from 0 to 360.
It is useful for measuring reflex angles larger than 180 degrees. It can also measure angles in all directions.
Digital Protractor
This type uses a digital display to show the angle measurement. It is very precise and easy to read.
Digital protractors often have buttons to reset or hold measurements. They are good for exact work.
Bevel Protractor
A bevel protractor has a rotating arm and a protractor scale. It measures angles between two surfaces.
This tool is used in metalwork and carpentry. It helps check and mark precise angles on materials.
Pocket Protractor
Small and portable, the pocket protractor is easy to carry. It usually measures angles up to 180 degrees.
This type is good for quick measurements outside a workshop or classroom. It fits easily in a pencil case.
Setting Up The Protractor
Measuring angles correctly needs a proper setup of the protractor. A good setup helps you get accurate results without confusion.
This guide explains how to position the protractor before measuring angles.
Aligning The Baseline
The baseline of the protractor is the straight edge at the bottom. It must line up with one side of the angle you want to measure.
- Place the protractor on a flat surface.
- Match the baseline with the angle’s bottom line.
- Make sure the baseline is straight and not tilted.
- Check that the zero mark on the baseline is exactly on the angle’s line.
Positioning The Vertex
The vertex is the point where the two lines of the angle meet. It must be at the center hole or midpoint of the protractor.
| Step | Action | Reason |
| 1 | Place the vertex exactly at the protractor’s center hole. | Ensures the angle is measured from the correct point. |
| 2 | Hold the protractor steady to avoid movement. | Keeps the reading accurate. |
| 3 | Check that both lines of the angle pass through the protractor’s scale. | Allows easy reading of the angle degree. |
Reading The Scale
Using a protractor correctly means reading its scale carefully. The scale shows the degrees of the angle.
Understanding how to read the inner and outer scales helps you measure angles accurately.
Inner Vs Outer Scale
A protractor usually has two sets of numbers on its curved edge. These are called the inner and outer scales.
- The inner scale runs from 0° to 180° in one direction.
- The outer scale runs from 0° to 180° in the opposite direction.
- Which scale you use depends on where the angle’s vertex and arms line up.
- Check which scale starts at zero closest to the baseline of the angle.
Identifying Zero Degrees
Zero degrees is the starting point on the protractor’s scale. It helps you align the protractor correctly.
| Zero Degrees Position | How to Identify |
| Inner Scale | The zero mark is on the right side of the protractor’s baseline. |
| Outer Scale | The zero mark is on the left side of the protractor’s baseline. |
Measuring Acute Angles
An acute angle is smaller than 90 degrees. You can measure it easily using a protractor.
A protractor is a tool that shows angle degrees. It helps you find the exact size of angles.
Place The Protractor Correctly
Put the protractor’s center hole on the angle’s vertex. The vertex is where the two lines meet.
Make sure the baseline of the protractor lines up with one side of the angle. This helps measure accurately.
Read The Inner Scale
Look at the inner numbers on the protractor. These start from zero on the side you lined up.
For acute angles, the number you see where the other side of the angle meets the protractor is the angle size.
Check The Angle Size
Confirm the angle is less than 90 degrees. If it is, you have measured an acute angle correctly.
- Angle less than 90 degrees is acute
- Use the inner scale for these angles
- Double-check the protractor alignment
Measuring Obtuse Angles
Obtuse angles are angles greater than 90 degrees but less than 180 degrees. Measuring them with a protractor is easy once you know the steps.
This guide will show you how to measure obtuse angles accurately using a protractor.
Position The Protractor Correctly
Place the protractor on the angle so the center hole is exactly on the angle’s vertex. The baseline of the protractor should align with one side of the angle.
Make sure the zero line on the protractor matches the side of the angle you are measuring from.
Read The Outer Scale
Obtuse angles measure between 90 and 180 degrees. Use the outer scale of the protractor because it counts up to 180 degrees.
Look at the number where the other side of the angle crosses the outer scale. This number is the measure of the obtuse angle.
Check Your Measurement
After finding the angle measure, check that it is greater than 90 degrees. If it is less, you might have read the wrong scale.
- Confirm the vertex is centered on the protractor hole.
- Ensure the baseline is aligned properly.
- Use the outer scale for obtuse angles.
- Double-check the number read on the scale.
Record The Angle
Write down the number you read from the protractor. This is the size of the obtuse angle in degrees.
Use this measurement for your math problems or projects requiring angle sizes.
Common Mistakes To Avoid
Measuring angles with a protractor can seem easy. Still, many people make small errors that lead to wrong readings. Avoiding these mistakes helps get accurate results every time.
This guide shows common errors and how to fix them. Learn to use your protractor with confidence and precision.
Not Aligning The Protractor Properly
One frequent mistake is placing the protractor incorrectly on the angle. The center hole or midpoint must sit exactly on the vertex of the angle. If it is off, the reading will be wrong.
Reading The Wrong Scale
Protractors have two sets of numbers, usually from 0 to 180 and 180 to 0. Many users read from the wrong scale, leading to errors.
- Check which side the angle opens to before reading.
- Use the scale that starts at zero on the baseline line.
- Double-check your reading by comparing both scales.
Not Aligning The Baseline Correctly
The baseline of the protractor must align exactly with one side of the angle. If it is tilted or shifted, the angle measurement will be off.
Ignoring Parallax Error
Looking at the protractor from an angle can cause parallax error. This mistake happens when your eyes are not directly above the measurement mark.
| Mistake | Effect | How to Avoid |
| Misplaced center hole | Wrong vertex point | Place center hole carefully on vertex |
| Wrong scale reading | Incorrect angle value | Identify correct scale before reading |
| Baseline misalignment | Skewed angle measurement | Align baseline with one angle side |
| Parallax error | Misreading numbers | Look straight down at protractor |
Credit: www.elearningcampus.io
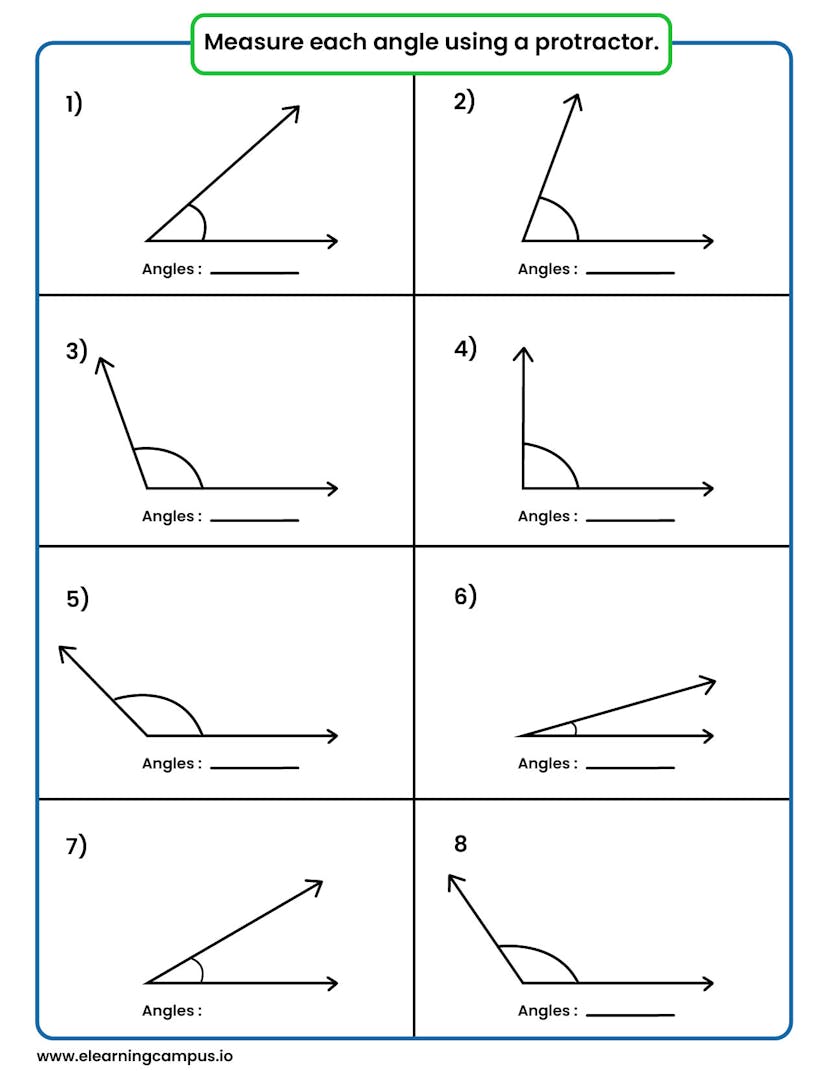
Practice Exercises
Practicing with a protractor helps you learn how to measure angles correctly. Try different exercises to build your skills.
Use a protractor and draw or measure angles on paper. Check your answers carefully each time.
Measuring Simple Angles
Start by measuring angles that are less than 90 degrees. Place the protractor’s center on the angle’s vertex.
Align the baseline with one side of the angle. Read the number where the other side crosses the scale.
- Draw an angle with a pencil
- Place the protractor on the vertex
- Align baseline with one arm of the angle
- Note the degree where the other arm crosses
- Write the measured angle
Obtuse angles are bigger than 90 degrees but less than 180 degrees. Use the protractor’s outer scale for these.
Put the center on the vertex and line up one arm with zero. Read the outer scale where the other arm points.
- Draw an angle between 90 and 180 degrees
- Place the protractor center on the vertex
- Line up the zero mark with one side
- Read the outer scale at the other side
- Record the angle measurement
Creating And Measuring Angles
Practice drawing angles of specific sizes using your protractor. Mark the correct degree and connect points.
Then measure the angle you drew to check if it matches the intended size.
- Mark a point on paper as the vertex
- Place the protractor center on the vertex
- Make a mark at the desired degree on the scale
- Draw a line from vertex through that mark
- Measure the angle to confirm accuracy
Using Different Protractor Types
Practice with both half-circle and full-circle protractors. Each type has different scales to read angles.
Learn to read the correct scale and measure the angles accurately on each protractor.
- Half-circle protractor measures 0 to 180 degrees
- Full-circle protractor measures 0 to 360 degrees
- Align the vertex with the protractor center
- Use the correct scale for your angle
- Practice measuring various angles on both types

Credit: www.teacherspayteachers.com
Frequently Asked Questions
How Do You Properly Align A Protractor?
To align a protractor, place its center hole on the angle’s vertex. Ensure the baseline aligns with one angle side. This helps measure angles accurately by reading the correct scale.
What Is The Easiest Way To Read A Protractor?
Read the inner or outer scale based on angle direction. Start from zero on the baseline side. Follow the scale where the second side crosses for the angle value.
Can I Measure Angles Larger Than 180 Degrees?
No, a standard protractor measures up to 180 degrees. For reflex angles above 180 degrees, use complementary methods or a 360-degree protractor.
How Do I Measure An Angle Inside A Shape?
Place the protractor’s center at the angle vertex inside the shape. Align one side with the baseline. Read the degree where the other side crosses the scale.
Conclusion
Measuring angles with a protractor is simple and useful. It helps in drawing and understanding shapes better. Practice makes it easier over time. Start by placing the protractor correctly. Align it with the angle’s base line. Read the degrees carefully.
Avoid common mistakes by checking twice. With these steps, anyone can measure angles accurately. This skill is valuable in math and everyday tasks. Keep practicing to improve. Soon, measuring angles will feel natural. Enjoy the process and watch your skills grow!