Are you struggling to get your wood cuts just right? When it comes to woodworking, precision is key, and knowing how to measure depth accurately can make all the difference.
Imagine the satisfaction of perfectly fitting joints and seamless designs, all because you mastered this fundamental skill. Whether you’re a seasoned woodworker or just starting out, understanding how to measure depth for wood cuts is essential for achieving professional results.
In this guide, we’ll walk you through easy-to-follow steps to ensure every cut is precise. Get ready to elevate your woodworking projects to the next level!
Choosing The Right Tools
Measuring depth accurately is key for clean wood cuts. Using the right tools helps you get precise results. This guide explains which tools to use for different wood cutting tasks.
Choosing tools depends on the type of cut and the wood thickness. Picking the correct tool saves time and reduces errors.
Types Of Measuring Tools
Several tools help measure depth for wood cuts. Each has its own use and level of precision.
- Ruler or Tape Measure:Basic tools for measuring lengths and depths. Good for rough cuts.
- Depth Gauge:A tool designed to measure cut depths precisely. Often attached to saws.
- Caliper:Offers very accurate measurements for small or detailed cuts.
- Combination Square:Measures depth and marks angles for cuts.
Tools For Different Wood Cuts
Different wood cuts require different measuring tools. Using the right tool ensures the cut is clean and fits well.
| Type of Cut | Recommended Tool | Why Use It |
| Straight Cut | Ruler or Tape Measure | Simple and quick for long, straight lines |
| Grooves or Dados | Depth Gauge or Combination Square | Measures exact depth for precise grooves |
| Fine Detail Cuts | Caliper | High accuracy for small cuts and joints |
| Angle Cuts | Combination Square | Helps mark and measure angles accurately |
Credit: www.popularwoodworking.com
Preparing Your Workspace
Measuring depth for wood cuts needs a clean and organized workspace. A proper setup helps you work safely and accurately.
Before you start, prepare your work area carefully. This step makes the cutting process easier and more precise.
Setting Up A Stable Surface
Use a flat and sturdy surface to place your wood and tools. This prevents any wobbling or shifting during measurement.
- Clear the table or bench of clutter
- Check that the surface does not shake
- Use clamps to hold wood pieces in place
- Make sure the surface is at a comfortable height
- Keep tools within easy reach
Ensuring Proper Lighting
Good lighting helps you see measurement marks clearly. It reduces mistakes and eye strain.
| Lighting Type | Benefits | Examples |
| Natural Light | Bright and even | Sunlight from windows |
| Overhead Light | Illuminates whole area | Ceiling lamps, fluorescent lights |
| Task Light | Focuses on work spot | Desk lamps, LED work lights |
Measuring Techniques
Measuring depth for wood cuts is key for precise woodworking. Use the right tools and methods.
Accurate measurement helps avoid mistakes and ensures the wood fits well in your project.
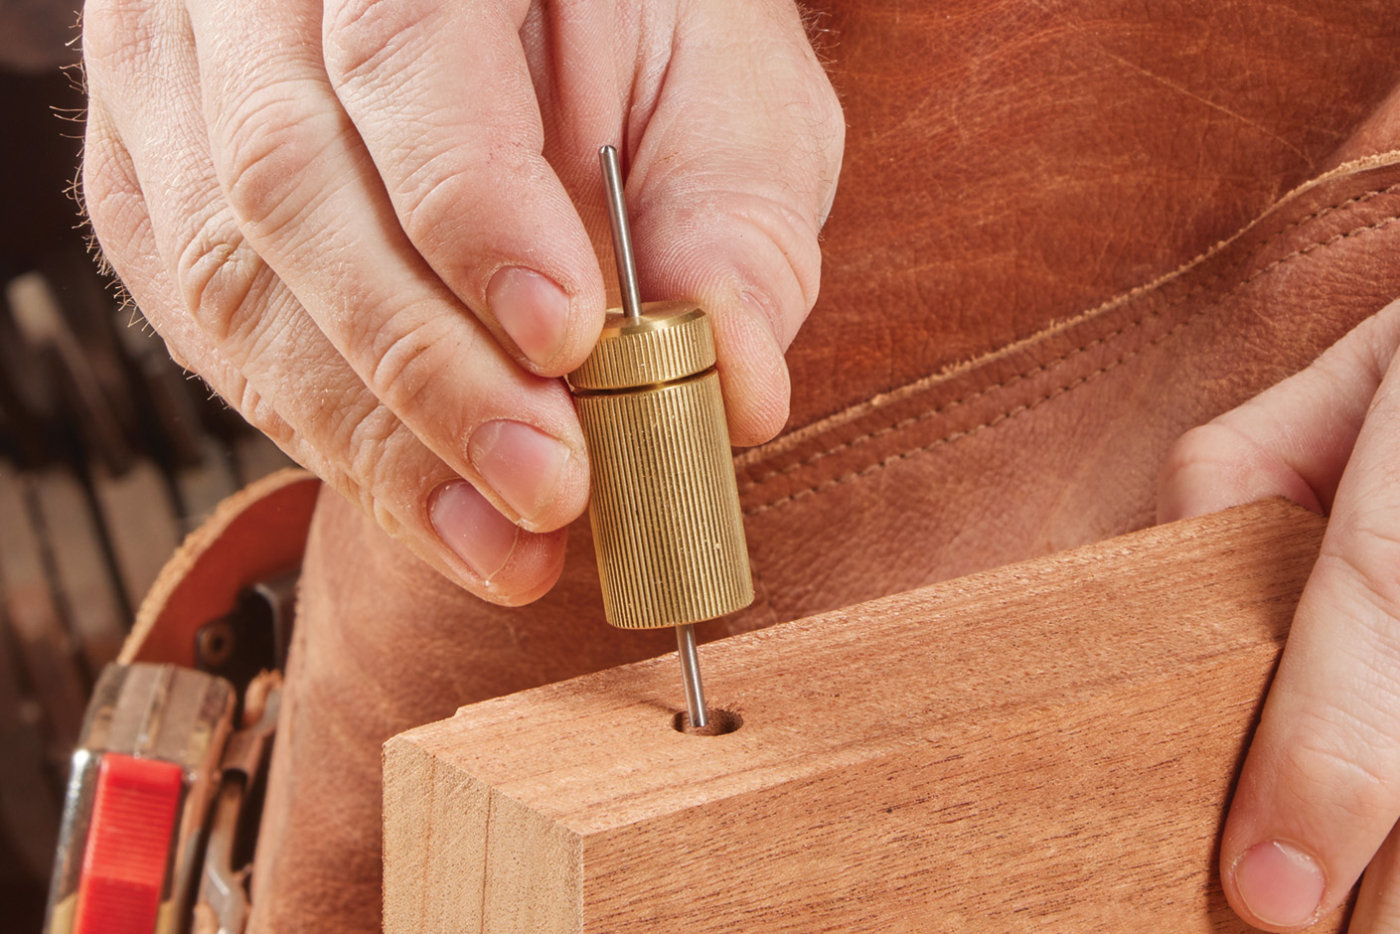
Using A Depth Gauge
A depth gauge shows the exact depth of your cut. Place the gauge’s base on the wood surface.
Adjust the gauge until the measuring rod touches the deepest point of the cut area. Read the number clearly.
Marking Cut Lines Accurately
Marking lines helps guide your saw or chisel. Use a sharp pencil or marking knife for fine lines.
- Measure the depth needed and note it.
- Use a ruler or square to draw straight lines.
- Mark both the start and end points of the cut.
- Double-check your lines before cutting.
Checking Measurements Twice
Check measurements twice to avoid errors. Measure once, then measure again before cutting.
| Check | Purpose |
| First Measurement | Set initial depth |
| Second Measurement | Confirm accuracy |
| Mark Lines | Guide your tool |

Credit: www.wikihow.com
Adjusting Your Saw For Depth
Setting the right blade depth on your saw is important for clean wood cuts. It helps you cut through the wood safely and efficiently.
Adjusting the saw blade height correctly prevents damage to your workpiece and extends the life of your blade.
Setting The Blade Height
Start by unplugging the saw for safety. Find the blade height adjustment lever or wheel on your saw. Raise or lower the blade so it sits just above the thickness of the wood.
- Turn the adjustment wheel or lever to move the blade up or down.
- Set the blade height about 1/4 inch above the wood surface.
- Make sure the blade is stable and locked in place after adjusting.
- Check the saw manual if you are unsure about the adjustment mechanism.
Testing On Scrap Wood
Always test your blade depth on a scrap piece of wood. This helps ensure you have the right setting before making the final cut.
| Test Action | Purpose | What to Check |
| Make a cut on scrap wood | Check blade depth | Blade just passes through without cutting too deep |
| Inspect the cut edge | Check cut quality | Clean edge with no tear-out or burn marks |
| Adjust blade if needed | Fine-tune depth | Blade height matches wood thickness precisely |
Tips For Different Wood Types
Measuring depth for wood cuts depends on the type of wood you use. Softwoods and hardwoods behave differently when cut.
Knowing how to handle grain direction also helps you get accurate and clean cuts. This guide explains key tips for both topics.
Softwood Vs Hardwood Considerations
Softwoods like pine are easier to cut and measure. Hardwoods like oak need more care to avoid splintering.
- Softwoods cut faster but can compress under blades.
- Hardwoods require slower cutting to prevent damage.
- Measure multiple times for hardwood to ensure depth accuracy.
- Use sharper blades for hardwood for cleaner cuts.
Dealing With Grain Direction
Grain direction affects how the blade moves through the wood. Cutting against the grain causes rough edges.
| Grain Direction | Effect on Cut | Measurement Tip |
| With the grain | Smoother cuts, less tear-out | Measure depth along the grain for accuracy |
| Against the grain | Rough edges, possible splintering | Take shallower cuts and measure carefully |
| Cross grain | Chips and splinters likely | Use sharp tools and steady pressure |

Credit: www.wikihow.com
Common Mistakes To Avoid
Measuring depth for wood cuts needs care and accuracy. Small errors can cause big problems. Avoiding common mistakes saves time and material.
This guide covers two frequent errors. Fixing these helps you get clean, correct cuts every time.
Inaccurate Markings
Marking the wood incorrectly leads to wrong depth cuts. Marks that are off by even a little cause poor fits and weak joints.
- Use a sharp pencil or marking knife for clear lines.
- Double-check measurements before marking.
- Mark on a flat surface to avoid errors.
- Avoid thick or smudged lines that blur the cut depth.
- Keep your measuring tool steady and aligned.
Skipping Test Cuts
Not doing test cuts wastes wood and causes mistakes. Test cuts confirm your depth settings work before cutting the final piece.
| Reason to Do Test Cuts | Possible Problem Without Test Cuts |
| Check depth accuracy | Cut too shallow or too deep |
| Verify tool setup | Wrong blade height or angle |
| Confirm material fit | Parts do not join well |
| Save wood and time | Waste material on errors |
Maintaining Precision Over Time
Measuring depth for wood cuts needs careful attention. Small mistakes can ruin your project.
Keeping your tools accurate helps you make exact cuts every time. This saves wood and effort.
Regular Tool Calibration
Calibration means checking your tools against a standard. It keeps measurements true and reliable.
Check your tools before each use or at least weekly. This stops errors from building up.
- Use a ruler or gauge block to check depth settings
- Adjust tools according to the manufacturer’s guide
- Test with scrap wood to confirm accuracy
- Record calibration dates for future reference
Proper Tool Maintenance
Clean your tools after every job to avoid dirt buildup. Dust and resin can affect tool parts.
Keep blades sharp and parts lubricated. Worn or sticky parts cause inaccurate cuts.
- Remove sawdust and wood chips regularly
- Sharpen blades and bits when dull
- Lubricate moving parts as the manual says
- Store tools in dry, safe places
Frequently Asked Questions
How Do I Measure Depth For Wood Cuts Accurately?
Use a depth gauge or ruler to measure from the saw blade to the base. Adjust the tool until it matches the desired cut depth precisely before starting.
What Tools Help Measure Wood Cut Depth Effectively?
Depth gauges, calipers, and adjustable rulers are ideal tools. They provide precise readings and ensure consistent cut depths for woodworking projects.
Why Is Measuring Depth Important For Wood Cuts?
Accurate depth ensures clean cuts and prevents damage to the wood. It also improves safety and helps achieve professional-quality woodworking results.
Can I Measure Depth Without Special Tools?
Yes, you can use a combination square or a marked ruler. These common tools help estimate depth when specialized gauges aren’t available.
Conclusion
Measuring depth for wood cuts ensures precise and safe results. Use the right tools and take your time. Double-check your measurements before cutting to avoid mistakes. Clear marks help guide your saw accurately. Practice this skill to improve your woodworking projects.
Small steps lead to better craftsmanship and confidence. Keep safety in mind at all times. Accurate depth measurement makes your work look professional and clean. Simple habits create lasting woodworking success.