Is your power planer not working like it used to? You don’t have to replace it just yet.
With a little know-how, you can fix many common problems yourself. Imagine saving money, avoiding downtime, and getting your tool back to perfect condition. In this guide, you’ll discover simple, step-by-step tips to repair your power planer quickly and safely.
Keep reading, and you’ll gain the confidence to tackle repairs on your own—no professional needed.

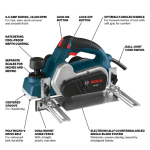
Credit: www.amazon.co.uk
Common Power Planer Issues
Power planers are useful tools for smoothing wood surfaces. Like any tool, they can face problems during use.
Knowing common issues helps fix the planer quickly. This guide covers typical problems and how to address them.
Blade Dullness And Replacement
Dull blades cause rough cuts and require more effort. They reduce the quality of the wood surface.
Replace blades regularly for best results. Always use the correct blade type for your planer model.
- Signs of dull blades: tear-out and uneven cuts
- Remove old blades carefully to avoid injury
- Install new blades firmly and align properly
- Sharpen blades if replacement is not possible
Motor Problems
Motor issues may cause the planer to stop or run slowly. Overheating or strange noises are warning signs.
Check for blockages and clean vents. Inspect brushes and replace them if worn out to keep the motor working well.
- Listen for unusual motor sounds
- Ensure proper ventilation to prevent overheating
- Replace worn brushes for smooth motor operation
- Test motor function before each use
Electrical Faults
Electrical problems can stop your planer from starting. Faulty cords or switches often cause these issues.
Inspect the power cord for cuts or damage. Test the switch for proper function and replace parts if needed.
- Check power cord for visible damage
- Test power switch for responsiveness
- Replace damaged cords or faulty switches promptly
- Use a multimeter to find electrical issues
Uneven Planing
Uneven planing leads to bumpy or wavy wood surfaces. It happens from incorrect blade height or worn parts.
Check blade alignment and adjust the depth settings. Inspect the planer base for damage or wear and fix as needed.
- Verify blade height is even across the width
- Adjust depth settings for consistent cuts
- Examine the base plate for flatness
- Replace worn parts causing uneven pressure
Tools And Safety Gear
Repairing power planers requires the right tools and safety gear. These help you fix the tool safely and correctly.
Using proper equipment protects you from injuries. It also makes the repair process easier and faster.
Essential Repair Tools
You need specific tools to repair power planers. These tools help you open, clean, and fix parts with care.
- Screwdrivers (flathead and Phillips)
- Allen wrenches or hex keys
- Small adjustable wrench
- Needle-nose pliers
- Soft brush for cleaning dust
- Multimeter for electrical checks
- Replacement blades or parts
Keep tools organized and clean. This prevents damage and helps you work better.
Protective Equipment
Wear safety gear to protect your eyes, hands, and lungs. Repairs can cause dust and sharp edges.
- Safety goggles to shield your eyes
- Work gloves to protect your hands
- Dust mask or respirator for breathing safety
- Ear protection if noise is loud
- Long sleeves to avoid scratches
Always check your safety gear before starting. Use it every time you repair power tools.
Diagnosing The Problem
Fixing a power planer starts with finding the problem. You need to check the tool carefully before you start repairs.
Look for signs that show what part might be broken or not working well. This helps save time and effort.
Visual Inspection
First, look over the planer for any visible damage. Check the body, cord, and blades for cracks or wear.
Look for loose screws or parts that do not sit right. Dirt and dust can also cause problems, so clean them off.
- Check for cracks or broken parts
- Look for loose screws or bolts
- Remove dust and debris
- Inspect the power cord for cuts or damage
Testing Electrical Components
Use a multimeter to check the power cord and switch. This will show if electricity flows properly.
Check the motor brushes for wear. Worn brushes can stop the planer from running smoothly.
- Test power cord for breaks or shorts
- Check switch for proper function
- Inspect motor brushes for wear
- Look for burning smells or sparks
Checking Blade Alignment
Blade alignment affects the smoothness of your cuts. Misaligned blades cause rough or uneven surfaces.
Remove the blades and check if they sit straight. Adjust or replace blades if they look bent or worn.
- Remove blades carefully
- Check if blades are straight and sharp
- Adjust blade angle if needed
- Replace blades if damaged
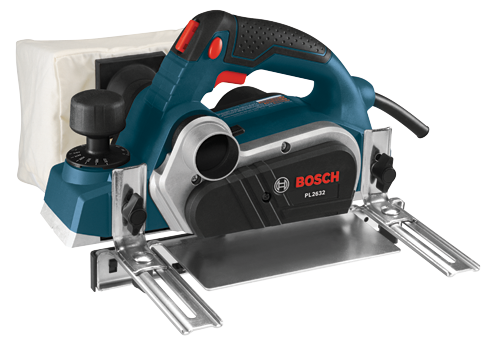
Credit: www.boschtools.com
Blade Maintenance And Replacement
Power planers need sharp and balanced blades for smooth performance. Proper blade care helps you avoid damage and get better results.
Replacing and maintaining blades is simple if you follow the right steps carefully. Safety is important during the entire process.
Removing Old Blades
Before removing blades, unplug the planer to avoid accidents. Use a screwdriver or wrench to loosen the screws holding the blades.
Handle the blades carefully as they can be sharp. Remove each blade slowly and check for damage or wear.
Installing New Blades
Place the new blades in the correct position. Make sure the cutting edge points in the right direction.
- Align the blade with the holder slot.
- Secure the blade by tightening the screws firmly.
- Check that each blade is fixed without movement.
- Wear gloves to protect your hands.
Balancing The Blades
Balanced blades reduce vibration and improve cutting quality. Use a blade balancer or hang the blade on a thin wire to check balance.
| Blade Condition | Action Needed |
|---|---|
| Blade tips tilt downward | Remove material from the heavier side |
| Blade tips stay level | Blade is balanced and ready to use |
| Blade tips tilt upward | Remove material from the lighter side |
Fixing Motor Issues
Power planers depend on a strong motor to work well. Motor issues can stop your tool from running or cause it to run poorly. Fixing these problems can save time and money.
Below are key ways to repair motor problems. Follow each step carefully to bring your power planer back to life.
Cleaning And Lubricating
Dirt and dust can clog the motor and cause it to overheat. Cleaning and lubricating the motor parts keeps it running smoothly and extends its life.
- Unplug the planer before starting any work.
- Remove the motor cover to access the parts.
- Use compressed air to blow out dust and debris.
- Apply a light machine oil to bearings and moving parts.
- Wipe off excess oil to avoid attracting more dirt.
- Reassemble the motor cover securely.
Replacing Brushes
Brushes wear out after long use and cause poor motor contact. Replacing worn brushes improves motor power and reduces sparking.
| Sign of Worn Brushes | How to Replace |
| Sparking inside motor | Remove brush caps and pull out old brushes |
| Intermittent power loss | Insert new brushes matching original size |
| Planer stops suddenly | Check springs and holders, then reassemble |
Motor Rewinding Basics
Motor rewinding fixes damaged coils inside the motor. This process takes skill and special tools. You can rewind the motor yourself or hire a professional.
- Remove the motor from the planer carefully.
- Take off the motor end caps and pull out the armature.
- Note the coil winding pattern and wire size.
- Remove old wire from the armature slots.
- Wind new wire matching the original turns and thickness.
- Insulate and secure the new coils in place.
- Reassemble the motor and test it for proper function.
Addressing Electrical Problems
Power planers often stop working because of electrical issues. Fixing these problems can save time and money. It is important to check the electrical parts carefully.
This guide covers how to inspect power cords, repair switches, and check fuses and circuits. Follow these steps for safe and effective repairs.
Inspecting Power Cords
Start by unplugging the planer. Look for cuts, cracks, or worn spots on the power cord. Damaged cords can cause shorts or shocks.
- Check the cord from plug to tool
- Look for exposed wires or broken insulation
- Make sure the plug prongs are not loose or bent
- Test the cord with a multimeter for continuity
Repairing Switches
The switch controls power flow in the planer. Dust and wear can cause it to fail. Remove the switch cover to inspect inside.
Use this checklist to repair a faulty switch:
- Disconnect power before working on the switch.
- Check for loose or broken wires at the terminals.
- Clean contacts with electrical contact cleaner.
- Replace the switch if contacts are burnt or damaged.
- Test the switch with a multimeter for proper function.
Fuse And Circuit Checks
Fuses and circuits protect your planer from damage. A blown fuse or tripped circuit can stop the tool from working.
| Component | Check Method | Action if Faulty |
| Fuse | Look for broken wire inside fuse or test with multimeter | Replace with the same type and rating |
| Circuit Breaker | Reset breaker switch | If it trips repeatedly, check wiring or replace breaker |
| Wiring | Inspect for loose connections and damage | Repair or replace damaged wires |
Adjusting For Smooth Operation
Power planers need regular adjustments to work well. Smooth operation keeps your cuts clean and safe. Small fixes can improve the tool’s performance.
This guide covers how to align the planer base, set depth controls, and test the planing performance. Follow these steps to keep your planer running smoothly.
Aligning The Planer Base
Check the planer base for flatness before use. A crooked base causes uneven cuts and rough surfaces. Use a straightedge to find any gaps or bumps.
- Place the planer on a flat surface.
- Run a straightedge along the base edges.
- Look for gaps between the base and the straightedge.
- Adjust the base screws if needed to level it.
- Tighten screws securely to keep the base stable.
Setting Depth Controls
Depth control adjusts how much wood the planer removes each pass. Setting it correctly avoids overloading the motor or damaging the wood.
| Depth Setting | Result |
| Shallow (1 mm or less) | Smooth finish, less strain on tool |
| Medium (2-3 mm) | Good balance of speed and quality |
| Deep (4 mm or more) | Faster removal, rougher surface |
Adjust the depth knob before starting. Test on scrap wood to find the best setting for your project.
Testing Planing Performance
Test the planer on a piece of scrap wood to check its operation. Look for smooth, even cuts without tear-out or chatter marks.
- Secure the scrap wood firmly to your workbench.
- Turn on the planer and let it reach full speed.
- Push the planer steadily across the wood surface.
- Inspect the wood for smoothness and uniform thickness.
- Adjust depth or base if the finish is rough or uneven.

Credit: www.familyhandyman.com
Maintenance Tips For Longevity
Power planers need care to work well for a long time. Regular maintenance helps avoid damage and costly repairs.
Follow these tips to keep your power planer in good shape and extend its life.
Regular Cleaning
Keep your power planer clean after each use. Dust and wood chips can build up and cause problems.
- Use a brush or compressed air to clear dust from blades and vents.
- Wipe the planer’s body with a dry cloth to remove dirt.
- Check and clean the blade area to prevent clogging.
Proper Storage
Store your power planer in a dry, safe place. This protects it from moisture and damage.
| Storage Tip | Reason |
| Use a case or cover | Protects from dust and impacts |
| Keep away from damp areas | Prevents rust and corrosion |
| Store on a stable surface | Avoids falls and damage |
Routine Inspections
Check your power planer regularly for signs of wear or damage. Early fixes save money and time.
- Inspect blades for dullness or chips and replace if needed.
- Check power cord for cuts or frays to avoid hazards.
- Test the switch and motor for smooth operation.
- Tighten any loose screws or parts.
Frequently Asked Questions
How Do I Fix A Power Planer Not Starting?
First, check the power supply and ensure the planer is plugged in. Inspect the power cord for any damage. Clean the dust and debris from the motor and switches. If the planer still doesn’t start, consider checking the motor brushes and replace them if worn out.
Why Is My Power Planer Producing Uneven Surfaces?
Uneven surfaces can be caused by dull blades. Ensure the blades are sharp and properly aligned. Check the planer’s base plate for warping or damage. Adjust the depth settings according to the manufacturer’s guide. Regular maintenance and proper handling during use will help ensure even surfaces.
What Should I Do If My Planer Overheats?
Ensure the planer is clean from dust and debris. Check for any blockages in the air vents. Allow the planer to cool down between uses. Avoid overloading the planer by making shallow passes. Regular maintenance and proper handling can prevent overheating issues.
How Can I Reduce Vibration In My Power Planer?
Vibration can be minimized by ensuring blades are sharp and balanced. Tighten any loose screws or bolts on the planer. Check for any damage to the planer’s components. Use the planer on a stable surface and ensure the workpiece is securely clamped.
Conclusion
Repairing power planers can save money and extend their life. Start with simple checks and clean the tool well. Replace worn parts carefully and follow safety steps. Regular care helps avoid common problems. Trust your skills and take time with each step.
Soon, your power planer will work smoothly again. Keep practicing, and repairs will feel easier. This knowledge helps you handle future issues with confidence.