Are you tired of digging through piles of tools every time you need a screwdriver or wrench? Setting up a garage tool rack can change that instantly.
Imagine having all your tools neatly organized and right within reach, saving you time and frustration. In this guide, you’ll learn simple steps to create a tool rack that fits your space and your needs perfectly. Keep reading, and soon your garage will be the organized, efficient workspace you’ve always wanted.

Credit: www.placerealestate.ca
Choosing The Right Tool Rack
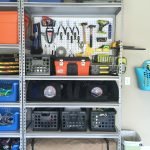
Setting up a garage tool rack helps keep your tools organized. Picking the right rack makes your workspace neat and safe.
Think about the types, materials, and size before you buy or build a tool rack. This way, it fits your needs well.
Types Of Tool Racks
There are many tool rack types for different tools. Some hold hand tools, others store power tools or small parts.
- Wall-mounted racks save floor space and keep tools visible.
- Freestanding racks can be moved and hold many tools.
- Magnetic racks hold metal tools securely on a flat surface.
- Pegboards let you arrange hooks for custom tool placement.
Material Options
Tool racks come in different materials. Choose one that lasts and fits your garage environment.
- Wood racks look nice and hold heavy tools but can wear out.
- Metal racks are strong and resist damage from tools.
- Plastic racks are lightweight and resist rust but may be less sturdy.
- Combination racks use metal hooks on wood or plastic boards.
Size And Capacity Considerations
Pick a rack size that fits your garage space and tool collection. Bigger is not always better.
Check the weight capacity to avoid damage. Make sure the rack holds your heaviest tools safely.
- Measure your available wall or floor space.
- List your tools to estimate rack size needs.
- Choose racks that can hold extra tools for future use.
- Consider adjustable racks for flexible storage options.
Preparing Your Garage Space
Setting up a garage tool rack needs some planning. You must prepare your garage space before starting.
Good preparation helps keep your tools safe and easy to find. It also makes the rack last longer.
Clearing The Area
Clear the space on the wall where you want to put the tool rack. Remove any items that block the area.
Make sure the floor near the wall is clean. This gives you room to work and keep your tools safe.
Measuring Wall Space
Measure the length and height of the wall space where the rack will go. Write down these numbers.
Check if the space fits the size of the tool rack you want. Leave extra room for easy access.
Locating Studs And Supports
Find the wooden studs inside the wall. Studs are needed to hold the weight of the tool rack safely.
Use a stud finder or tap the wall to hear solid areas. Mark the stud locations with a pencil.
- Studs usually sit 16 or 24 inches apart
- Mark each stud clearly
- Check for electrical wires before drilling
Gathering Necessary Tools And Materials
Setting up a garage tool rack starts with gathering the right tools and materials. This helps you work efficiently and safely.
Organizing your supplies before you begin makes the process smooth and saves time.
Essential Tools
You need some basic tools to build a sturdy and reliable tool rack. These tools help you measure, cut, and assemble parts correctly.
- Measuring tape for accurate dimensions
- Power drill with drill bits
- Screwdriver set for various screw types
- Level to ensure straight installation
- Hammer for nailing if needed
- Safety glasses to protect your eyes
- Stud finder to locate wall studs
- Pencil for marking measurements
Hardware And Accessories
Choose the right hardware and accessories to support your tool rack’s weight and design. These materials keep your tools safe and accessible.
| Hardware/Accessory | Purpose | Recommended Type |
| Screws | Fasten parts to walls or rack | Wood screws, 2-3 inches |
| Wall anchors | Support screws in drywall | Heavy-duty plastic or metal |
| Brackets | Support shelves or racks | Metal L-shaped brackets |
| Hooks | Hang tools like wrenches | Metal S-hooks or peg hooks |
| Wood planks or boards | Build rack frame and shelves | Pine or plywood, 1×4 or 1×6 inches |

Credit: www.reddit.com
Installing The Tool Rack
Installing a garage tool rack keeps your tools organized and easy to reach. Proper installation ensures the rack holds weight safely.
This guide covers marking mounting points, drilling and anchoring, and securing the rack to the wall.
Marking Mounting Points
Start by holding the tool rack against the wall at the desired height. Use a pencil to mark where the mounting holes will go.
Make sure the marks line up with wall studs if possible for stronger support.
- Use a stud finder to locate studs behind drywall.
- Mark the stud locations clearly.
- Position the rack so holes match the studs.
- Mark each mounting hole with a pencil.
Drilling And Anchoring
Drill pilot holes at the marked points. Use a drill bit size that fits your wall anchors or screws.
If you cannot mount on studs, use wall anchors to support the rack’s weight.
| Wall Type | Anchor Type | Drill Bit Size |
| Drywall (no stud) | Plastic expansion anchor | 1/4 inch |
| Concrete or brick | Masonry anchor | 3/16 inch |
| Wood stud | Wood screw (no anchor) | Match screw diameter |
Securing The Rack To The Wall
Place the rack back on the wall, aligning holes with drilled points. Insert screws through the rack holes and tighten them into anchors or studs.
- Use a screwdriver or drill with a screwdriver bit.
- Tighten screws until the rack is firmly held.
- Do not overtighten to avoid damaging the wall.
- Check rack stability by gently pulling on it.
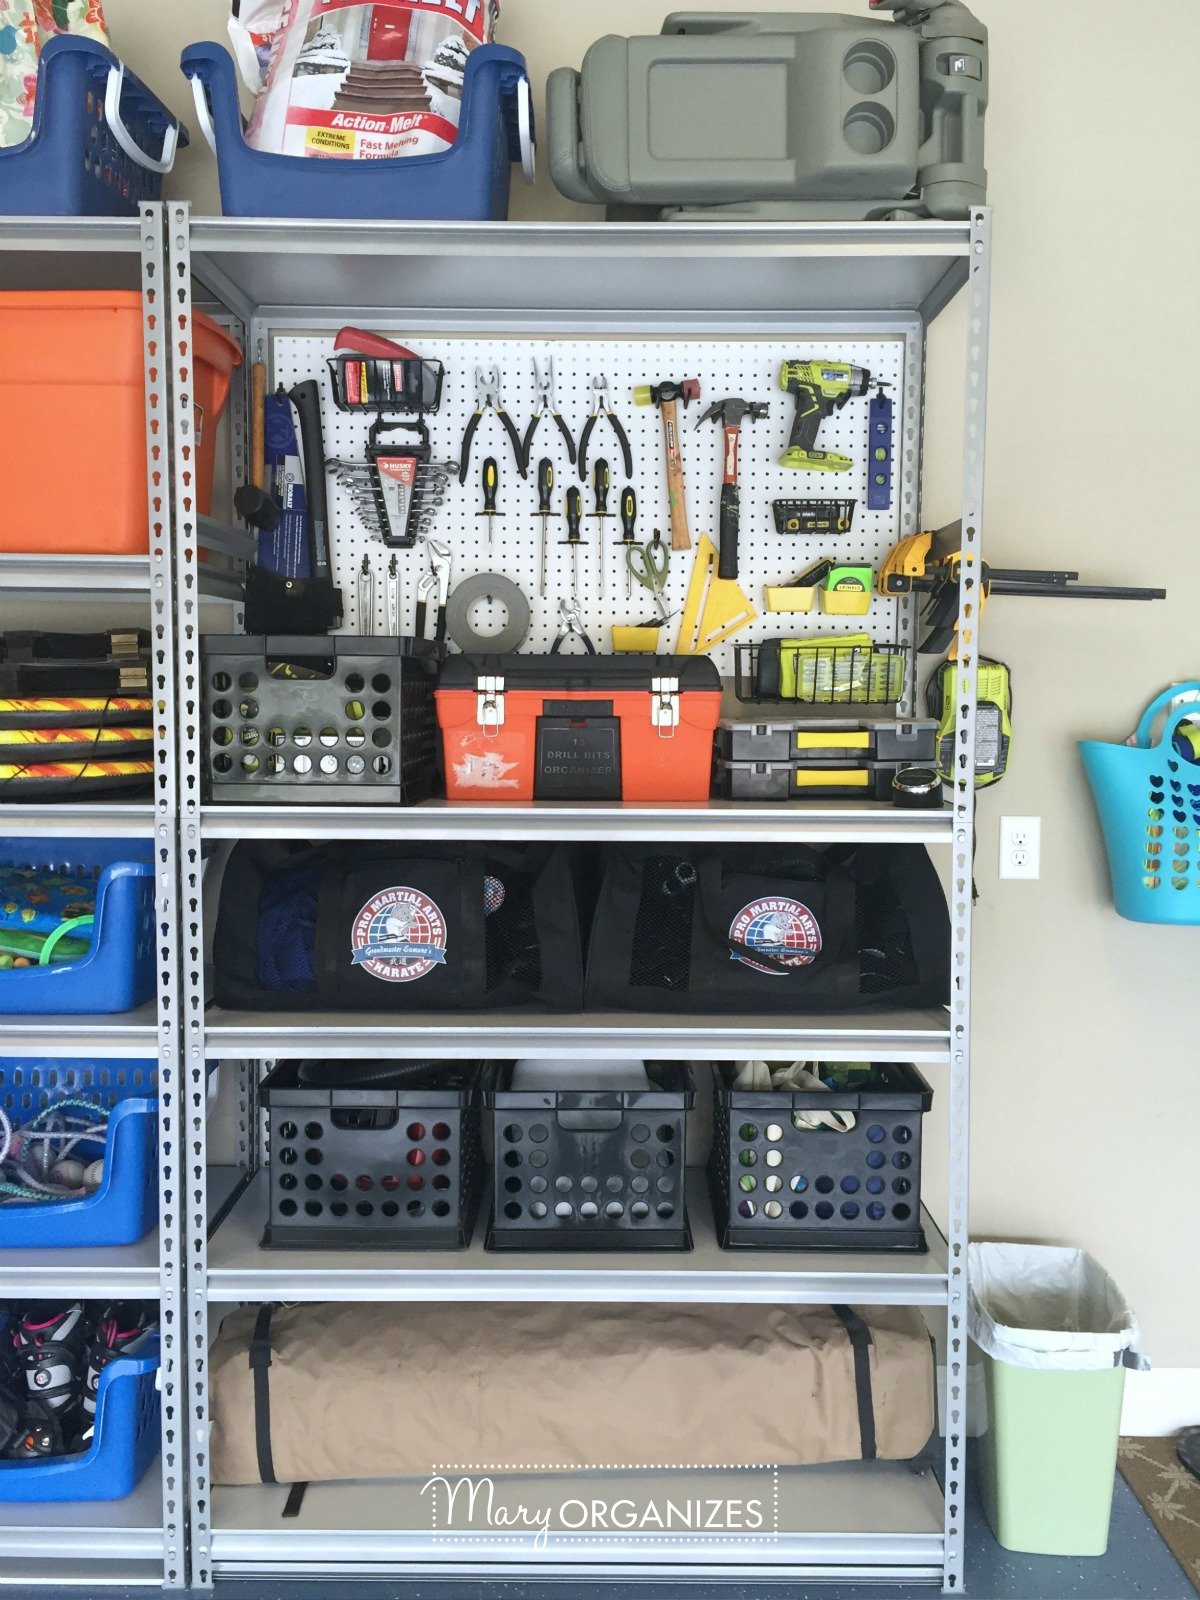
Organizing Tools On The Rack
Keeping your tools organized on a garage tool rack saves time and space. A well-arranged rack makes finding tools quick and easy.
Organizing tools properly also protects them from damage and keeps your garage neat. Let’s explore how to arrange your tools effectively.
Grouping Tools By Type
Sort your tools by their type to keep similar items together. This helps you find tools fast and keeps the rack tidy.
For example, group all screwdrivers in one area and wrenches in another. This system stops tools from mixing up.
- Put hand tools like hammers and pliers together
- Keep cutting tools like saws and knives in one spot
- Place power tool accessories in a separate section
Using Hooks And Holders
Hooks and holders make it easy to hang tools on the rack. They keep tools visible and accessible.
Use different sizes of hooks for various tool shapes and weights. Holders can hold items like screwdrivers or drills securely.
- Use heavy-duty hooks for large tools
- Install small holders for screwdrivers and pliers
- Add magnetic strips for metal tools
Maximizing Space Efficiency
Make the most of your tool rack by using all available space. Arrange tools to avoid gaps and clutter.
Place less-used tools higher or in corners. Keep daily-use tools at eye level for quick reach.
- Use vertical space by hanging tall tools upright
- Stack smaller holders to save horizontal space
- Group tools by size to fit more on the rack
Maintaining Your Tool Rack
Keeping your garage tool rack in good shape helps your tools last longer. It also makes your workspace safer and more organized.
Regular care includes cleaning, rearranging, and following safety steps. These simple tasks save you time and effort later.
Regular Cleaning
Dust and dirt can build up on your tool rack. Clean it often to keep tools easy to find and use.
- Remove all tools before cleaning
- Use a dry cloth to wipe dust off shelves and hooks
- For stubborn dirt, use a mild soap solution and dry well
- Check for rust or damage while cleaning
- Allow the rack to dry completely before placing tools back
Reorganizing As Needed
Over time, your tool needs may change. Keep your rack useful by rearranging tools for easy access.
- Sort tools by type or frequency of use
- Place often-used tools at eye level or within reach
- Group similar items together to find them fast
- Label shelves or hooks if needed
- Remove broken or unused tools to save space
Safety Tips
Keep your tool rack safe to prevent accidents and damage. Follow these rules for a secure setup.
| Safety Tip | Reason |
| Secure the rack to the wall | Prevents tipping or falling |
| Use hooks and holders properly | Keeps tools stable and easy to grab |
| Store sharp tools with covers | Protects you from cuts |
| Keep the area well-lit | Helps you see tools clearly |
| Check weight limits of the rack | Avoids breaking or damage |

Credit: www.reddit.com
Frequently Asked Questions
What Tools Do I Need For A Garage Tool Rack?
You need a drill, screws, wall anchors, a level, measuring tape, and brackets. These tools help securely mount the rack on the wall for safe storage.
How Do I Choose The Right Spot For My Tool Rack?
Pick a dry, accessible wall near your workspace. Ensure the wall can support the rack’s weight and leaves enough room to reach tools easily.
Can I Customize My Garage Tool Rack Design?
Yes, customize by adding shelves, hooks, or magnetic strips. Tailor the layout to fit your tools and garage size for better organization.
How Do I Securely Mount A Garage Tool Rack?
Use a stud finder to locate studs. Drill pilot holes and use appropriate anchors or screws to ensure the rack is firmly attached and safe.
Conclusion
Setting up a garage tool rack is simple and rewarding. It keeps tools organized and easy to find. A tidy garage saves time and space. Follow steps carefully for best results. Choose the right materials for durability. Secure tools properly to avoid accidents.
Enjoy the neat, efficient space you create. Share your experience with friends and family. Inspire others to organize their garages too. A well-organized garage makes every project easier. Happy organizing!