Imagine stepping into your garage and instantly finding every tool you need, neatly organized and within arm’s reach. No more time wasted searching through cluttered drawers or rummaging through piles of misplaced equipment.
Setting up a garage tool wall can transform your workspace into a haven of efficiency and order. You’ll experience the satisfaction of a well-organized environment that not only boosts your productivity but also gives you peace of mind. Ready to learn how you can achieve this?
In this guide, we’ll walk you through the simple steps to set up your very own garage tool wall, making your DIY projects smoother and more enjoyable than ever before. Discover the secret to turning chaos into calm and see how a few changes can revolutionize your garage.
Choosing The Right Wall
Setting up a garage tool wall starts with picking the best wall. The right wall helps keep tools organized and easy to reach.
Consider the space, material, and lighting before choosing your wall. These factors make your tool wall practical and safe.
Assessing Available Space
Look at all the walls in your garage. Find a wall with enough room to hold your tools and allow movement.
Measure the height and width to know how many hooks and shelves you can add. Avoid walls cluttered with pipes or outlets.
- Choose a wall free of obstacles
- Check for enough width and height
- Consider space needed for opening doors or cabinets
Selecting Wall Material
Pick a wall with a strong surface that holds hooks and shelves well. Wood and drywall are common choices.
Concrete or brick walls need special anchors to hold heavy tools. Avoid walls that may get damaged easily.
- Wood walls are easy to drill and sturdy
- Drywall needs studs for heavy items
- Concrete walls require masonry anchors
- Avoid weak or crumbling walls
Considering Lighting And Accessibility
Choose a wall with good lighting or plan to add lights. Bright light helps you find tools quickly and safely.
Make sure the wall is easy to reach. Avoid placing tools where you need to move furniture or climb to get them.
- Pick a wall near windows or install lights
- Keep tools within easy arm’s reach
- Leave space for future tool additions
Gathering Essential Tools And Materials
Setting up a garage tool wall helps keep tools organized and easy to find. Before starting, gather all the tools and materials you will need. This saves time and makes the project smoother.
In this guide, we look at the key items: hooks and holders, panels and pegboards, and the fasteners and anchors needed to install them securely.
Types Of Hooks And Holders
Hooks and holders come in many shapes and sizes to hold different tools. Choose the right type for your tool wall to maximize space and keep tools safe.
- J-hooks for large tools like shovels and rakes
- Loop hooks for cords and hoses
- Tool holders with slots for screwdrivers and pliers
- Magnetic strips for metal tools such as wrenches
- Bins and baskets for small parts and accessories
Panels And Pegboards
Panels and pegboards provide the base to attach hooks and holders. They must be strong and easy to work with. Pegboards have holes for flexible hook placement.
| Material | Benefit | Common Use |
| MDF Pegboard | Affordable and smooth surface | Light to medium weight tools |
| Metal Pegboard | Very durable and strong | Heavy tools and outdoor use |
| Wood Panels | Sturdy and easy to customize | Custom tool holders and shelves |
Fasteners And Anchors
Fasteners and anchors secure your panels and hooks to the wall. Using the right type ensures safety and stability for your tool wall.
- Wall anchors for drywall mounting
- Masonry anchors for concrete or brick walls
- Wood screws for wooden studs
- Toggle bolts for heavy loads
- Washers to protect panels from damage
Planning Your Layout
Setting up a garage tool wall starts with a good plan. You need to think about how to arrange your tools for easy access and neat storage.
Planning helps you use your space well and keeps your tools organized. This guide covers key points to consider for your tool wall layout.
Grouping Tools By Type
Keep similar tools together to find them quickly. Grouping by type also saves space and makes the wall look tidy.
- Hand tools like hammers, screwdrivers, and pliers
- Power tools such as drills and sanders
- Measuring tools including tape measures and levels
- Fasteners and small parts stored in bins or boxes
Maximizing Vertical Space
Use the full height of your garage wall. Vertical space frees up floor areas and keeps tools visible.
| Wall Section | Use |
| Top Rows | Store rarely used or seasonal tools |
| Middle Rows | Place frequently used tools at eye level |
| Bottom Rows | Keep heavy or bulky items |
Designing For Future Expansion
Plan your tool wall with growth in mind. You might buy new tools or change your needs later.
Consider these tips for future-proofing your layout:
- Leave empty spaces for extra hooks or shelves
- Choose adjustable pegboards or modular panels
- Use removable containers and bins

Credit: www.reddit.com
Preparing The Wall Surface
Setting up a garage tool wall starts with preparing the wall surface properly. This process ensures the wall is clean, sturdy, and ready to hold your tools safely.
Taking time to clean, mark, and install supports will help you create a durable and organized tool storage area.
Cleaning And Repairing
Begin by cleaning the wall to remove dust, dirt, and grease. Use a mild detergent and water, then let the wall dry completely. Check for holes, cracks, or loose paint that can weaken the surface.
Fill any holes or cracks with spackle or wall filler. Sand the repaired areas smooth once dry. This step creates a flat and strong base for mounting your tool holders.
Marking Mounting Points
Use a pencil and a measuring tape to mark where you will place hooks, shelves, or pegboards. Mark mounting points at regular intervals to balance the weight of your tools evenly.
- Measure the height and width of the wall space.
- Decide which tools will go where for easy reach.
- Mark spots for screws and anchors clearly with a pencil.
- Double-check measurements before drilling any holes.
Installing Support Structures
Strong support structures keep your tool wall safe and stable. Use wooden studs or metal brackets to back your mounting boards or pegboards.
| Support Type | Material | Use |
|---|---|---|
| Wooden Studs | Wood | Attach mounting boards for heavy tools |
| Metal Brackets | Steel or aluminum | Support shelves and pegboards |
| Wall Anchors | Plastic or metal | Secure screws in drywall without studs |
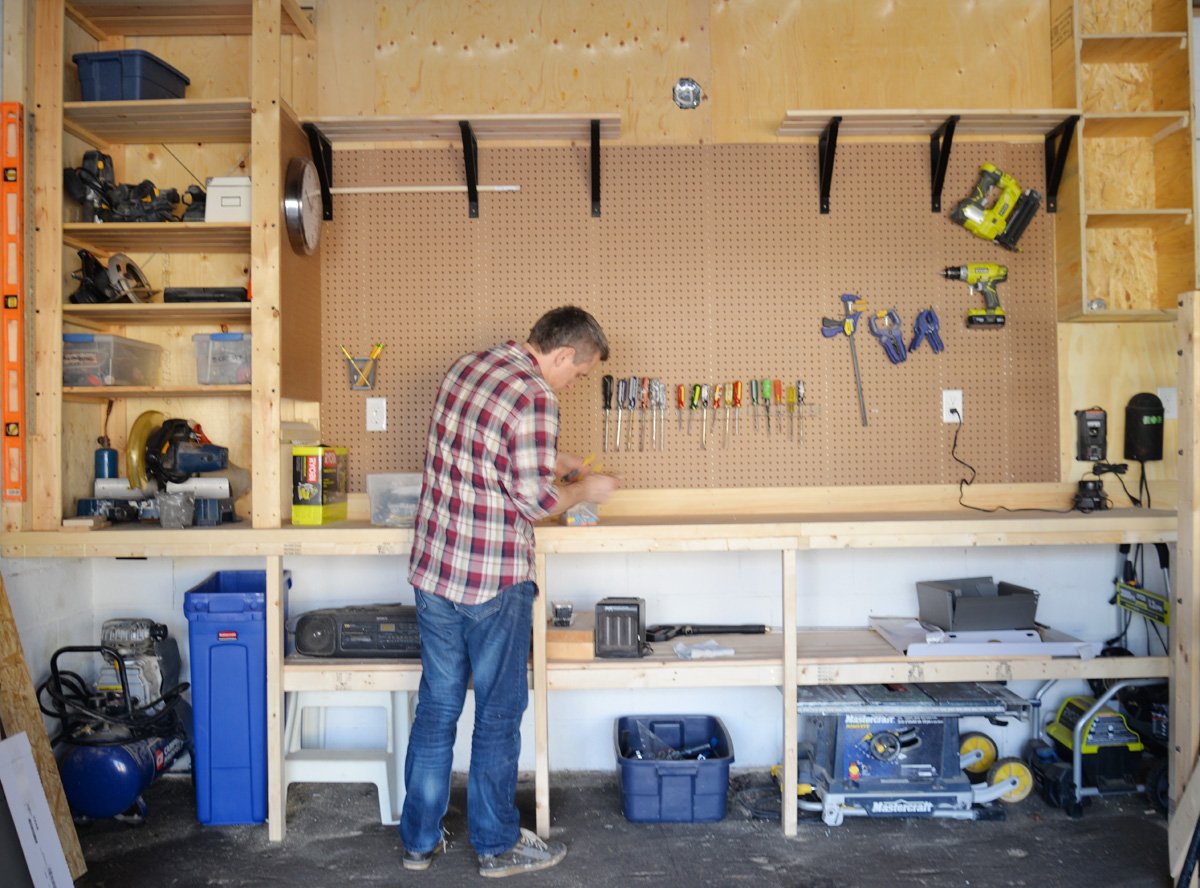
Installing The Tool Wall
Setting up a garage tool wall helps keep your tools easy to find. A well-organized wall saves space and time during projects.
This guide covers the key parts of installing your tool wall. You will learn how to mount pegboards, secure hooks, and organize tools well.
Mounting Pegboards And Panels
Start by choosing a strong wall space for your pegboard or panel. Use a level to mark where to drill holes for screws. Attach the board to wall studs for good support.
- Measure the wall area and cut the pegboard to fit.
- Find wall studs with a stud finder.
- Mark drill points on the pegboard and wall.
- Drill pilot holes to prevent cracking.
- Screw the pegboard securely into the studs.
Securing Hooks And Holders
Hooks and holders keep tools stable on the wall. Choose the right size and type for each tool. Insert hooks firmly into the pegboard holes. Test each hook for strength before hanging heavy items.
| Hook Type | Use For | Tip |
| Single Hook | Hammers, Wrenches | Insert fully for safety |
| Double Hook | Power Tools | Use near studs |
| Tool Holder | Screwdrivers, Pliers | Match size to tool |
| Basket Hook | Paint Cans, Small Parts | Hang at eye level |
Organizing Tools Effectively
Organize tools by frequency of use and type. Keep daily tools within easy reach. Group similar tools together to find them fast.
- Hang frequently used tools at eye level.
- Place large tools on lower hooks or shelves.
- Label sections for quick identification.
- Use color-coded holders for different tool groups.

Credit: www.ramblingrenovators.ca
Maintaining Your Tool Wall
Keeping your garage tool wall tidy helps you find tools fast. It also makes your workspace safer and more organized.
Regular care extends the life of your tools and the wall system. Simple habits keep everything in good shape.
Regular Cleaning Tips
Dust and dirt can build up on your tool wall. Clean it often to keep tools visible and easy to grab.
Wipe hooks, shelves, and pegboards with a damp cloth. Use mild soap if needed, then dry well.
- Remove all tools before cleaning
- Use a soft cloth or brush
- Check for rust or dirt on tools
- Clean floors near the wall too
Rearranging For Efficiency
Move your tools to spots you use most. This saves time and effort during projects.
Group similar tools together. Keep frequently used tools at eye level or within easy reach.
- Place heavy tools lower on the wall
- Hang small tools near your workbench
- Label tool locations for quick access
- Change layout as your tool collection grows
Inspecting For Wear And Damage
Look over your tool wall regularly. Check hooks, shelves, and mounts for damage or looseness.
Inspect tools for rust, cracks, or broken parts. Fix or replace any damaged items right away.
- Tighten screws and bolts on mounts
- Replace bent or broken hooks
- Keep tools sharp and clean
- Store tools safely to avoid damage
Creative Customization Ideas
Setting up a garage tool wall helps keep your workspace tidy. Customizing it makes your tools easy to find and use. You can add style and function with simple ideas.
Try using colors, magnets, and extra storage to make your tool wall more practical. These ideas fit different tools and help you work faster.
Labeling And Color Coding
Labels and colors show where each tool belongs. This saves time and keeps the wall organized. You can use tags or paint to mark spots clearly.
- Use color tape to mark tool outlines
- Attach name tags under each hook or shelf
- Choose bright colors for quick spotting
- Group similar tools by color
- Write tool names with a permanent marker
Incorporating Magnetic Strips
Magnetic strips hold metal tools securely on the wall. They keep tools visible and easy to grab. This method saves space and looks neat.
Here is a simple way to add magnetic strips:
- Measure the wall area for the strip
- Buy strong magnetic strips or bars
- Attach strips with screws or heavy-duty adhesive
- Place metal tools like screwdrivers and wrenches on the strip
- Check that magnets hold tools firmly
Adding Shelves And Bins
Shelves and bins add extra space for small parts and bulky tools. You can arrange them by size or use. This keeps the wall tidy and tools safe.
| Storage Type | Best For | Advantages |
| Shelves | Power tools, paint cans | Easy to access, holds heavy items |
| Bins | Nails, screws, small parts | Keeps small items organized and visible |
| Stackable Bins | Assorted hardware | Saves floor space, easy to label |

Credit: www.reddit.com
Frequently Asked Questions
How Do I Start Setting Up A Garage Tool Wall?
Begin by selecting a sturdy wall with enough space. Clean the area, measure dimensions, and plan tool placement for easy access. Gather necessary materials like pegboards, hooks, and mounting hardware before installation.
What Materials Are Best For A Garage Tool Wall?
Pegboards are popular due to versatility and easy customization. Metal slat walls offer durability and heavy tool support. Choose materials based on your tool types and garage space.
How Can I Organize Tools Efficiently On The Wall?
Group similar tools together for quick access. Use labeled hooks and bins to keep small items tidy. Arrange frequently used tools at eye level for convenience.
What Tools Do I Need To Install A Tool Wall?
Basic tools include a drill, screws, level, measuring tape, and pencil. These help mount the pegboard or panels securely and ensure proper alignment.
Conclusion
Setting up a garage tool wall keeps your space tidy and tools easy to find. It saves time and effort during projects. Choose the right materials and plan the layout carefully. Hang tools where you use them most. Keep the wall neat by returning tools after use.
A well-organized garage makes work more enjoyable. Start today and see the difference it makes. Simple steps lead to big improvements. Your garage will thank you.