Are your chisels leaving rough edges instead of clean, precise cuts? If so, it’s time to sharpen them the right way.
Sharp chisels not only make your work easier but also give you better control and flawless results every time. In this guide, you’ll discover simple, effective techniques to bring your chisels back to life quickly. Keep reading to learn how sharpening your chisels can transform your woodworking projects and save you time and frustration.
Choosing The Right Chisel
Choosing the right chisel is key for sharp, precise cuts. Not all chisels fit every woodworking task.
Focus on the chisel type and steel quality to get the best tool for your needs.
Types Of Chisels
Chisels come in different shapes and sizes. Each type suits certain jobs in woodworking.
- Bench chisels are versatile for general use and fine work.
- Mortise chisels have thick blades for heavy-duty chopping.
- Paring chisels are thin and long for delicate trimming.
- Corner chisels create clean 90-degree corners.
- Skew chisels cut at an angle, useful for smoothing edges.
Selecting Quality Steel
Steel quality affects sharpness and edge retention. High-quality steel lasts longer and sharpens well.
| Steel Type | Features | Best Use |
|---|---|---|
| Carbon Steel | Easy to sharpen, holds edge well | General woodworking |
| Chrome Vanadium Steel | Corrosion resistant, durable | Heavy-duty tasks |
| High-Speed Steel | Very hard, heat resistant | Precision cutting |
Essential Sharpening Tools
Sharpening chisels correctly needs the right tools. These tools help keep the chisel edges sharp and ready for precise cuts.
Using proper sharpening tools improves your woodworking and makes your work safer and cleaner.
Grinding Wheels
Grinding wheels are fast and efficient for reshaping dull chisels. They remove metal quickly but require care to avoid overheating the blade.
- Choose the correct wheel grit for your chisel type.
- Keep the blade cool by dipping it in water often.
- Use light pressure to avoid removing too much metal.
- Wear safety glasses to protect your eyes from sparks.
Sharpening Stones
Sharpening stones are essential for fine sharpening and honing. They come in various grits from coarse to very fine.
| Stone Type | Grit Range | Use |
| Coarse Stone | 200-400 | Remove nicks and reshape edges |
| Medium Stone | 800-1000 | Sharpen dull edges |
| Fine Stone | 3000-8000 | Polish and refine the edge |
Honing Guides
Honing guides help keep a consistent angle while sharpening. This tool improves edge accuracy and repeatability.
Benefits of using honing guides:
- Maintain a steady sharpening angle
- Prevent uneven bevels
- Make sharpening easier for beginners
- Protect the chisel from damage
Preparing The Chisel
Sharpening a chisel starts with good preparation. You need to make sure the chisel is clean and set at the right angle.
Proper preparation helps you get sharp and precise cuts. It also protects your tools from damage.
Cleaning The Blade
Remove dirt and rust from the blade before sharpening. A clean blade sharpens more evenly and lasts longer.
Use a cloth and some oil to wipe the blade. For rust, use fine steel wool or sandpaper gently.
- Wipe off dust and dirt with a dry cloth
- Apply light oil to remove rust spots
- Use fine steel wool for tough rust
- Dry the blade completely before sharpening
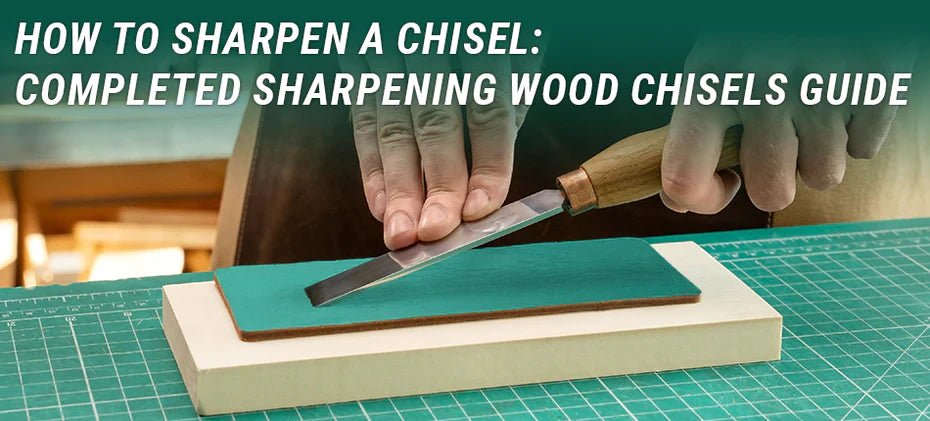
Checking Blade Angle
The blade angle affects how sharp and precise the cut will be. Most chisels work best at angles between 25 and 30 degrees.
Use a bevel gauge or angle guide to check your chisel’s edge. Keep the angle steady during sharpening for best results.
- Find the current bevel angle with a bevel gauge
- Mark the angle if needed with a pencil
- Keep the same angle on sharpening stones or tools
- Adjust angle slightly for different wood types

Credit: woodworkersinstitute.com
Sharpening Techniques
Sharpening chisels is key for clean and precise cuts in woodworking. Using the right technique keeps the tool sharp longer. This guide covers important methods to sharpen chisels effectively.
Each sharpening step focuses on different parts of the blade. Proper care prevents damage and improves your work quality.
Grinding The Bevel
Grinding the bevel shapes the main cutting edge of the chisel. Use a bench grinder or sharpening wheel with care to avoid overheating the steel. Keep the bevel angle consistent during grinding.
- Secure the chisel firmly.
- Lightly touch the bevel to the grinding surface.
- Move the chisel back and forth evenly.
- Dip the blade in water to cool often.
- Check the bevel angle with a guide.
Using Water Stones
Water stones refine the cutting edge after grinding. They remove scratches and smooth the bevel. Soak the stones in water before use and keep them wet while sharpening.
| Stone Grit | Purpose | Use Time |
| 400-600 | Coarse sharpening | 5-10 minutes |
| 1000-3000 | Fine sharpening | 10-15 minutes |
| 4000-8000 | Polishing edge | 5-10 minutes |
Creating A Secondary Bevel
A secondary bevel protects the main edge and improves control. It is a small flat surface at the tip of the bevel. This step helps reduce chipping and keeps the edge sharp longer.
Follow these points to create a secondary bevel:
- Hold the chisel at a slightly higher angle than the main bevel.
- Use a fine sharpening stone or fine grit sandpaper.
- Apply light pressure and move evenly across the bevel.
- Check the edge frequently to avoid over-sharpening.
Honing For Precision
Honing chisels makes their edges very sharp and smooth. This helps you make clean and exact cuts in wood.
Good honing keeps your chisels working well for a long time. It also improves your woodworking quality.
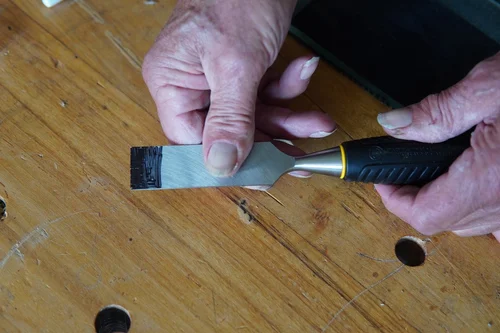
Stropping Methods
Stropping removes tiny burrs and smooths the chisel edge. It uses a leather strap or strop to polish the blade.
Use gentle, even strokes on the strop. Pull the chisel away from the edge to avoid cutting the leather.
- Attach a leather strop to a flat surface.
- Apply light pressure while stropping.
- Keep the blade angle consistent during stropping.
- Repeat stropping after each use for best results.
Using Honing Compounds
Honing compounds improve stropping by adding abrasive particles. They help sharpen and polish the chisel edge.
Choose a fine or extra-fine compound for precise edges. Spread the compound thinly on the leather strop.
- Apply a small amount of compound to the strop.
- Rub the chisel blade on the strop with compound.
- Wipe off excess compound after stropping.
- Store compounds in a dry place to keep them effective.

Credit: woodworkersinstitute.com
Maintaining Sharpness
Keeping chisels sharp is key for clean, precise cuts. Sharp chisels cut wood easily and safely.
Regular care helps your chisels stay effective longer. Two main ways to do this are proper storage and regular touch-ups.
Proper Storage
Storing chisels correctly protects their edges and prevents damage. Avoid tossing them in toolboxes without protection.
- Use a chisel roll or wooden rack to keep chisels separated.
- Keep blades covered with blade guards or caps.
- Store chisels in a dry place to stop rust from forming.
- Clean chisels before storing to remove dirt and moisture.
Regular Touch-ups
Touching up chisels keeps edges sharp between full sharpenings. Small fixes save time and effort.
| Touch-Up Method | How to Do It | When to Use |
| Honing with a Strop | Drag the chisel back on leather strop with polishing compound | After each use or weekly |
| Light Honing on Stone | Use fine sharpening stone to smooth edge | When edge feels dull or rough |
| Removing Burrs | Rub the back of chisel flat on fine stone to remove burrs | During every sharpening session |
Common Mistakes To Avoid
Sharpening chisels correctly is important for precise cuts. Many beginners make simple mistakes that can damage the blade or reduce its sharpness.
Knowing these common errors helps you keep your chisels sharp and safe to use. Avoiding them saves time and improves your woodworking results.
Overheating The Blade
When sharpening, rubbing the blade too fast or pressing too hard creates heat. This heat can ruin the blade’s hardness and cause it to lose its edge quickly.
- Use light, even pressure when sharpening.
- Move the blade slowly across the sharpening stone.
- Pause often to check the blade temperature by touch.
- Cool the blade with water or oil if it gets hot.
Incorrect Angles
Sharpening at the wrong angle makes the edge weak or uneven. Each chisel has a recommended sharpening angle, usually between 25 and 30 degrees.
| Angle Mistake | Effect on Blade |
| Too steep | Edge chips easily |
| Too shallow | Edge dulls quickly |
| Uneven angle | Cut is rough and inaccurate |
Use a sharpening guide or angle jig to keep a steady angle. Check the angle often during sharpening to avoid mistakes.
Skipping Honing Steps
Honing smooths the blade edge after sharpening. Skipping this step leaves tiny rough spots that dull the blade faster.
- Start with coarse stones to shape the edge.
- Use medium stones to refine the edge.
- Finish with fine stones or a leather strop to hone.
- Test the sharpness on scrap wood before use.
Credit: www.anneofalltrades.com
Testing Sharpness
After sharpening your chisels, you need to check if they are sharp enough. Testing sharpness helps ensure precise cuts. It also keeps your work safe and clean.
There are simple tests you can do at home. These tests show if the chisel edge is ready for woodworking tasks.
Paper Test
The paper test is a quick way to check sharpness. Take a thin sheet of paper and try slicing it with the chisel edge.
If the chisel cuts cleanly without tearing or snagging, it is sharp. If the paper tears or the chisel struggles, it needs more sharpening.
- Hold the paper firmly.
- Slice the paper with light pressure.
- Look for a smooth, clean cut.
- Repeat if needed to confirm results.
Wood Cutting Test
Testing on wood is a practical way to check your chisel. Use a soft piece of wood and try making cuts with your chisel.
A sharp chisel will cut wood easily and leave smooth surfaces. If the chisel tears or leaves rough edges, sharpen it more.
- Choose a soft wood block.
- Make small cuts with the chisel edge.
- Check the smoothness of the cuts.
- Notice if the chisel slips or drags.
Frequently Asked Questions
How Often Should You Sharpen Chisels?
Sharpen chisels whenever you notice them becoming dull or less effective. Regular use may require sharpening monthly. For occasional use, check sharpness before each project. Consistent sharpening ensures precise cuts and extends the tool’s lifespan.
What Tools Are Needed For Chisel Sharpening?
You’ll need a sharpening stone, honing guide, and lubricant (water or oil). A bench grinder can be useful for damaged chisels. A strop or leather belt helps achieve a razor-sharp edge. These tools ensure efficient and effective sharpening.
Can Beginners Easily Sharpen Chisels?
Yes, beginners can sharpen chisels with practice and proper guidance. Start with basic tools like a sharpening stone and honing guide. Follow step-by-step tutorials or watch videos. With patience, you’ll achieve a sharp edge and improve your woodworking skills.
How Do You Test Chisel Sharpness?
Test chisel sharpness by slicing through a piece of paper. A sharp chisel will cut smoothly without tearing. You can also try paring softwood; a sharp chisel will effortlessly shave thin, even curls. Regular testing ensures consistent performance.
Conclusion
Sharpening chisels takes practice and patience. Use the right tools and keep the angle steady. A sharp chisel cuts wood cleanly and easily. Regular sharpening saves time and improves your work. Small steps make a big difference in precision. Stay safe and take breaks as needed.
Now, your chisels will help create better projects. Keep sharpening, and enjoy crafting with confidence.