Are your planer blades starting to dull and slowing down your woodworking projects? If you want smooth, clean cuts every time, sharpening your planer blades is key.
You might think it’s complicated or time-consuming, but it doesn’t have to be. You’ll discover simple, effective steps to sharpen your planer blades quickly and safely. Keep reading, and you’ll save money, improve your work quality, and get your tools back to top performance in no time.

Credit: www.youtube.com
Choosing The Right Tools
Sharpening planer blades needs the right tools to work well. Picking good equipment helps you get sharp blades faster and safer.
Using the right gear also protects your blades from damage. This guide explains what tools and safety items to use.
Essential Sharpening Equipment
You need specific tools to sharpen planer blades properly. These tools help keep the edge straight and sharp.
- Sharpening stone or diamond stone for grinding edges
- Blade honing guide to keep a steady angle
- Lubricant like water or oil for smooth sharpening
- Flat surface to check blade flatness
- Cloth to clean blades after sharpening
Safety Gear For Blade Sharpening
Safety gear protects you from cuts and dust during sharpening. Always wear the right items to stay safe.
| Safety Gear | Purpose |
| Cut-resistant gloves | Protect hands from sharp blades |
| Safety glasses | Shield eyes from metal shards |
| Dust mask | Prevent inhaling metal dust |
| Apron | Protect clothes and skin |
Preparing The Blades
Sharpening planer blades starts with proper preparation. Taking out the blades safely and checking them carefully helps you get better results.
This guide covers removing the blades and cleaning and inspecting them before sharpening.
Removing Blades From The Planer
Always unplug the planer before removing the blades. This keeps you safe from accidental starts. Use the right tools to loosen the screws or bolts holding the blades.
- Unplug the planer from the power source.
- Locate the blade holder and screws.
- Use a screwdriver or wrench to remove the screws.
- Carefully take out the blades without touching the sharp edges.
- Place the blades on a clean, flat surface.
Cleaning And Inspecting Blades
Cleaning the blades removes resin and dirt. Inspecting helps find damage or dull spots that sharpening can fix.
| Check Point | What to Look For | Action Needed |
| Blade edge | Chips, nicks, or cracks | Replace if damaged, otherwise sharpen |
| Blade surface | Rust or resin build-up | Clean with solvent and soft cloth |
| Blade flatness | Bent or warped shape | Do not sharpen; replace blade |
Sharpening Techniques
Keeping your planer blades sharp helps you get smooth and clean cuts. Dull blades can damage wood and make your work harder.
There are different ways to sharpen planer blades. Choose the method that fits your tools and skills best.
Using A Bench Grinder
A bench grinder is a fast tool that can sharpen blades quickly. It spins a grinding wheel to remove metal and shape the edge.
Hold the blade firmly and move it against the wheel at a steady angle. Keep the blade cool by dipping it in water often.
- Wear safety glasses and gloves
- Use a slow and steady motion
- Keep the sharpening angle consistent
- Cool the blade frequently to avoid damage
Hand Sharpening With A Whetstone
A whetstone lets you sharpen blades by hand. It is slower but gives good control over the blade’s edge.
Soak the whetstone in water before use. Rub the blade on the stone at the right angle until it feels sharp.
- Use coarse grit first to shape the edge
- Finish with fine grit to smooth the blade
- Keep the blade angle steady during sharpening
- Use water to keep the stone wet
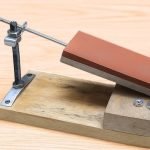
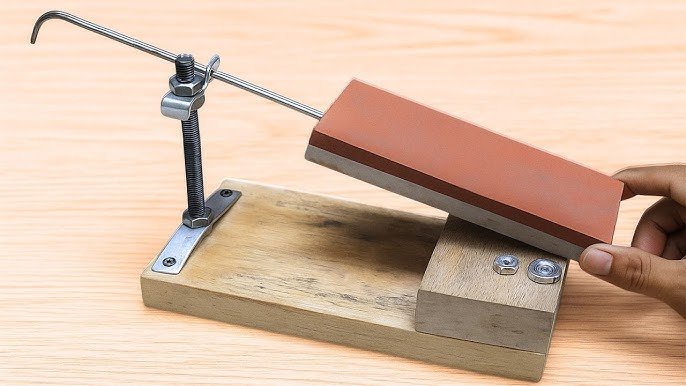
Employing A Sharpening Jig
A sharpening jig holds the blade at a set angle. It makes sharpening easier and more accurate.
Attach the blade to the jig and use a sharpening tool on the blade edge. The jig keeps the angle steady for a clean cut.
- Secure the blade firmly in the jig
- Choose the correct angle for your planer blades
- Move the sharpening tool evenly across the edge
- Check the sharpness often to avoid over-sharpening

Credit: www.msn.com
Setting The Blade Angle
Sharpening planer blades requires setting the right angle. The blade angle affects cutting quality and blade life.
Choosing and keeping the correct angle helps the blade cut smoothly and safely.
Determining The Correct Angle
Check the blade’s original angle before sharpening. This angle is usually between 25 and 30 degrees.
Use a protractor or angle gauge to measure the blade’s bevel. Match this angle when grinding.
- Look for manufacturer markings on the blade
- Use an angle guide tool for accuracy
- Keep the sharpening angle steady to avoid damage
Maintaining Consistency
Keep the same angle on the entire blade edge. Inconsistent angles cause poor cutting and quick dulling.
Use a jig or guide to hold the blade steady. This helps keep the angle uniform during sharpening.
- Sharpen in smooth, even strokes
- Check the angle often with a guide
- Keep the blade cool to avoid warping
Balancing And Testing
Sharpening planer blades is not complete without balancing and testing them. Proper balance ensures smooth operation and safety. Testing helps confirm blades cut evenly and cleanly.
This guide covers how to check blade balance, reinstall blades correctly, and perform test cuts after sharpening.
Checking Blade Balance
Balanced blades reduce vibration and wear on the planer. Use a blade balancing tool or a simple nail mounted horizontally to check balance.
- Place the blade on the balancing tool or nail.
- See if one side dips lower than the other.
- If it dips, lightly file the heavier side’s edge.
- Repeat until the blade stays level when placed on the tool.
Reinstalling Blades Properly
Correct blade installation keeps the planer safe and ensures smooth cuts. Tighten blades evenly and keep them aligned with the cutterhead.
| Task | Tip |
|---|---|
| Clean the cutterhead | Remove dust and debris before installing blades |
| Insert blades | Align blades with the cutterhead slots |
| Tighten screws | Use even pressure and check torque specs |
| Check blade height | Adjust so blades are flush and level |
Performing Test Cuts
Test cuts confirm blades sharpened and installed correctly. Use scrap wood similar to your project material.
- Set the planer to a shallow depth for first cuts.
- Feed the wood slowly and evenly through the planer.
- Inspect the wood surface for smoothness and evenness.
- Listen for unusual sounds like vibration or chatter.
- Make adjustments if cuts are uneven or rough.

Credit: rumbointerior.com
Maintenance Tips
Keeping your planer blades sharp helps you get clean, smooth cuts. Proper care extends the blade’s life and saves money.
Follow simple maintenance tips to keep your blades in good shape and avoid damage to your tools and wood.
Regular Cleaning
Remove dust and wood chips from the blades after each use. Dirt can dull the blades and cause rust.
Use a soft brush or cloth to clean the blades gently. Avoid harsh chemicals that may damage the metal.
- Clean blades with a soft brush or cloth
- Remove all dust and debris
- Keep blades dry to prevent rust
- Use mild cleaning agents if needed
Storage Recommendations
Store your planer blades in a dry place to avoid rust and corrosion. Moisture is the main enemy of sharp blades.
Keep blades in protective covers or cases. This prevents accidental damage and keeps blades safe when not in use.
- Store blades in a dry, cool area
- Use blade guards or protective cases
- Avoid stacking blades directly on each other
- Check blades before storage for moisture
When To Replace Blades
Replace planer blades if they are chipped, cracked, or too dull. Worn blades reduce cut quality and increase effort.
Blades that no longer sharpen well should be replaced. Using damaged blades can harm your planer and wood workpieces.
- Replace blades with visible chips or cracks
- Replace if sharpening does not restore sharpness
- Change blades if cuts become rough or uneven
- Inspect blades regularly for damage signs
Frequently Asked Questions
How Do You Sharpen Planer Blades At Home?
Sharpening planer blades at home is simple with the right tools. Use a honing guide and sharpening stone. Clamp the blade securely and maintain a consistent angle. Move the blade across the stone in a back-and-forth motion. Finish with a finer grit for a razor-sharp edge.
What Tools Do I Need To Sharpen Planer Blades?
To sharpen planer blades, you’ll need a honing guide, sharpening stone, and lubricant. These tools help maintain angle and precision. A honing guide keeps the blade steady. The sharpening stone grinds the blade edge effectively. Lubricant like water or oil ensures smooth sharpening and prevents overheating.
Can You Sharpen Planer Blades By Hand?
Yes, you can sharpen planer blades by hand using a honing guide and sharpening stone. Secure the blade and maintain a consistent angle. Move it steadily across the stone. This method requires patience and precision but yields excellent results. Hand sharpening allows for more control over the blade’s sharpness.
How Often Should Planer Blades Be Sharpened?
Planer blades should be sharpened when they show signs of dullness. This could be after every 20-30 hours of use. Dull blades produce rough surfaces and strain the planer. Regular maintenance ensures optimal performance. Inspect blades frequently and sharpen them promptly to maintain efficiency and extend their lifespan.
Conclusion
Sharpening planer blades keeps your tools working well and safe. Regular care saves time and money on repairs or replacements. A sharp blade makes clean cuts and better finishes on wood. Follow the steps carefully and check your blades often.
Small efforts lead to big improvements in your woodworking projects. Keep your blades sharp and enjoy smoother, easier planing every time. Simple maintenance makes a big difference in your work quality.