Are you struggling to get precise measurements inside small objects? Using a caliper for internal measurements might seem tricky at first, but once you learn the simple steps, it becomes easy and reliable.
Getting this right can save you time, avoid costly mistakes, and improve the quality of your work—whether you’re a hobbyist, mechanic, or professional. Keep reading, and you’ll discover clear, practical tips that will boost your confidence and help you master internal measurements like a pro.
Credit: www.penntoolco.com
Choosing The Right Caliper
Using a caliper for internal measurements is easy with the right tool. Picking the right caliper helps you get accurate results.
Calipers come in many types. Each type works best for different measurement needs.
Types Of Calipers
There are three main types of calipers: vernier, dial, and digital. Each type shows measurements differently.
Vernier calipers use a sliding scale. Dial calipers have a round dial to show numbers. Digital calipers display measurements on a screen.
- Vernier Calipers:Manual reading, no batteries needed
- Dial Calipers:Easy to read dial, needs calibration
- Digital Calipers:Quick reading, requires batteries
Selecting Based On Measurement Needs
Choose a caliper based on what you need to measure and how often. Accuracy and ease of use matter.
For quick checks, digital calipers are good. For work without batteries, vernier calipers fit well. Dial calipers balance manual use and easy reading.
- Use digital calipers for fast, clear readings
- Pick vernier calipers for battery-free use
- Dial calipers suit users who like analog displays
- Consider the size and precision for your tasks
- Think about durability if you work in rough conditions
Credit: aci24.com
Preparing For Internal Measurements
Using a caliper for internal measurements requires careful preparation. Proper setup helps get accurate results.
Before measuring inside objects, you must clean and zero your caliper. These steps ensure precise readings.
Cleaning The Caliper
Keep your caliper clean to avoid errors in measurement. Dirt or dust on the jaws affects accuracy.
- Wipe the jaws gently with a clean, dry cloth.
- Use a soft brush to remove dust from tight spaces.
- If needed, use a small amount of rubbing alcohol on a cloth.
- Dry the caliper completely before use.
- Avoid using harsh chemicals that can damage the tool.
Zeroing The Tool
Zeroing the caliper sets the baseline for accurate internal measurements. This step adjusts the tool to read zero when fully closed.
| Action | Description |
|---|---|
| Close the jaws | Gently close the internal measuring jaws until they touch. |
| Check the display | Look at the digital or dial display for the reading. |
| Press zero button | Reset the display to zero for digital calipers. |
| Rotate dial | Turn the dial to align the needle to zero on dial calipers. |
| Confirm zero | Open and close jaws again to ensure the reading returns to zero. |
Positioning The Caliper Inside
Using a caliper for internal measurements requires careful positioning. The inside jaws must fit correctly inside the object to get accurate results.
This guide explains how to position the caliper inside with focus on using the inside jaws and ensuring proper alignment.
Using The Inside Jaws
The inside jaws are designed to measure the inside diameter or width of an object. To use them properly, open the jaws slightly wider than the object’s interior.
- Insert the inside jaws gently into the space to be measured.
- Slowly close the jaws until they touch the inside surfaces.
- Make sure the jaws contact the points evenly without tilting.
- Avoid forcing the jaws, which can cause inaccurate readings.
- Hold the caliper steady while reading the measurement.
Ensuring Proper Alignment
Proper alignment of the caliper inside the object is key to precise measurements. Misalignment leads to errors and wrong data.
| Common Alignment Issues | How to Fix |
| Jaws tilted inside the object | Adjust the caliper until jaws sit flat on surfaces |
| Caliper not centered | Reposition caliper to align with the center axis |
| Uneven pressure on jaws | Apply gentle and even closing force |
| Object movement during measurement | Hold object steady or secure it before measuring |
Taking Accurate Readings
Using a caliper for internal measurements needs care and attention. Accurate readings help you get the right size of holes or inner widths. This guide shows how to do it correctly.
Two key points are applying steady pressure and reading the scale properly. Each helps avoid errors and ensures precise measurement results.
Applying Consistent Pressure
Hold the caliper firmly but gently inside the object. Too much pressure can widen the space and give a wrong reading. Too little pressure might not touch the sides well.
- Place the inside jaws of the caliper carefully into the space to measure.
- Close the jaws slowly until they just touch the inner sides.
- Keep steady pressure without forcing the jaws further.
- Use the thumb wheel or slider to control the movement smoothly.
- Hold the caliper steady while reading the scale to avoid shifts.
Reading The Scale Correctly
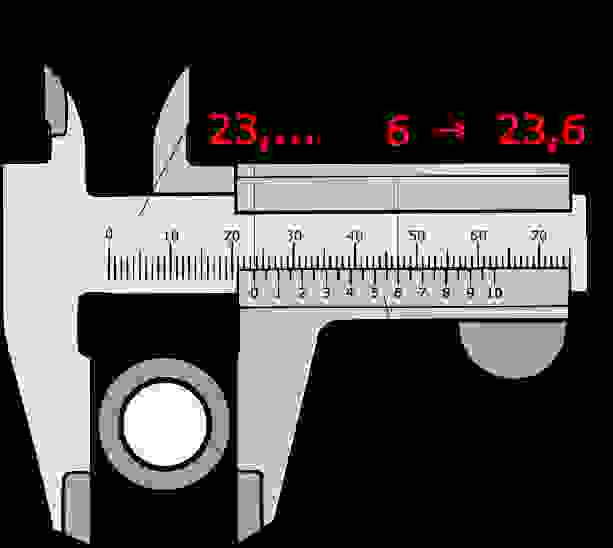
Look at the scale straight on to avoid parallax error. Check the main scale and the vernier or digital display carefully. Note the exact number shown where the jaws meet.
| Scale Type | How to Read | Tip |
| Main Scale | Read the number just before the zero on the vernier. | Use a bright light to see markings clearly. |
| Vernier Scale | Find the line that best lines up with the main scale. | This adds the fraction of a millimeter or inch. |
| Digital Display | Read the number shown directly. | Reset to zero before measuring for accuracy. |
Common Mistakes To Avoid
Using a caliper for internal measurements needs care and attention. Small errors can cause wrong readings.
This guide covers common mistakes to avoid when measuring inside objects with a caliper.
Misalignment Issues
One common mistake is not aligning the caliper jaws properly inside the object. Misalignment leads to incorrect measurements.
- Keep the caliper jaws perpendicular to the surface being measured.
- Do not tilt the caliper, or the reading will be off.
- Check the position twice before reading the scale.
- Use a steady hand to avoid shifting the caliper during measurement.
Overtightening The Caliper
Applying too much force when closing the caliper jaws can damage the tool or the object.
| Effect | Reason | Solution |
| Damaged jaws | Excessive pressure | Use gentle pressure to close jaws |
| Wrong measurements | Object deforms under pressure | Apply light touch, avoid squeezing |
| Reduced tool lifespan | Stress on caliper parts | Handle caliper with care |
Maintaining Your Caliper
Keeping your caliper in good shape helps you get accurate measurements. Regular care extends its life and keeps it working well.
Small steps like cleaning and storing your caliper properly make a big difference. These habits protect the tool from damage and dirt.
Regular Cleaning Tips
Clean your caliper after each use to remove dust and debris. Dirt can affect the tool’s accuracy and cause wear.
Use a soft cloth to wipe the caliper. Avoid using water or harsh chemicals that can damage the metal or electronic parts.
- Wipe jaws and scale gently with a dry cloth
- Use a small brush to clean hard-to-reach areas
- Apply a little machine oil on metal parts to prevent rust
- Check battery contacts on digital calipers and clean if needed
Storage Best Practices
Store your caliper in a dry, clean place to avoid damage. Keep it away from dust, moisture, and extreme temperatures.
Use the original case or a protective pouch to keep the caliper safe. This prevents scratches and keeps the tool ready for use.
- Keep caliper in a protective case when not in use
- Store away from direct sunlight and heat sources
- Place it on a flat surface to avoid bending or warping
- Do not store near magnets or strong electrical fields

Credit: www.reddit.com
Frequently Asked Questions
How Do You Measure Inside Diameter With A Caliper?
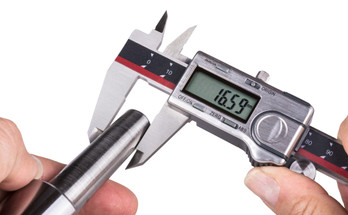
To measure inside diameter, open the caliper jaws and insert them inside the object. Gently expand the jaws until they touch the inner walls. Read the measurement on the scale or digital display for an accurate internal diameter.
What Type Of Caliper Is Best For Internal Measurements?
Vernier calipers and digital calipers are ideal for internal measurements. They provide precise readings of inside dimensions. Digital calipers are easier to read, while vernier calipers offer reliable manual measurements.
How To Zero A Caliper Before Measuring Internal Dimensions?
Close the caliper jaws completely and press the zero button on digital models. For vernier calipers, ensure the zero lines align perfectly. This ensures all internal measurements start from an accurate baseline.
Can I Use A Caliper For Measuring Small Internal Features?
Yes, calipers are perfect for small internal features. Their fine jaws fit into tight spaces to measure grooves, holes, or slots accurately. Use steady hands to avoid errors when measuring small dimensions.
Conclusion
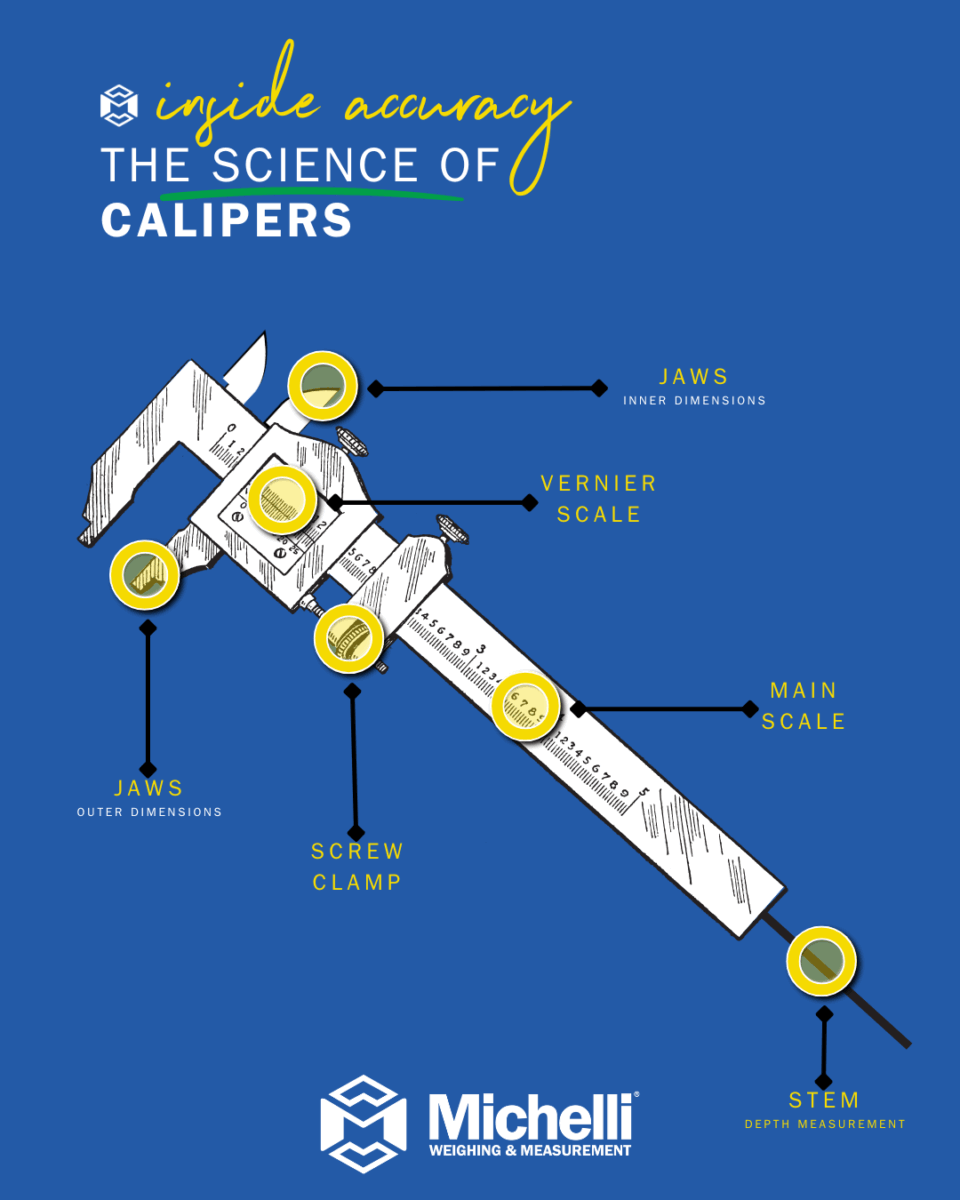
Mastering caliper use for internal measurements improves precision. Start by understanding caliper parts. Practice gently opening and closing the jaws. Ensure the caliper is clean and calibrated. Place the caliper correctly for accurate readings. Double-check measurements for reliability. Consistent practice enhances skill and confidence.
Internal measurements become easier with experience. Remember, patience leads to accuracy. Keep honing your skills for better results. A well-used caliper is your best tool. Enjoy the precision it brings to your projects. Happy measuring!