Are you looking to master the art of precise measurements and perfect angles in your woodworking projects? Discover the secret tool that every carpenter swears by: the carpenter’s square.
Whether you’re building a bookshelf, crafting a table, or tackling any DIY project, knowing how to use a carpenter’s square for layout is essential. Imagine the satisfaction of creating flawless joints and achieving symmetry in your work. In this guide, you’ll unlock the techniques that transform your woodworking skills, ensuring accuracy and efficiency.
Ready to elevate your craftsmanship and impress with your precision? Let’s dive into the world of the carpenter’s square and see how it can become your trusted ally in every project.

Credit: www.amazon.ca
Types Of Carpenter’s Squares
Carpenter’s squares help make precise measurements and angles. They come in different types for various tasks.
Knowing the right square to use makes your work easier and more accurate.
Try Square
The try square is a simple tool used to check right angles. It has a fixed metal blade attached to a wooden or metal handle.
Carpenters use it to mark and measure 90-degree angles on wood pieces.
Combination Square
The combination square is a versatile tool with an adjustable ruler. It can measure angles, depths, and mark straight lines.
- Includes a ruler and a movable head
- Can check 90 and 45-degree angles
- Used for depth marking and level checking
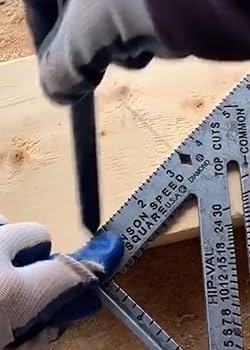
Speed Square
The speed square is a triangular tool. It helps quickly mark angles and guide saw cuts on lumber.
This square combines several functions in one, making it popular for framing and roofing tasks.
Framing Square
The framing square is a large L-shaped tool. It has long arms for measuring and laying out large pieces of wood.
| Feature | Purpose |
|---|---|
| Long arms | Measure and mark large wood |
| Ruler markings | Read measurements easily |
| Right angle | Check and mark 90-degree angles |
| Commonly used for | Framing walls, stairs, and roofs |
Choosing The Right Square
Using a carpenter’s square correctly starts with selecting the right one. Different projects need different types of squares.
Knowing what to look for helps you pick a square that fits your work style and project needs.
Material And Build Quality
Carpenter’s squares come in various materials like steel, aluminum, and plastic. Steel squares are strong and last long.
Aluminum squares are lighter, which can be easier to handle. Plastic squares are cheaper but less durable.
- Steel: durable and precise
- Aluminum: lightweight and rust-resistant
- Plastic: affordable but less sturdy
Size Considerations
| Square Size | Best Use | Portability |
| 6 inches | Small projects, fine details | Easy to carry |
| 12 inches | General carpentry, framing | Moderate |
| 24 inches and up | Large layouts, roofing | Less portable |
Choose a size that matches your project scale. Larger squares help with big layouts.
Purpose-based Selection
Different squares serve different tasks. Here is a list of common types and their uses:
- Try Square:For checking right angles and marking.
- Combination Square:Measures angles, depth, and marks lines.
- Speed Square:Quick marking and layout on boards.
- Framing Square:Used for framing and roofing layouts.
Basic Layout Techniques
A carpenter’s square is a simple tool for making accurate marks on wood. It helps create straight lines and check angles.
Using this tool correctly saves time and improves the quality of your work. Learn the basic layout techniques below.
Marking Straight Lines
Place the carpenter’s square flat on the wood edge. Hold it firmly to avoid movement. Use a pencil to draw a line along the square’s edge.
This method helps you mark long, straight lines quickly and accurately. It is useful for cutting or measuring.
Checking Right Angles
Align the carpenter’s square inside a corner or joint. The square’s arms should fit perfectly without gaps. This check shows if the angle is exactly 90 degrees.
If you see a gap, the angle needs adjustment. This step ensures your corners are square and strong.
Measuring And Marking
The carpenter’s square has ruler markings on its edges. Use these to measure distances from wood edges. Mark points clearly with a pencil for cutting or drilling.
- Place the square flat on the surface
- Read the measurement on the ruler
- Mark the point with a sharp pencil
- Double-check measurements before cutting

Credit: www.randrtools.co.uk
Advanced Marking Tips
Using a carpenter’s square well can improve your woodworking accuracy. These tips help you use the square for more precise markings.
Learn how to transfer measurements, mark angled cuts, and repeat layouts easily with your carpenter’s square.
Transferring Measurements
To transfer measurements, place the square against the workpiece edge. Mark the point on the blade that matches your measurement.
Move the square to the new workpiece. Align the blade with the edge and mark the same point to copy the measurement.
- Ensure the square is flush against the edge each time
- Use a sharp pencil or marking knife for clear lines
- Double-check measurements before marking
Creating Angled Cuts
Carpenter’s squares can help mark angles other than 90 degrees. Use the square’s body or blade as a guide for angles.
For common angles, like 45 degrees, align the square’s corner with the workpiece edge. Draw along the blade or body for the angled line.
- Use a protractor or angle finder with the square for unusual angles
- Mark both sides of the workpiece for better cutting guidance
- Practice on scrap wood to check angle accuracy
Using The Square For Repetitive Layouts
For multiple pieces with the same measurements, the carpenter’s square speeds up your layout work. Set the square once and use it repeatedly.
Clamp the square to the workbench or workpiece for hands-free marking. This helps keep measurements consistent across all pieces.
- Mark all pieces in one session to maintain accuracy
- Check that the square has not moved between markings
- Use a marking gauge for even faster repetitive layout
Common Mistakes To Avoid
Using a carpenter’s square correctly helps create accurate layouts and cuts. Many beginners make simple mistakes that cause errors in their work. Knowing what to avoid saves time and materials.
Below are common errors when using a carpenter’s square. Learn these to improve your woodworking projects and get better results.
Misreading Measurements
One common mistake is misreading the scale on the carpenter’s square. This can cause wrong cuts and poor fits in your project.
- Check if you are reading from the correct edge of the square.
- Pay attention to fractions and decimal marks.
- Use good lighting to see the markings clearly.
- Double-check measurements before marking.
Improper Square Positioning
Placing the square incorrectly on your material leads to inaccurate lines and angles. This mistake affects the whole project’s quality.
| Positioning Error | Effect |
|---|---|
| Square not flush against edge | Lines are off angle or length |
| Square tilted or raised | Measurements become inconsistent |
| Marking before holding square steady | Marks shift and cause cutting errors |
Ignoring Tool Calibration
A carpenter’s square can lose accuracy over time. Ignoring this leads to repeated errors in your work.
- Check the square against a known straight edge regularly.
- Replace or adjust if the angles are off.
- Store the square carefully to avoid damage.
- Clean the square to keep markings visible.

Credit: www.temu.com
Maintenance And Care
Using a carpenter’s square correctly helps with precise layouts. Taking care of it keeps it accurate and lasting longer. Regular maintenance stops damage and rust.
This guide covers cleaning, storing, and checking your carpenter’s square for best results.
Cleaning Techniques
Clean your carpenter’s square after each use. Dirt and sawdust can cause wear and affect accuracy.
Use a soft cloth to wipe the square. For sticky spots, dampen the cloth with mild soap and water. Dry it completely to stop rust.
- Remove dust with a dry cloth
- Use mild soap for tough dirt
- Dry thoroughly after cleaning
- Avoid harsh chemicals that damage metal
Storage Tips
Store your carpenter’s square in a dry place. Moisture can cause rust and damage the metal.
Keep it flat or hang it on a pegboard. Avoid placing heavy tools on top to prevent bending or warping.
- Store in a dry, cool area
- Hang on a pegboard or keep flat
- Keep away from heavy items
- Use a protective case if available
Calibration Checks
Check your carpenter’s square regularly to keep it accurate. Even small bends can cause errors in layout work.
Place the square against a known straight edge. Look for gaps or light shining through the edges. Use a ruler to verify measurements.
- Test against a straight edge
- Check for gaps or light leaks
- Measure edges with a ruler
- Replace if bent or damaged beyond repair
Frequently Asked Questions
What Is A Carpenter’s Square Used For?
A carpenter’s square measures and marks right angles in woodworking. It ensures accurate cuts, layouts, and helps maintain precise measurements for projects.
How Do You Properly Hold A Carpenter’s Square?
Hold the square firmly against the workpiece edge. Align the inside corner with the corner of the material for accurate marking.
Can A Carpenter’s Square Measure Angles Other Than 90 Degrees?
Primarily, it measures 90-degree angles. Some carpenter’s squares have degree markings for basic angle measurements but are not for complex angles.
How To Mark A Straight Line With A Carpenter’s Square?
Place the square’s edge along the workpiece. Use a pencil along the blade to draw a straight, precise guideline on the material.
Conclusion
Using a carpenter’s square helps create accurate and clean layouts. It ensures straight lines and perfect right angles every time. This tool saves time and reduces mistakes in your projects. Practice using it on simple tasks first. Soon, you will feel more confident in your measurements.
A carpenter’s square is a basic but valuable tool for any woodworker. Keep it handy and use it often to improve your work quality. Precision and ease come with regular use. Simple steps lead to better results. Give it a try on your next project.
