If you want your woodworking projects to look sharp and professional, mastering the carpenter’s square is a must. This simple tool can help you create perfect layout lines every time, saving you from costly mistakes and frustrating do-overs.
You’ll discover easy steps to use a carpenter’s square like a pro, so your cuts and measurements are always spot on. Ready to boost your skills and make your work stand out? Let’s get started.
Choosing The Right Carpenter’s Square
Using a carpenter’s square properly starts with choosing the right one. This tool helps you draw straight and accurate layout lines. Picking the correct square makes your work easier and more precise.
This guide covers the main types of carpenter’s squares, their materials, and size options. These points will help you find the best square for your project.
Types Of Carpenter’s Squares
There are several types of carpenter’s squares. Each type fits different tasks and preferences. Knowing these types helps you select the right tool.
- Try Square:Used to check right angles and mark straight lines on wood.
- Combination Square:Adjustable and useful for measuring angles and depths.
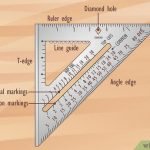
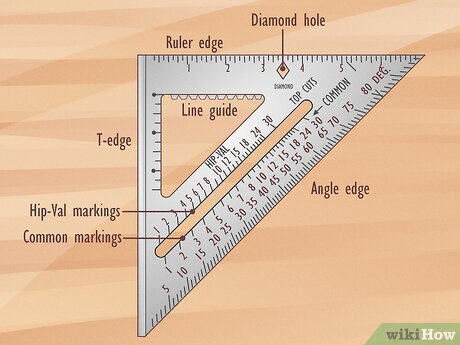
- Speed Square:Handy for quick measurements and marking common angles.
- Framing Square:Large and used for framing and roofing layouts.
Material And Durability
Carpenter’s squares come in different materials. The material affects how long the tool lasts and how easy it is to use.
| Material | Durability | Weight | Cost |
|---|---|---|---|
| Steel | Very durable, resists bending | Heavy | Moderate to high |
| Aluminum | Durable but can dent | Light | Moderate |
| Plastic | Less durable, can break | Very light | Low |
Size Considerations
Size matters when choosing a carpenter’s square. The size affects how easy it is to handle and what projects it suits.
- Smaller squares (6 to 7 inches) are good for small woodworking tasks.
- Larger squares (12 to 24 inches) work well for framing and large projects.
- Choose a size that feels comfortable and fits your work area.
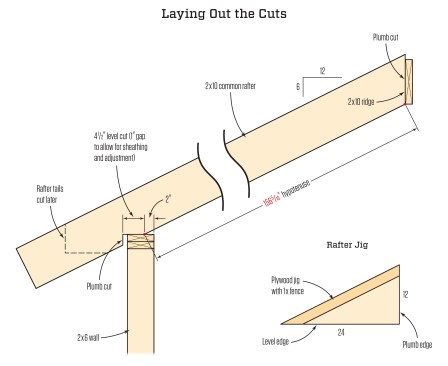
Credit: www.jlconline.com
Preparing Your Workspace
Using a carpenter’s square needs a clean and well-organized space. Preparing your workspace helps you work faster and with more accuracy.
Before you start marking lines, make sure your area is safe and ready. This guide covers how to clear the surface, choose marking tools, and follow safety rules.
Clearing The Surface
Remove any clutter from your workbench or table. Dust and small objects can affect your measurements and marks.
- Take off tools and scraps
- Wipe the surface with a dry cloth
- Check for uneven spots or damage
- Ensure good lighting over the area
Marking Tools Needed
| Tool | Purpose | Tip |
| Pencil | Mark lines on wood | Use a sharp pencil for thin lines |
| Chalk | Mark on rough surfaces | Good for temporary marks |
| Marking Knife | Make precise cuts | Use carefully to avoid slips |
| Measuring Tape | Measure distances | Check the tape for damage |
Safety Precautions
Protect yourself and your workspace while working with a carpenter’s square. Follow simple safety rules to avoid injuries.
- Wear safety glasses to protect your eyes
- Keep fingers clear of sharp marking tools
- Work in a well-lit area to see clearly
- Keep your workspace free from tripping hazards
Basic Layout Lines With A Carpenter’s Square
A carpenter’s square is a simple tool that helps you mark straight and accurate lines on wood. It is useful for many woodworking projects.
Using this tool correctly can save time and make your cuts precise. Let’s look at how to use it for basic layout lines.
Drawing Straight Lines
Place the carpenter’s square firmly on the wood’s edge. Use the straight edge of the square as a guide.
Hold a pencil and draw a line along the square’s edge. This gives you a straight line that is easy to follow.
Creating Right Angles
Set the carpenter’s square on the wood so its two arms meet the edges. This forms a perfect 90-degree angle.
Mark along the edges of the square. This helps you draw or check right angles in your project.
- Align one arm with the edge of the wood
- Ensure the other arm points across the surface
- Draw lines along both arms for right angles
Marking Parallel Lines
Use the carpenter’s square to mark lines that stay the same distance apart. This is helpful for repeated cuts.
Place the square’s arm at the distance you want from the edge. Slide the square along the wood while keeping the arm fixed.
- Set the square’s arm at the desired width
- Hold it steady and slide along the wood
- Draw a line along the arm for a parallel mark

Credit: www.wikihow.com
Advanced Techniques For Precision
A carpenter’s square is a key tool for making precise layout lines. Using it well improves your accuracy on all projects. This guide covers advanced ways to use the square.
Learn to draw angled lines, check squareness, and combine the square with other tools. These techniques help you work faster and with better results.
Using The Square For Angled Lines
To mark angled lines, position the square at the desired angle on your workpiece. Use the edge of the square as a guide for your pencil or marking knife.
- Place the square’s body on the edge of the board.
- Rotate the tongue to the needed angle.
- Hold the square firmly to avoid movement.
- Draw the line along the tongue’s edge.
Checking For Squareness
Verifying that corners are exactly 90 degrees is vital. Use the carpenter’s square to check the fit between two surfaces or materials.
| Method | How to Use | Result |
| Direct Fit | Place square inside corner | Gap means not square |
| Edge Alignment | Align square edges with surfaces | Lines match if square |
| Diagonal Check | Measure diagonals of a rectangle | Equal length means square |
Combining With Other Tools
Pair the carpenter’s square with other tools for better precision. Using them together can save time and reduce errors.
- Carpenter’s square and tape measure for layout accuracy
- Square with a marking gauge for parallel lines
- Square plus bevel gauge for transferring angles
Common Mistakes To Avoid
Using a carpenter’s square correctly is key for precise layout lines. Mistakes can cause errors in your project. Avoiding these common problems saves time and material.
Focus on how you align, mark, and calibrate the tool. Each step affects the final result. Learn to spot and fix common errors.
Misalignment Issues
Misalignment happens when the square is not properly placed on the workpiece. This leads to lines that are not square or straight. Check the edges and hold the square firmly.
- Ensure the square’s blade sits flush against the edge.
- Keep the stock part steady without rocking.
- Double-check the angle before drawing the line.
- Use clamps if needed to hold the square in place.
Incorrect Marking Pressure
Pressing too hard or too soft with your pencil or marking knife can cause problems. Too much pressure may damage the wood. Too little pressure can make faint lines hard to see.
| Pressure Level | Effect |
| Too Hard | Leaves deep grooves or dents |
| Too Soft | Lines are faint and unclear |
| Just Right | Clear, visible lines without damage |
Ignoring Tool Calibration
Carpenter’s squares can lose their accuracy over time. Ignoring calibration causes incorrect angles. Check your square before use to keep it precise.
Tips to check calibration:
- Place the square on a flat surface.
- Draw a line along the blade edge.
- Flip the square over and draw another line.
- If the lines do not match, the square needs adjustment or replacement.
Maintaining Your Carpenter’s Square
Keeping your carpenter’s square in good condition helps you get accurate measurements. Regular care can extend its life and keep it reliable.
Below are simple tips for cleaning, storing, and checking your carpenter’s square to keep it working well.
Cleaning Tips
Remove dirt and dust from your carpenter’s square after each use. Use a soft cloth and mild cleaner to wipe it down. Avoid harsh chemicals that can damage the metal or markings.
- Use a damp cloth to clean the surface
- Dry the square completely to avoid rust
- Apply a light oil to metal parts to prevent corrosion
- Check for paint or glue residue and remove gently
Storage Recommendations
Store your carpenter’s square in a dry place to protect it from moisture. Keep it in a toolbox or hang it on a wall to avoid bending or damage.
| Storage Method | Benefits |
| Toolbox | Protects from dust and drops |
| Wall hook | Keeps square flat and accessible |
| Protective case | Prevents scratches and impacts |
| Dry area | Prevents rust and corrosion |
Regular Calibration Checks
Check your carpenter’s square regularly to make sure it measures correctly. Small errors can lead to big problems in your projects.
- Place the square against a known straight edge
- Check if the edges line up perfectly
- Look for gaps or unevenness along the blade
- Adjust or replace the square if it shows signs of wear

Credit: www.wikihow.com
Frequently Asked Questions
What Is A Carpenter’s Square Used For?
A carpenter’s square is used to mark and measure right angles. It helps ensure accurate cuts and layouts in woodworking projects. It is essential for creating precise, straight lines and checking the squareness of corners.
How Do You Hold A Carpenter’s Square Properly?
Hold the carpenter’s square firmly with one hand on the handle. Place the blade against the edge of your workpiece. This stable grip ensures accurate measurements and straight layout lines without slipping.
Can A Carpenter’s Square Measure Angles Other Than 90 Degrees?
Primarily, a carpenter’s square measures 90-degree angles. However, some models include angled markings for common angles like 45 degrees. These features assist in drawing various layout lines beyond just right angles.
How Do You Mark Layout Lines Using A Carpenter’s Square?
Place the square’s blade against the workpiece edge. Use a pencil along the square’s ruler to draw straight, accurate lines. This method ensures your layout lines are perfectly perpendicular or angled as needed.
Conclusion
Mastering a carpenter’s square improves your woodworking. Precise layout lines ensure clean cuts. Practice regularly to gain confidence. This tool simplifies complex tasks. It is reliable and efficient. Always double-check your measurements for accuracy. Safety should be your top priority.
Keep your carpenter’s square clean and stored properly. This extends its life. With practice, your skills will grow. You will create precise and beautiful projects. Enjoy the process and creativity woodworking offers. Stay patient and persistent. Your efforts will pay off.
Happy woodworking!