Are you struggling to get precise measurements for your projects? A digital angle finder can be your best tool for accuracy and efficiency.
Whether you’re working on woodworking, metalworking, or DIY home improvements, knowing exactly how to use this device will save you time and frustration. In this guide, you’ll discover simple steps to master your digital angle finder and make every angle count.
Ready to boost your skills and get perfect results every time? Keep reading—you’re about to unlock the full potential of your tool.

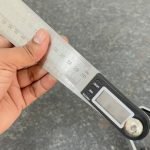
Credit: www.amazon.in
Choosing The Right Digital Angle Finder
Digital angle finders help measure angles quickly and accurately. Picking the right one depends on your needs and skill level.
This guide covers types, key features, and how to balance budget and quality for your purchase.
Types Of Digital Angle Finders
There are several types of digital angle finders. Each type fits different tasks and preferences.
- Protractor Style:Simple and easy to use for basic angle measurements.
- Inclinometer Style:Measures slope angles, good for construction work.
- Combination Tools:Include levels and angle finders for multi-use tasks.
- Bluetooth Models:Send measurements to your phone or computer for records.
Key Features To Consider
Look for features that improve accuracy and ease of use. The right features save time and reduce errors.
| Feature | Why It Matters |
| Display Type | Clear screen helps read angles easily in any light. |
| Measurement Range | Wide range covers more types of projects. |
| Accuracy | Higher accuracy means better results for detailed work. |
| Battery Life | Long life avoids interruptions during work. |
| Durability | Strong build lasts longer on job sites. |
Budget And Quality Balance
Choose a digital angle finder that fits your budget and needs. Avoid very cheap models that break easily.
- Set a price range before you shop.
- Check reviews for reliability and accuracy.
- Consider buying from brands with good support.
- Think about how often you will use the tool.
- Sometimes spending a bit more saves money over time.
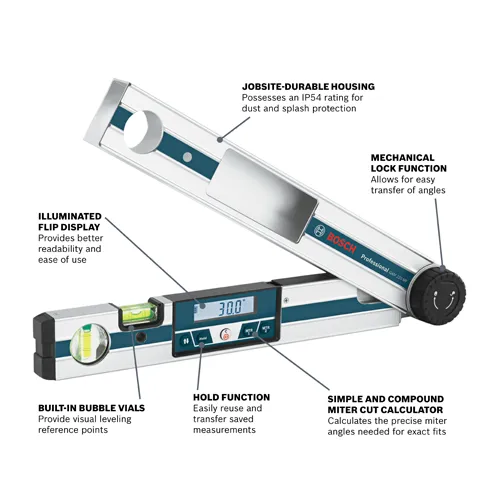
Credit: www.boschtools.com
Preparing The Device For Use
Using a digital angle finder starts with preparing the device correctly. This ensures accurate measurements and smooth operation.
Before measuring, you need to power on the device, set the right units, and check the battery status.
Powering On And Calibration
Turn on the digital angle finder by pressing the power button. Wait a few seconds for it to start up. Some devices automatically calibrate on startup.
If your device does not auto-calibrate, place it on a flat surface and press the calibration button. This sets the zero point for accurate readings.
Setting Measurement Units
Choose the measurement unit that fits your project. Most devices allow you to switch between degrees, percent, and radians.
- Press the unit button to cycle through available units.
- Stop when your preferred unit shows on the screen.
- Confirm the selection if needed by pressing the set or enter button.
Checking Battery Life
Good battery power is important for reliable measurements. Check the battery level before use.
| Battery Indicator | Meaning |
| Full | Battery is fully charged |
| Half | Battery charge is moderate |
| Low | Battery needs replacement or charging |
Taking Accurate Angle Measurements
Using a digital angle finder helps you get precise angle readings. It is a useful tool for many projects.
To get the best results, you need to hold the finder correctly and measure carefully. This guide shows you how.
Positioning The Finder Correctly
Place the digital angle finder flat on the surface you want to measure. Make sure it touches both sides of the angle.
Keep the finder steady and avoid moving it while reading the angle. This helps prevent errors in the measurement.
Measuring Angles On Flat Surfaces
Put the angle finder flat against the surface. Align one arm of the finder with one side of the angle.
Then, adjust the other arm to match the other side of the angle. Read the digital display for the exact angle.
- Ensure both arms of the finder are touching the surface
- Hold the finder steady during measurement
- Check the digital reading carefully before moving
Using The Finder On Irregular Shapes
For curved or uneven surfaces, place the finder where it fits best. Try to find two points that define the angle clearly.
Use gentle pressure to keep the finder in place. Take multiple readings if needed to ensure accuracy.
- Find stable points on the irregular shape
- Keep the finder steady while measuring
- Repeat measurements for consistent results

Credit: blog.sra-solder.com
Advanced Tips For Precision
Using a digital angle finder can improve your project accuracy. Learning advanced tips helps get the best results. Precision matters in woodworking, metalwork, and other crafts.
This guide covers using hold and zero functions, combining measurements, and avoiding errors. Follow these tips to measure angles more precisely.
Using Hold And Zero Functions
The hold function freezes the current angle reading on the display. Use it to record angles in hard-to-see places or when moving the tool is difficult. The zero function resets the angle to zero at any position. It lets you measure relative angles from that point.
- Press hold to lock the measurement before moving the tool.
- Use zero to set a new baseline for measuring multiple angles.
- Reset zero after each new measurement for accuracy.
Combining Measurements For Complex Angles
Some angles are not direct and require combining simple angle measurements. You can add or subtract angles to find the total angle. This method is helpful for compound cuts and layouts.
| Measurement 1 | Measurement 2 | Combined Angle |
| 30° | 45° | 75° (30 + 45) |
| 90° | 15° | 75° (90 – 15) |
| 60° | 60° | 120° (60 + 60) |
Always check if you should add or subtract angles based on your project needs. Mark each step clearly to avoid confusion.
Avoiding Common Measurement Errors
Errors often come from tool misuse or environmental factors. Keep the tool clean and check battery levels. Hold the finder steady and avoid tilting it during measurement.
- Calibrate the tool regularly using a flat surface.
- Do not apply excessive force on the finder edges.
- Keep the surface free from dust and debris.
- Replace batteries to prevent weak readings.
- Double-check measurements before cutting or drilling.
Maintaining Your Digital Angle Finder
Taking care of your digital angle finder helps it last longer. Regular maintenance keeps it accurate and ready to use.
Follow simple steps to clean, store, and fix common problems with your tool.
Proper Cleaning Techniques
Clean your digital angle finder after each use. Dirt and dust can damage its sensors and screen.
Use a soft cloth to wipe the surface gently. Avoid harsh chemicals that may harm the device.
- Turn off the device before cleaning
- Use a dry or slightly damp microfiber cloth
- Do not spray liquids directly on the tool
- Remove debris from hinges and joints carefully
Storage Recommendations
Store the digital angle finder in a dry and cool place. Avoid extreme temperatures that can harm the battery.
Keep the tool in its protective case if available. This prevents scratches and accidental damage.
- Switch off the device before storing
- Remove batteries if not used for a long time
- Keep away from direct sunlight and moisture
- Store on a flat surface to avoid dropping
Troubleshooting Common Issues
If your angle finder shows wrong readings, check the calibration. Reset the device if needed.
Battery problems are common. Replace weak batteries to keep the tool working well.
- Clean the sensors if readings are off
- Check battery contacts for corrosion
- Reset the device following the manual
- Contact support if problems continue
Frequently Asked Questions
How Do I Calibrate A Digital Angle Finder?
Calibrate by placing the tool on a flat surface. Press the zero or calibration button. This ensures accurate angle measurements every time.
What Surfaces Can A Digital Angle Finder Measure?
It measures angles on wood, metal, plastic, and other flat or curved surfaces. It’s versatile for many materials.
How Accurate Is A Digital Angle Finder?
Most digital angle finders offer accuracy within 0. 1 to 0. 2 degrees. Always check the specifications for your model.
Can I Use A Digital Angle Finder For Woodworking?
Yes, it’s ideal for woodworking. It helps measure precise angles for cuts, joints, and layouts.
Conclusion
Using a digital angle finder simplifies many tasks. Its accuracy saves time and reduces errors. This tool is user-friendly and suits various projects. From DIY tasks to professional jobs, it enhances precision. Learning to use it is straightforward and rewarding.
Keep it handy for your next project. You’ll notice the difference in results. Practice regularly to become more confident. Remember, accurate measurements lead to better outcomes. Whether you’re a beginner or experienced, this tool is valuable. Enjoy the ease and precision it offers.
Happy measuring!