If you’re diving into woodworking or home improvement, mastering the framing square is a game-changer. This simple tool can help you make precise cuts, create perfect angles, and build sturdy frames with confidence.
But how do you use a framing square the right way? By learning a few key techniques, you’ll save time, avoid costly mistakes, and bring your projects to life with accuracy. Keep reading, and you’ll soon handle your framing square like a pro.
Choosing The Right Framing Square
A framing square is a helpful tool for builders and woodworkers. It helps measure and mark right angles.
Picking the right framing square makes your work easier and more accurate. Consider the type, material, and size before buying.
Types Of Framing Squares
There are several types of framing squares. Each type suits different tasks and preferences.
- Standard Framing Square: The common L-shaped tool for general use.
- Rafter Square: Used for roof framing and measuring angles.
- Combination Square: Offers multiple measuring functions in one tool.
Materials And Durability
Framing squares come in different materials. The material affects how long the tool lasts.
Steel squares are strong and last a long time. Aluminum squares are lighter but can bend. Plastic squares are cheap but not very durable.
- Steel: Heavy and very durable
- Aluminum: Light and rust-resistant
- Plastic: Affordable but less sturdy
Size Considerations
Choose a size that fits your projects. Larger squares help with big wood pieces. Smaller squares are easier to carry and use in tight spaces.
- 12-inch squares: Good for small projects and tight areas
- 16-inch squares: Most common size for general framing
- 24-inch or larger: Best for big framing jobs

Credit: www.youtube.com
Parts Of A Framing Square
A framing square is a basic tool used in carpentry. It helps measure and mark right angles.
Knowing its parts helps you use it correctly and safely on your projects.
Blade And Tongue
The framing square has two main arms called the blade and the tongue. The blade is the longer arm. The tongue is shorter and narrower. Both parts meet at a 90-degree angle. This shape helps you check corners and measure cuts.
Numbering And Markings
Numbers and marks on the framing square show measurements. They are usually in inches. The blade and tongue have these markings. The blade’s markings run along its length. The tongue’s markings run along its width. These help measure length and width quickly and accurately.
| Part | Markings | Use |
|---|---|---|
| Blade | Inches and fractions | Measure long lengths and check angles |
| Tongue | Inches and fractions | Measure shorter lengths and mark cuts |
Common Features
Most framing squares share some features. These include a steel body for strength and durability. They often have a thickness that prevents bending. The corners are usually square and sharp to keep accurate measurements. Some squares have extra markings for special angles like 45 and 30 degrees.
- Steel construction for long life
- Clear, easy-to-read numbers
- Right angle corner for accuracy
- Extra angle markings for common cuts
- Flat surface for marking and measuring
Basic Techniques For Using A Framing Square
A framing square is a simple tool used in carpentry. It helps make sure your cuts and layouts are accurate.
Learning how to use a framing square correctly will improve your work quality. It is easy to use with a little practice.
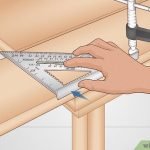
Measuring And Marking Straight Lines
Place the framing square flat on the wood surface. Align the edge with the point where you want to start measuring.
Use a pencil to mark the measurement on the wood along the square’s edge. This ensures a straight and precise line.
- Hold the square firmly to avoid movement
- Use the ruler side to measure the length
- Mark your line clearly with a sharp pencil
Checking Right Angles
Place the framing square so that one leg lines up with one edge of the wood. The other leg should point across the wood.
If the wood edges match the framing square perfectly, they form a 90-degree angle. This confirms your corner is square.
- Use the inside corner of the square for best accuracy
- Adjust your wood piece until it fits the square exactly
- Mark your lines after confirming the right angle
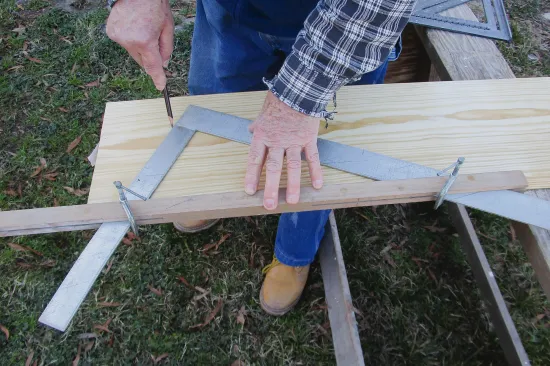
Drawing Cut Lines
Use the framing square to draw lines where you want to cut wood pieces. This helps keep cuts straight and clean.
Align the square with the edge of the wood. Draw along the square’s edge to make your cut line clear and accurate.
- Double-check measurements before drawing cut lines
- Keep the square steady while marking
- Use a sharp pencil or marking tool for clear lines
Credit: www.jlconline.com
Advanced Applications
The framing square is a key tool in woodworking and construction. It helps with many complex tasks beyond simple measurements.
Using the framing square for advanced work improves accuracy and saves time on projects. Learn how to apply it for roofs, stairs, and angles.
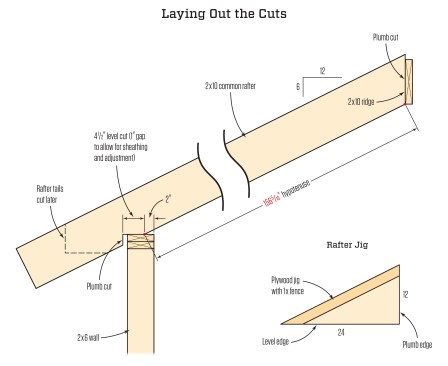
Laying Out Roof Rafters
The framing square helps mark roof rafters quickly and accurately. It shows the rise and run of the roof clearly on the lumber.
Use the framing square’s numbers to find the correct angle and length for each rafter. This reduces guesswork and waste.
- Place the framing square on the board’s edge.
- Align the rise on the tongue and the run on the body.
- Mark the cut line along the square’s edge.
- Repeat for each rafter needed.
Stair Stringer Layout
The framing square helps draw stair stringers with even steps. It shows the rise and run for each step clearly.
Set the square on the board to mark both the vertical rise and horizontal run of the stairs. This guides your cuts.
- Place the square on the stringer board.
- Match the rise on the tongue and run on the body.
- Draw the step lines along the edges.
- Use these marks to cut the stringer.
Complex Angle Measurement
The framing square measures and marks angles that are not 90 degrees. This helps in cutting boards for unusual shapes.
Use the square to transfer angles from one piece to another. This keeps your work pieces consistent and precise.
- Place the square along one edge of the angle.
- Use the markings to find the exact angle degrees.
- Mark the cut line based on the angle measurement.
- Check angles on multiple pieces for uniformity.
Common Mistakes To Avoid
Using a framing square correctly is key to getting precise cuts and strong frames. Many beginners make simple errors that cause problems later.
Knowing which mistakes to avoid can save time and materials. This guide covers common errors and how to prevent them.
Misreading Measurements
One frequent mistake is misreading the numbers on the framing square. This can lead to wrong cuts and wasted wood.
- Check if you are reading the correct side of the square.
- Remember that some squares show inches in fractions, not decimals.
- Double-check the measurement before marking your cut line.
- Use good lighting to see the numbers clearly.
Improper Square Placement
Placing the framing square incorrectly can cause angles to be off. This affects the fit and strength of your frame.
| Common Placement Error | Effect on Project |
| Not lining up the tongue with the edge | Cut lines will be uneven |
| Tilting the square instead of keeping it flat | Incorrect angle measurements |
| Sliding the square while marking | Inaccurate lines and gaps |
Ignoring Tool Calibration
Assuming your framing square is perfectly accurate can cause errors. Old or damaged squares may not measure correctly.
Check your framing square by comparing it against a known square or a straight edge. Look for:
- Bent or warped edges
- Worn or faded measurement marks
- Loose or broken parts
Replace or fix the tool if needed to ensure precise work.
Credit: www.jlconline.com
Maintenance And Care
Taking good care of your framing square keeps it accurate and lasts longer. Regular maintenance helps avoid damage and ensures precise measurements.
Simple steps like cleaning and proper storage protect your tool. Checking its accuracy often keeps your work reliable.
Cleaning Tips
Clean your framing square after each use to remove dirt and debris. Use a soft cloth to wipe it down gently.
If needed, use mild soap and water to remove stubborn grime. Dry the tool completely to prevent rust.
- Use a soft, dry cloth for daily cleaning
- Apply mild soap and water for tough spots
- Dry thoroughly to stop rust formation
- Avoid harsh chemicals that can damage the finish
Storage Recommendations
Store the framing square in a dry place to avoid moisture damage. Keep it in a toolbox or hang it on a pegboard.
Protect the edges and corners by not stacking heavy objects on top. This prevents bending or warping.
- Keep in a dry, cool area
- Hang on pegboard or lay flat
- Avoid stacking heavy tools on it
- Use a protective case if possible
Checking For Accuracy
Check your framing square’s accuracy regularly. This ensures your measurements stay correct for every job.
Place the square on a flat surface and look for gaps between the blade and the surface. Use a known square to compare angles.
- Place the square against a flat edge
- Look for gaps or light passing through
- Compare with a trusted square tool
- Replace or repair if the square is bent
Frequently Asked Questions
What Is A Framing Square Used For?
A framing square helps measure and mark right angles in woodworking. It’s essential for framing walls, stairs, and roofs. It ensures accuracy in cutting and assembling materials, making construction easier and more precise.
How Do You Read Measurements On A Framing Square?
Read the framing square by aligning its edges with the workpiece. The inner edges show inches and fractions for precise measurements. Use the numbered scales to mark lengths and angles clearly on your materials.
Can A Framing Square Measure Angles Other Than 90 Degrees?
Yes, a framing square can measure various angles. Use the rafter tables on the square to find roof pitch and angles. It also helps mark common angles for different construction tasks.
How Do You Mark A 45-degree Angle With A Framing Square?
To mark 45 degrees, align the square’s corner with your workpiece. Use the diagonal edge to draw the angle. This method helps create accurate miters and angled cuts in framing projects.
Conclusion
A framing square is essential for precise woodworking. Understanding its markings simplifies many tasks. It helps in measuring, marking, and squaring. Practice using it regularly for better results. Ensure your tool is in good condition. This guarantees accuracy in every project.
Remember, patience is key when learning new skills. Over time, your confidence will grow. Soon, you’ll handle projects with ease. Always keep safety in mind. Safe handling ensures longevity of your tools. Happy building!