Are you ready to tackle your woodworking projects with confidence? Knowing how to use a hand saw properly can make all the difference in your work.
Whether you’re cutting precise lines or shaping rough wood, mastering this simple tool will save you time and effort. In this guide, you’ll discover clear, step-by-step tips that anyone can follow—no experience needed. Keep reading, and soon you’ll handle your hand saw like a pro, turning your ideas into beautiful, finished pieces.
Choosing The Right Hand Saw
Using a hand saw correctly starts with picking the right one. Different saws work better for certain jobs.
Choosing the right hand saw can make your woodworking easier and more precise. Consider the wood type and saw features.
Types Of Hand Saws
There are many types of hand saws for woodworking. Each saw fits different cuts and wood thicknesses.
- Crosscut saws cut across the wood grain.
- Rip saws cut along the wood grain.
- Back saws have a stiff spine for fine cuts.
- Keyhole saws cut small shapes and curves.
Selecting Based On Wood Type
Softwood and hardwood need different saws. Softwood is easier to cut with fewer teeth.
Hardwood requires saws with more teeth for a clean, smooth cut. Match the saw to the wood.
- Use rip saws for softwood to cut fast.
- Use crosscut saws for hardwood to avoid splinters.
- Fine-toothed saws work well for plywood and thin boards.
Blade Size And Tooth Count
Blade length and tooth count affect cutting speed and smoothness. A longer blade cuts bigger pieces.
More teeth per inch (TPI) give a smoother cut but cut slower. Fewer teeth cut faster but rougher.
| Blade Size | Best For | Teeth Per Inch (TPI) |
|---|---|---|
| 12-15 inches | General woodworking | 6-10 TPI |
| 15-20 inches | Large boards and logs | 4-8 TPI |
| 10-12 inches | Fine, detailed cuts | 12-14 TPI |

Credit: www.anneofalltrades.com
Preparing Your Workspace
Before using a hand saw, prepare your workspace well. A tidy and organized area helps you work better and safer.
Good preparation makes your woodworking project easier and more enjoyable.
Setting Up A Stable Workbench
Use a strong and flat workbench to support your wood. The bench should not shake or move while you cut.
Check that the workbench height fits your body to avoid strain during cutting.
Securing The Wood Properly
Hold the wood firmly in place to get clean cuts. Loose wood can slip and cause mistakes or injuries.
- Use clamps to fix the wood on the workbench.
- Check the wood is stable before you start sawing.
- Do not hold the wood with your hand near the saw line.
- Place scrap wood pieces under the workpiece if needed for support.
Ensuring Safety Measures
Safety is key when using a hand saw. Wear protective gear and keep your area clean.
| Safety Item | Purpose |
| Safety Glasses | Protect eyes from dust and wood chips |
| Gloves | Protect hands from splinters and cuts |
| Ear Protection | Reduce noise if using power tools nearby |
| Clear Floor | Prevent tripping over tools or debris |
Basic Hand Saw Techniques
Using a hand saw is simple if you know the right techniques. Good skills make your cuts clean and safe.
Learn how to hold the saw, start a cut, and keep your stroke steady for better woodworking results.
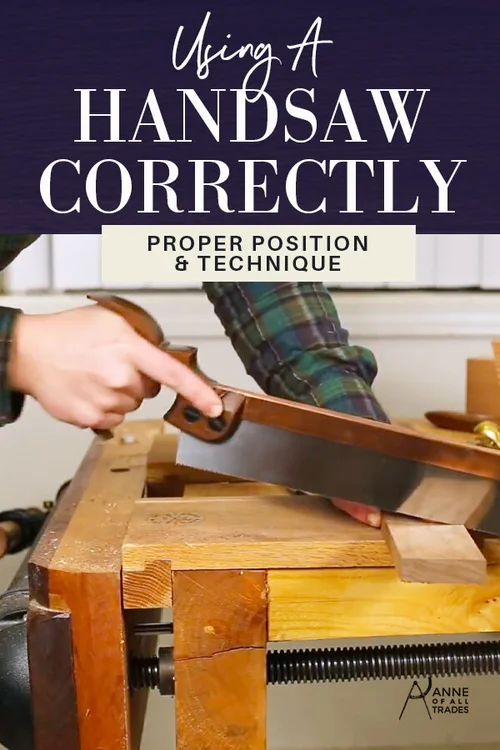
Correct Grip And Stance
Hold the saw handle firmly but not too tight. Your hand should feel comfortable and in control.
Stand with your feet shoulder-width apart. Position your body so the saw moves straight along the cut line.
- Grip the handle with your dominant hand
- Keep your wrist straight and relaxed
- Stand with one foot slightly forward
- Face the wood at a slight angle
Starting The Cut
Begin the cut slowly to guide the saw along the mark. Use short, light strokes at first.
Keep the saw blade flat on the wood. This helps prevent the saw from slipping off the line.
- Place the saw teeth on the cut line
- Use your thumb as a guide near the blade
- Start with gentle, short strokes
- Increase stroke length as the cut deepens
Maintaining A Steady Stroke
Use smooth, even strokes to cut through the wood. Avoid pushing too hard to keep control.
Let the saw do the work. Keep your arm and wrist steady for a clean cut.
- Push and pull the saw evenly
- Keep the blade straight and aligned
- Do not force the saw through the wood
- Maintain a comfortable rhythm

Credit: www.youtube.com
Advanced Cutting Tips
Using a hand saw can be simple, but some projects need more skill. Advanced cutting helps you get clean and precise cuts.
These tips focus on improving your control and accuracy for different cutting styles.
Making Curved Cuts
Curved cuts need a steady hand and patience. Use a saw with a narrow blade for better control on curves.
Mark your curve clearly with a pencil. Cut slowly and follow the line carefully to avoid mistakes.
- Choose a coping saw or a small back saw for curves
- Make relief cuts to help turn the blade easily
- Keep your wrist flexible to guide the saw along the curve
Cutting Angles And Bevels
Cutting angles and bevels needs careful measurement. Use a protractor or angle guide to mark the wood.
Hold the saw at the marked angle and cut slowly. Check your progress often to keep the angle correct.
- Set the wood firmly on a stable surface
- Use clamps to keep the wood from moving
- Start with a shallow cut to guide the saw
- Keep your saw blade aligned with the angle mark
Avoiding Common Mistakes
Many people cut wood too fast or lose control of the saw. This causes rough or crooked cuts.
Focus on steady, even strokes. Keep the saw straight and follow your marks closely.
- Don’t force the saw; let the teeth do the work
- Keep your cutting line visible by marking it well
- Use sharp blades to reduce effort and splintering
- Check your grip and stance for better control
Saw Maintenance And Care
Taking care of your hand saw keeps it sharp and safe. A well-maintained saw lasts longer and cuts better.
Regular cleaning, sharpening, and proper storage help your saw work smoothly for woodworking projects.
Cleaning The Blade
Remove dirt and resin from the blade after each use. This prevents rust and keeps the saw sharp.
- Use a stiff brush to clear sawdust.
- Wipe the blade with a cloth dipped in soapy water.
- Dry the blade completely to avoid moisture.
- Apply a light coat of oil to stop rust.
Sharpening Techniques
Sharpen the saw teeth to keep cuts smooth and easy. Use the correct tools for best results.
- Secure the saw in a vise to hold it steady.
- Use a triangular file sized for your saw teeth.
- File each tooth evenly, keeping the same angle.
- Check for damaged teeth and replace if needed.
- Test the saw on scrap wood to check sharpness.
Proper Storage
| Storage Method | Purpose |
|---|---|
| Hang on a wall hook | Prevents blade damage and keeps saw dry |
| Use a blade guard | Protects teeth and prevents injuries |
| Store in a dry place | Stops rust and blade warping |
| Keep away from heavy tools | Avoids bending or denting the blade |

Credit: www.anneofalltrades.com
Frequently Asked Questions
What Type Of Hand Saw Is Best For Woodworking?
A crosscut saw is ideal for cutting across wood grain. A rip saw works best for cutting along the grain. Choose based on your project’s needs for clean and efficient cuts.
How Do I Hold A Hand Saw Correctly?
Grip the handle firmly with your dominant hand. Use your other hand to steady the wood. Keep your wrist straight and saw at a comfortable angle for control.
What Safety Tips Should I Follow Using A Hand Saw?
Wear safety goggles to protect your eyes. Keep fingers clear of the cutting path. Saw slowly at first to maintain control and avoid slips or accidents.
How Can I Make Straight Cuts With A Hand Saw?
Mark your cutting line clearly with a pencil. Use a square to ensure the line is straight. Start cutting slowly to follow the line accurately.
Conclusion
Using a hand saw effectively enhances your woodworking skills. Practice makes the process easier. Focus on safety first to avoid accidents. Always choose the right saw for the task. Keep the blade sharp for smooth cuts. Remember to measure twice before cutting.
Patience is key in achieving precise results. Woodworking can be a rewarding hobby. Enjoy the process and watch your projects come to life. Happy sawing!