Are you tired of uneven ceilings and the frustration that comes with trying to get them just right? Imagine the satisfaction of a perfectly level ceiling, effortlessly achieved.
If you’re looking for a game-changer in your DIY toolkit, a laser level might be just what you need. This powerful tool promises precision and ease, transforming the way you approach ceiling installations. But how exactly do you harness its potential to save time and energy while achieving flawless results?
In this guide, you’ll uncover the secrets of using a laser level for ceiling installation, ensuring your projects are completed with the accuracy and professionalism you desire. Stay with us, and discover how this tool can revolutionize your home improvement endeavors.
Choosing The Right Laser Level
Using a laser level makes ceiling installation easier and more accurate. Picking the right one is important to get the best results.
This guide helps you choose a laser level by looking at types, features, and budget options.
Types Of Laser Levels
There are several laser levels to pick from. Each fits different ceiling jobs.
- Dot Laser Levels:Project single or multiple dots for simple alignment.
- Line Laser Levels:Show straight lines across walls or ceilings for leveling.
- Rotary Laser Levels:Rotate laser beams 360 degrees for large area leveling.
- Combination Laser Levels:Include lines and dots for versatile use.
Key Features To Consider
Look for these features to get a laser level that fits your needs well.
| Feature | Benefit |
| Accuracy | Ensures ceiling parts align perfectly |
| Range | Covers the size of your work area |
| Self-Leveling | Automatically adjusts for level lines |
| Mounting Options | Easy to place on tripods or walls |
| Battery Life | Lasts through your installation work |
Budget And Brand Options
Laser levels come in many prices and brands. Choose one that fits your budget and is known for quality.
- Basic models cost less but may lack features like self-leveling.
- Mid-range models balance price and useful functions.
- High-end models offer best accuracy and durability.
- Popular brands often have better support and parts availability.
Preparing The Ceiling Area
Using a laser level for ceiling installation needs careful preparation. This helps ensure the ceiling is even and secure. Before starting, clear the area, measure the height, and mark key points.
These steps make the process smoother and help avoid mistakes. Proper preparation saves time and effort during installation.
Clearing The Workspace
Remove all furniture and objects from the room. Cover remaining items with plastic sheets. Sweep or vacuum the floor to remove dust and debris. This keeps the area safe and clean for work.
- Move furniture away from walls
- Cover electrical outlets and switches
- Protect floors with drop cloths
- Ensure good lighting in the workspace
Measuring Ceiling Height
Use a tape measure to check the height from floor to ceiling at several points. Write down the measurements to find the average height. This helps position the laser level accurately.
| Location | Height (feet) |
| Corner 1 | 8.1 |
| Corner 2 | 8.0 |
| Center | 7.9 |
| Corner 3 | 8.1 |
| Corner 4 | 8.0 |
Marking Reference Points
Mark points on the walls where the laser line will hit. Use a pencil to make small marks at the measured height. These points guide the laser level and the ceiling installation.
Follow these tips for marking:
- Mark at equal distances around the room
- Use a level to check marks for accuracy
- Label marks to avoid confusion
- Double-check all measurements before proceeding
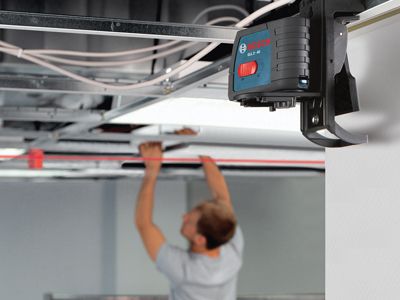
Setting Up The Laser Level
Using a laser level helps you install ceilings with precision. Setting it up correctly is key to getting accurate results.
This guide explains how to mount, calibrate, and adjust your laser level for ceiling work.
Mounting The Laser Level
Place the laser level on a stable surface or tripod. Make sure it is secure and will not move during use.
- Choose a flat and steady location near the ceiling area.
- Attach the laser level firmly to a tripod or mounting bracket.
- Check that the device is not tilted or loose.
- Ensure the laser can reach the entire ceiling without obstruction.
Calibrating For Accuracy
Calibration ensures the laser line is level and reliable. Follow the steps below to check and adjust the calibration.
| Action | Purpose | How to Do It |
| Check Level | Verify laser is horizontal | Use a spirit level on the laser device |
| Adjust Screws | Correct tilt or angle | Turn calibration screws slowly until level |
| Test Laser Line | Confirm accuracy | Project line on wall and measure height consistency |
Adjusting The Laser Beam
Adjust the laser beam to match your ceiling height and layout. This helps mark the correct installation points.
- Set the beam height to align with your ceiling marks.
- Use the beam’s focus control for a clear, sharp line.
- Rotate the laser housing to cover the entire ceiling area.
- Turn off the beam when repositioning the device.
Aligning The Ceiling Framework
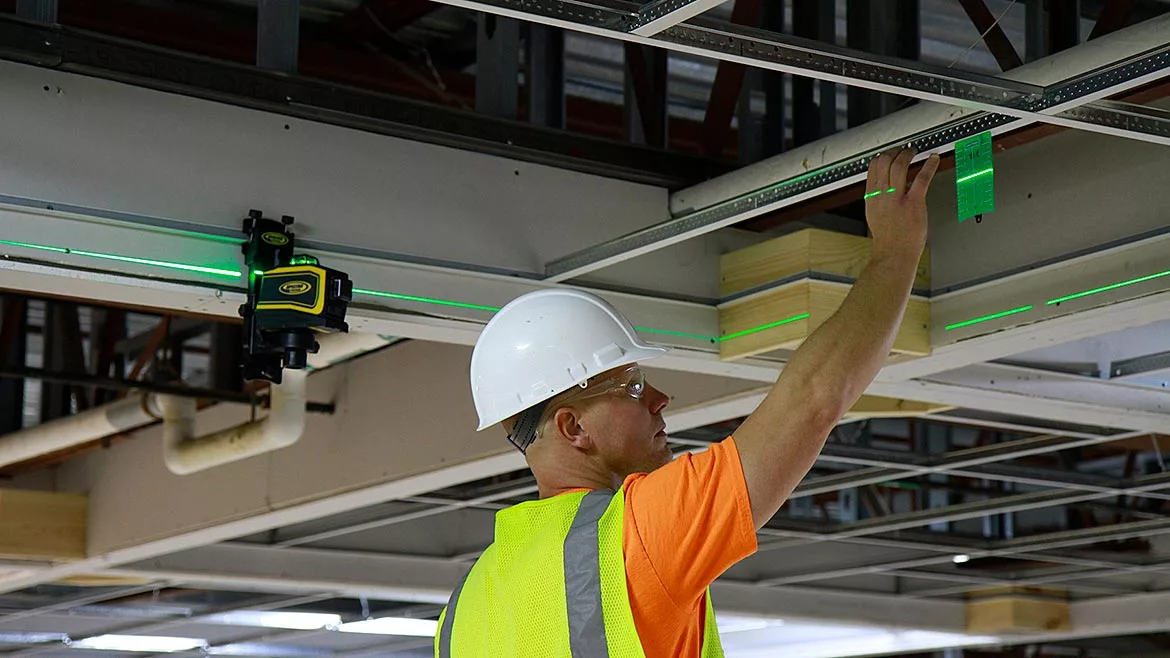
Using a laser level helps you align the ceiling framework precisely. This tool creates straight lines that guide your work.
Proper alignment ensures the ceiling is even and sturdy. Follow these steps to use the laser level correctly.
Using Laser Lines For Guidance
Turn on the laser level and aim it at the ceiling area. The laser will project bright lines across the surface.
Use these lines to mark where the framework parts should go. The laser lines act as a clear guide for placing beams and joists.
- Place the laser level on a stable surface
- Adjust it to cover the entire ceiling area
- Mark the laser lines with a pencil for reference
- Follow the lines when positioning framework components
Checking Level And Plumb
Use the laser level to check if the framework is level. This means it is perfectly horizontal.
Also check if vertical supports are plumb. Plumb means perfectly vertical and straight up and down.
- Compare the framework to the horizontal laser line
- Adjust beams until they match the laser level
- Use a plumb laser line or a spirit level for vertical checks
- Make small changes to fix any misalignment
Securing The Framework
Once the framework is aligned, fasten it securely. Use screws or nails to hold beams in place.
Double-check alignment before tightening all fasteners. This keeps the ceiling structure strong and even.
- Use the laser lines as a final guide
- Secure each beam at the marked points
- Check level and plumb again after fastening
- Make adjustments if needed before the ceiling panels go up
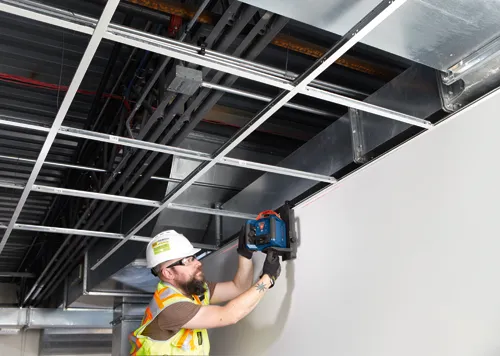
Installing Ceiling Panels
Using a laser level makes ceiling panel installation easier and more accurate. It helps keep panels straight and aligned.
This guide explains how to position panels, fasten them correctly, and ensure even spacing with laser help.
Positioning Panels With Laser Help
Set up the laser level so its line hits the ceiling area where panels will go. This creates a clear guide to place each panel straight.
Check that the laser beam is level before starting. Move the panels along the laser line to keep them aligned perfectly.
Fastening Techniques
Secure panels using the right fasteners. Nails or screws work best depending on the panel type and ceiling frame.
- Hold the panel in place against the laser line.
- Use a drill or hammer to attach the panel to the ceiling joists.
- Start fastening from one edge and move to the other to avoid gaps.
- Check panel stability after fastening each piece.
Ensuring Even Spacing
Even spacing between panels creates a neat and professional look. Use measuring tools along with the laser guide.
| Tool | Purpose |
| Laser level | Align panels horizontally |
| Measuring tape | Check gap distance between panels |
| Spacer blocks | Maintain consistent space during fastening |
Credit: www.boschtools.com
Troubleshooting Common Issues
Using a laser level for ceiling installation can be simple. Sometimes, problems arise that slow down work.
Knowing how to fix common issues helps keep your project on track. Check the tips below to solve problems fast.
Laser Misalignment
If the laser beam does not line up correctly, your ceiling lines will be off. Misalignment can cause uneven installation.
Check if the laser is mounted firmly and not loose. Adjust the device until the beam is straight and level.
- Place the laser on a flat, stable surface
- Use the built-in adjustment knobs to align the beam
- Calibrate the laser regularly as recommended
- Keep the laser clean to avoid beam distortion
Uneven Ceiling Surfaces
Ceilings may have bumps or dips that affect laser leveling. These uneven areas cause wrong measurements.
Use a measuring tape to find high and low spots. Mark these areas and adjust your installation plan accordingly.
- Mark uneven spots clearly on the ceiling
- Use shims or spacers to level ceiling panels
- Double-check laser lines against marked points
- Consider using a flexible laser for curved surfaces
Battery And Power Concerns
Low battery power can cause the laser to flicker or turn off. This interrupts your work and lowers accuracy.
Always check battery levels before starting. Carry extra batteries or a charger to avoid downtime.
- Use fresh or fully charged batteries
- Keep spare batteries nearby during installation
- Turn off the laser when not in use to save power
- Consider a laser model with battery indicator lights
Safety Tips When Using Laser Levels
Using a laser level helps install ceilings with precision. Safety is important to avoid accidents and injuries. Follow key tips to protect yourself and others.
This guide covers eye protection, safe equipment handling, and avoiding electrical hazards during ceiling installation.
Eye Protection
Laser beams can harm your eyes if you look directly at them. Wear safety glasses designed to block laser light. Avoid staring at the laser beam or its reflection.
Handling Equipment Safely
Handle the laser level with care to prevent damage and injury. Use the device only as instructed. Keep it stable on a tripod or flat surface.
- Turn off the laser when moving the device
- Keep the laser level away from children
- Store the equipment in a protective case
- Inspect the device for damage before use
Avoiding Electrical Hazards
Ceiling installation may expose you to electrical wires. Use caution to avoid electric shocks when placing the laser level.
| Safety Measure | Reason |
|---|---|
| Turn off power supply | Prevents accidental shocks |
| Check for hidden wires | Avoids damaging electrical lines |
| Use insulated tools | Protects against electrical contact |
| Keep laser level dry | Reduces risk of short circuits |
Credit: www.boschtools.com

Credit: levelsure.com
Frequently Asked Questions
What Is The Purpose Of A Laser Level In Ceiling Installation?
A laser level ensures precise alignment and leveling of ceiling materials. It projects a straight, visible line for accurate installation. This tool reduces errors and speeds up the process, making ceiling installation easier and more professional.
How Do You Set Up A Laser Level For Ceilings?
Place the laser level on a stable surface or tripod. Adjust it to the desired height and ensure it is perfectly horizontal. Turn on the laser to project a level line across the ceiling area before starting installation.
Can A Laser Level Improve Ceiling Installation Accuracy?
Yes, a laser level greatly improves accuracy by providing a consistent reference line. It helps avoid uneven surfaces and misaligned panels, resulting in a smooth, professional finish. This tool is essential for precise ceiling work.
What Safety Tips Should I Follow When Using A Laser Level?
Avoid direct eye exposure to the laser beam. Use protective eyewear if necessary. Ensure the device is securely mounted to prevent falls. Always follow the manufacturer’s safety instructions for safe operation.
Conclusion
Using a laser level makes ceiling installation easier and more accurate. It helps keep lines straight and even. This tool saves time and reduces mistakes. Always check the level before starting. Practice a few times to feel confident. A steady hand and clear marks lead to better results.
With patience and care, your ceiling will look great. Remember, the right tools make any job simpler. Try using a laser level on your next project. You will see the difference it makes.