Have you ever wondered how professionals find underground pipes without digging up your entire yard? Knowing how to use a pipe locator can save you time, money, and a lot of frustration.
Whether you’re planning a home project or just want to avoid damaging hidden utilities, this tool is essential. You’ll discover simple steps to master a pipe locator, ensuring you work smarter and safer. Keep reading, and you’ll learn how to protect your property and avoid costly mistakes before you even pick up a shovel.
Choosing The Right Pipe Locator
Using a pipe locator helps find underground pipes safely and quickly.
Choosing the right tool depends on the job and the pipes you need to locate.
Types Of Pipe Locators
There are several types of pipe locators designed for different uses.
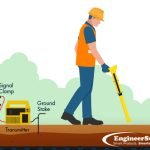
- Electromagnetic Locators:Use signals to trace metal pipes and cables.
- Acoustic Locators:Detect sounds made by leaks or tapping on pipes.
- Ground Penetrating Radar (GPR):Uses radar pulses to map underground objects, useful for non-metal pipes.
- Sonar Locators:Often used underwater to find pipes and cables.
Factors To Consider
Pick a pipe locator based on site conditions and pipe types.
| Factor | Details |
|---|---|
| Pipe Material | Metal pipes work well with electromagnetic locators; plastic pipes may need GPR. |
| Soil Type | Rocky or wet soil affects signal strength and tool choice. |
| Depth | Some locators work better for deep pipes than others. |
| Environment | Urban areas with many cables require precise and advanced tools. |
| Budget | Higher-end locators offer more features but cost more. |
Preparing For Pipe Detection
Using a pipe locator helps find underground pipes safely. Proper preparation improves detection results and avoids damage.
Before starting, review safety steps and gather all tools needed for the job.
Safety Precautions
Safety is very important when locating pipes underground. Follow these precautions to protect yourself and others.
- Wear protective gloves and safety glasses.
- Check for electrical hazards in the area.
- Inform local utility companies before digging.
- Use caution around marked pipelines.
- Keep a safe distance from heavy machinery.
Gathering Necessary Tools
Having the right tools ready makes pipe detection easier and faster. Use the list below to prepare your equipment.
| Tool | Purpose |
| Pipe locator device | Detects underground pipes |
| Protective gloves | Protect hands during work |
| Safety glasses | Protect eyes from debris |
| Marker flags | Mark detected pipe locations |
| Measuring tape | Measure pipe distances |
| Notebook and pen | Record pipe details |
Setting Up The Device
Using a pipe locator correctly starts with setting up the device properly. This guide covers the basic steps to prepare your tool for accurate locating.
Proper setup ensures the device works well and helps you find pipes safely and quickly.
Powering On And Calibration
First, turn on your pipe locator by pressing the power button. Wait for the device to run its startup checks. Most locators display a ready signal when powered on.
- Check the battery level before turning on.
- Press the power button and hold it for two seconds.
- Wait for the device to complete self-test.
- Follow on-screen prompts for calibration if needed.
Calibration adjusts the device to detect pipes accurately. It may involve placing the locator on a known pipe or ground surface.
Adjusting Sensitivity Settings
Sensitivity controls how well the device detects signals. Adjust it based on the environment and pipe depth.
| Sensitivity Level | Use Case |
| Low | Areas with many pipes or metal objects |
| Medium | General locating in open spaces |
| High | Deep pipes or weak signals |
Adjust sensitivity slowly to avoid false readings. Use the device controls to increase or decrease the level.
Credit: www.engineersupply.com
Locating Pipes Accurately
Finding underground pipes is important for safe digging and repairs. Using a pipe locator helps you avoid damage. It gives clear signals about pipe locations.
Understanding how to scan, read signals, and handle interference improves your accuracy. This guide explains these key parts.
Scanning Techniques
Move the pipe locator slowly across the ground surface. Keep the device steady and close to the soil. Scan in straight lines to cover the area evenly.
- Start from a known point and expand outward
- Overlap each pass slightly to avoid missing pipes
- Use both vertical and horizontal scanning motions
- Mark detected pipe locations clearly on the ground
Interpreting Signals
The pipe locator shows signals as sound or light. Strong signals mean the pipe is near. Weaker signals mean it is farther away or deeper underground.
| Signal Type | Meaning | Action |
| Strong beep or bright light | Pipe is close to the surface | Mark location carefully |
| Weak beep or dim light | Pipe is deeper or farther | Scan more slowly to confirm |
| No signal | No pipe detected | Move to next area |
Dealing With Interference
Other underground utilities or electrical sources can cause interference. This affects the pipe locator’s accuracy. To reduce interference, try these tips.
- Turn off nearby electrical equipment if possible
- Use the locator’s filtering settings to block noise
- Change scanning angle to avoid false signals
- Scan slowly and repeat passes for confirmation
Advanced Tips For Difficult Conditions
Using a pipe locator in tough environments needs special skills. Pipes may be hidden deep or made from tricky materials.
These tips help you find pipes when usual methods fail. They work well in hard soil or busy areas.
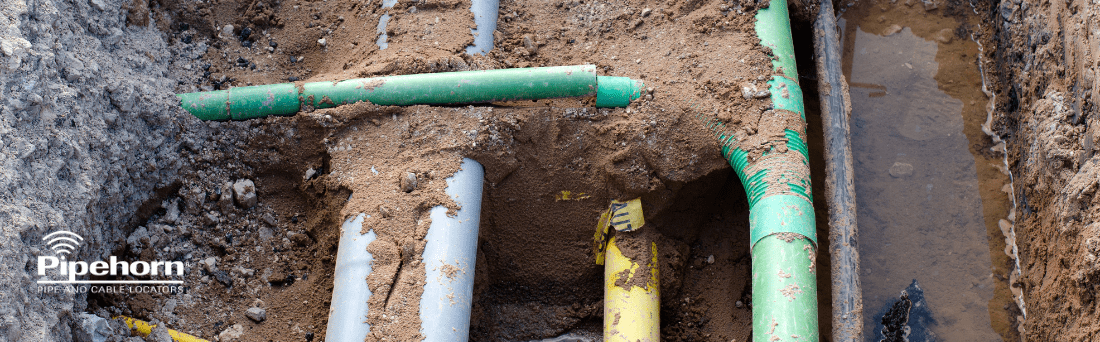
Locating Non-metallic Pipes
Non-metallic pipes do not carry a signal like metal ones. This makes them hard to detect with regular locators.
Use a tracer wire or conductive tape along the pipe. Attach the locator’s signal to this wire for better detection.
- Check if the pipe has a tracer wire installed
- Use a special locator that detects plastic pipes with tracer wires
- Apply conductive tape on exposed pipe sections
- Utilize ground microphones to listen for pipe sounds
Working In Urban Environments
Urban areas have many pipes and cables close together. Signals may overlap and cause confusion.
Use a pipe locator with frequency filters. This helps separate signals from nearby utilities.
- Scan slowly to avoid missing pipes
- Mark pipes clearly as you find them
- Use multiple frequencies to identify the right pipe
- Work during less busy hours to reduce interference
Credit: www.engineersupply.com
Maintaining Your Pipe Locator
Keeping your pipe locator in good shape helps it work well for a long time. Regular care stops problems before they start.
Simple maintenance tasks can improve accuracy and extend the tool’s life. Focus on cleaning, storage, and calibration.
Cleaning And Storage
Clean your pipe locator after each use. Dirt and dust can damage parts and affect readings.
Store the device in a dry, cool place. Avoid extreme temperatures and moisture to protect its electronics.
- Use a soft cloth to wipe dirt and debris
- Check for cracks or damage to the case
- Keep the device in a padded case for safety
- Remove batteries if storing for a long time
Regular Calibration
Calibration keeps your pipe locator accurate. Check calibration often, especially before important jobs.
Follow the manufacturer’s instructions to calibrate the device. Some models need professional service for calibration.
- Test the locator in a known environment
- Adjust settings as needed for correct readings
- Schedule yearly professional calibration
- Record calibration dates and results
Credit: pipehorn.com
Frequently Asked Questions
What Is A Pipe Locator And How Does It Work?
A pipe locator detects underground pipes using electromagnetic signals. It sends a signal into the pipe and measures its response. This helps identify pipe position and depth accurately. It prevents damage during excavation and ensures safe digging practices.
How Do I Prepare Before Using A Pipe Locator?
Before use, review the site plans and mark known utilities. Clear the surface of debris for better signal detection. Calibrate the locator according to the manufacturer’s instructions. Wear safety gear and follow local regulations for underground utility locating.
What Are Common Mistakes When Using A Pipe Locator?
Common errors include incorrect calibration, ignoring interference sources, and misinterpreting signals. Not marking detected pipes accurately can cause damage. Always double-check readings and maintain steady movement while scanning for precise results.
Can A Pipe Locator Detect All Types Of Pipes?
Most pipe locators detect metallic and some plastic pipes with tracer wires. Non-metallic pipes without tracer wires may be hard to locate. Using compatible accessories or complementary methods improves detection accuracy for various pipe materials.
Conclusion
Using a pipe locator can save time and prevent damage. It helps identify underground pipes with ease. Always follow the manual for accurate results. Practice will improve your skills over time. Ensure the device is fully charged before use. Remember to mark identified pipes clearly.
This tool is essential for safe digging projects. It minimizes risks and maximizes efficiency. Stay safe and informed on your projects. With these tips, you’ll locate pipes confidently and effectively.