Have you ever dug into your yard only to hit an unexpected pipe? That sudden pause and worry can be avoided with the right tool.
Knowing how to use a pipe locator tool can save you time, money, and a lot of frustration. Imagine confidently working on your project, knowing exactly where underground pipes lie. You’ll discover simple steps to master this tool, protect your property, and complete your work safely.
Keep reading, and you’ll never have to guess where the pipes are again.
Choosing The Right Pipe Locator
Using a pipe locator tool helps you find underground pipes safely. Picking the right tool is important for accuracy and ease.
Different types of pipe locators work best for different jobs. Knowing the options helps you choose the best one.
Types Of Pipe Locators
There are several types of pipe locators. Each uses a different method to find pipes underground.
- Electromagnetic Locators:Use signals to detect metal pipes.
- Radio Frequency Locators:Pick up radio waves from pipes with transmitters.
- Ground Penetrating Radar (GPR):Uses radar to find pipes and other objects underground.
- Acoustic Locators:Detect sounds made by pipes or leaks.
Choose a type based on the pipe material and the depth you need to check.
Factors To Consider Before Buying
Check several factors to pick the right pipe locator. This ensures it meets your needs and works well.
- Pipe Material:Some locators work only with metal pipes.
- Depth Range:Choose a tool that can reach the pipe depth you expect.
- Ease of Use:Look for clear displays and simple controls.
- Durability:The tool should resist damage from drops or weather.
- Battery Life:Longer battery life helps during long jobs.
- Price:Compare features with cost to find good value.
Think about your specific needs before selecting a pipe locator. This saves time and helps avoid mistakes.
Preparing For Pipe Detection
Using a pipe locator tool starts with proper preparation. It helps you find pipes safely and quickly.
Before you begin, you need to understand safety rules and gather the right tools. This makes the job easier.
Safety Precautions
Safety is very important when detecting pipes. You must avoid accidents and damage to underground utilities.
- Wear protective gear like gloves and safety glasses.
- Mark the area where you will work to warn others.
- Check for electrical lines before you start.
- Keep a safe distance from heavy machinery.
- Follow local regulations about digging and pipe detection.
Gathering Necessary Equipment
You need specific tools to use a pipe locator correctly. Collect all equipment before starting your work.
| Equipment | Purpose |
| Pipe Locator Tool | Detects underground pipes |
| Protective Gloves | Protects hands from injury |
| Safety Glasses | Protects eyes from debris |
| Marker Flags | Marks detected pipe locations |
| Measuring Tape | Measures distance and depth |
| Mobile Phone | Calls for help if needed |
Setting Up The Locator Tool
Using a pipe locator tool starts with proper setup. This ensures accurate pipe detection and safe digging.
Follow simple steps to prepare the tool before you begin locating pipes underground.
Calibrating The Device
Calibrating the locator tool helps it measure signals correctly. This step reduces errors during pipe detection.
Turn on the device and place it on a flat surface. Use the calibration function to adjust the baseline reading.
- Ensure no metal objects are nearby
- Follow the device’s calibration instructions
- Check the display for confirmation
- Repeat calibration if readings seem off
Adjusting Sensitivity And Settings
Adjust the sensitivity to detect pipes at different depths. Higher sensitivity finds deeper pipes but may cause false signals.
Set other device options like frequency or volume to fit your environment. These settings improve signal clarity and ease of use.
- Lower sensitivity for shallow pipes
- Higher sensitivity for deep pipes
- Choose frequency based on pipe material
- Adjust volume for noisy areas
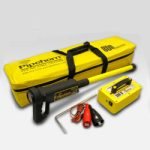
Credit: www.engineersupply.com
Techniques For Accurate Detection
Using a pipe locator tool properly is key to finding underground pipes. Careful methods help avoid mistakes and damage.
This guide explains scanning methods and how to interpret signals for better results.
Scanning Methods
Start by choosing the right scanning mode on the locator tool. Different modes detect different pipe types and depths.
- Passive scan mode listens for signals naturally emitted by metal pipes.
- Active scan mode uses a transmitter to send a signal through the pipe.
- Radio frequency scanning helps find pipes in complex environments.
- Depth estimation feature shows how deep the pipe lies underground.
Interpreting Signals
Understanding the signals from your tool is essential. The strength and type of signal help locate the pipe accurately.
| Signal Type | Meaning | Action |
| Strong steady signal | Directly over pipe | Mark location carefully |
| Weak fluctuating signal | Pipe nearby but not below | Scan nearby area again |
| Intermittent signal | Possible interference | Change scanning mode or frequency |
| No signal | No pipe detected | Check equipment or scan new area |
Common Challenges And Solutions
Using a pipe locator tool can be tricky. Many users face problems that affect accuracy.
This guide covers common challenges and how to solve them. It helps you use the tool better.
Dealing With Interference
Interference can stop the pipe locator from working well. It comes from electric cables or metal objects nearby.
Try to move away from sources of interference. Turn off nearby electrical devices if possible. Use the tool’s filters to reduce noise.
- Keep distance from power lines and transformers
- Switch off nearby machines or devices
- Use the tool’s interference filter settings
- Calibrate the locator before starting work
Handling Difficult Terrains
Rough or uneven ground makes pipe locating harder. Rocks, roots, and wet soil can affect signal strength.
Scan slowly and cover the area in small sections. Adjust the tool’s sensitivity to detect signals better in tough spots.
- Move the locator slowly over uneven surfaces
- Divide the area into smaller parts to scan
- Increase sensitivity for weak signals
- Avoid wet or muddy spots if possible

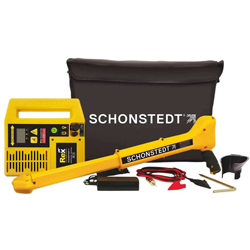
Credit: www.walmart.com
Maintaining And Storing Your Locator
Taking care of your pipe locator tool helps it last longer. Proper cleaning and storage keep it working well.
Regular maintenance prevents damage and ensures accurate readings every time you use it.
Cleaning Tips
Clean your locator tool after each use to remove dirt and dust. Use a soft, dry cloth to wipe the surface.
Avoid using water or harsh chemicals, as they can damage the electronic parts inside the tool.
- Turn off the device before cleaning
- Use a soft brush to remove stubborn dirt
- Check and clean battery contacts if needed
- Keep the screen and sensors free of smudges
Proper Storage Practices
Store your pipe locator in a cool, dry place away from direct sunlight. This prevents damage to its components.
Use the original case or a padded container to protect it from bumps and scratches during storage or transport.
- Remove batteries if you won’t use the tool for a long time
- Keep the tool away from magnets and strong electrical fields
- Store in a place with stable temperature and low humidity
- Check the tool regularly to ensure it is in good condition

Credit: www.amazon.com
Frequently Asked Questions
What Is A Pipe Locator Tool Used For?
A pipe locator tool detects underground pipes and utilities. It helps avoid damage during excavation and ensures safe digging. This tool is essential for plumbers, contractors, and DIY enthusiasts to identify pipe locations accurately.
How Does A Pipe Locator Tool Work?
Pipe locator tools use electromagnetic signals to detect metal pipes underground. The device emits a signal that travels through the pipe and is picked up by the receiver. This helps pinpoint the pipe’s exact location and depth.
Can I Use A Pipe Locator For Plastic Pipes?
Standard pipe locators detect metal pipes only. For plastic pipes, you need a tracer wire or a specialized locator that detects signals from inserted transmitters. Without these, locating plastic pipes accurately is challenging.
How Accurate Are Pipe Locator Tools?
Accuracy depends on the tool quality and operator skill. High-quality locators can detect pipes within a few inches. Proper calibration and technique improve precision, reducing the risk of hitting unknown utilities during excavation.
Conclusion
Using a pipe locator tool can simplify locating underground pipes. With practice, you can easily identify pipe locations. Remember to always check instructions before use. This ensures accurate results and avoids mistakes. Safety is crucial, so wear protective gear. Be patient and take your time during the process.
Regular practice improves your skills. This tool is valuable for both beginners and professionals. It saves time and reduces guesswork. Understanding its use boosts confidence in tackling projects. Keep learning and refining your technique. You’ll find using a pipe locator becomes second nature.