Have you ever struggled with rough or jagged edges when working with pipes? You know how frustrating it can be, especially when you’re aiming for a clean, professional finish.
That’s where a pipe reamer comes in handy. It’s a simple tool that can make a world of difference in your projects. Whether you’re a seasoned DIY enthusiast or just getting started, learning how to use a pipe reamer can save you time and improve your results.
You’ll discover the step-by-step process to master this tool, ensuring your pipes are smooth and ready for any task. Stick around, and you’ll wonder how you ever managed without it!
Credit: www.vevor.com
Choosing The Right Pipe Reamer
A pipe reamer removes burrs and smooths pipe edges after cutting. Picking the right reamer makes the job easier and safer.
Choosing a reamer depends on pipe type, size, and material. This guide helps you select the best one.
Types Of Pipe Reamers
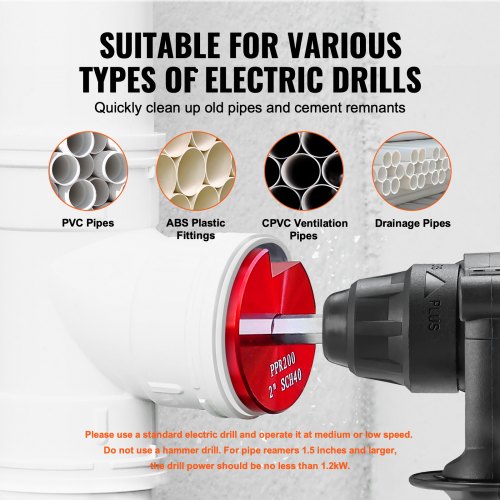
There are several types of pipe reamers. Each fits different needs and tools.
- Handheld reamers with a simple handle and blade
- Rotary reamers that attach to drills for faster work
- T-shaped reamers for better grip and control
- Adjustable reamers that fit multiple pipe sizes
Choose a type based on your comfort and the tool you have. Handheld reamers work well for small jobs.
Selecting Based On Pipe Material
Pipe materials vary like copper, steel, and plastic. Each needs a specific reamer type to avoid damage.
- Use carbide blades for hard metals like steel
- Choose softer blades for copper and brass pipes
- Plastic pipes need smooth blades to prevent cracking
Matching the blade to the pipe material extends the tool’s life. It also improves cutting quality.
Size Considerations
Pipe reamers come in different sizes. Picking the right size is important for a clean finish.
Measure your pipe’s inner diameter before buying a reamer. The blade should fit snugly without forcing.
- Small pipes need small reamers for precision
- Large pipes require bigger reamers for full coverage
- Adjustable reamers work well for varied pipe sizes
Preparing The Pipe
Preparing the pipe correctly makes reaming easier and safer. It helps remove dirt and ensures accurate cutting.
Follow these steps before using a pipe reamer to get the best results.
Cleaning The Pipe End
Clean the pipe end to remove dirt, rust, and old debris. This prevents damage to the reamer and gives a smooth finish.
- Wipe the pipe end with a dry cloth.
- Use a wire brush for rust or heavy dirt.
- Rinse with water if the pipe is very dirty.
- Dry the pipe completely before reaming.
Marking The Cut Line
Marking the cut line guides your reaming and cutting. It keeps the pipe straight and accurate.
| Tool | Purpose |
|---|---|
| Marker or Pencil | Draws a visible cut line |
| Measuring Tape | Measures the exact length to cut |
| Square or Ruler | Ensures a straight line around the pipe |
Wrap the ruler around the pipe and mark the line clearly before cutting.
Ensuring Safety Precautions
Safety helps avoid injuries during pipe preparation and reaming.
- Wear safety gloves to protect hands.
- Use safety goggles to protect eyes from metal shavings.
- Work in a well-lit and clean area.
- Keep the pipe stable using a clamp or vise.
- Check tools for damage before use.
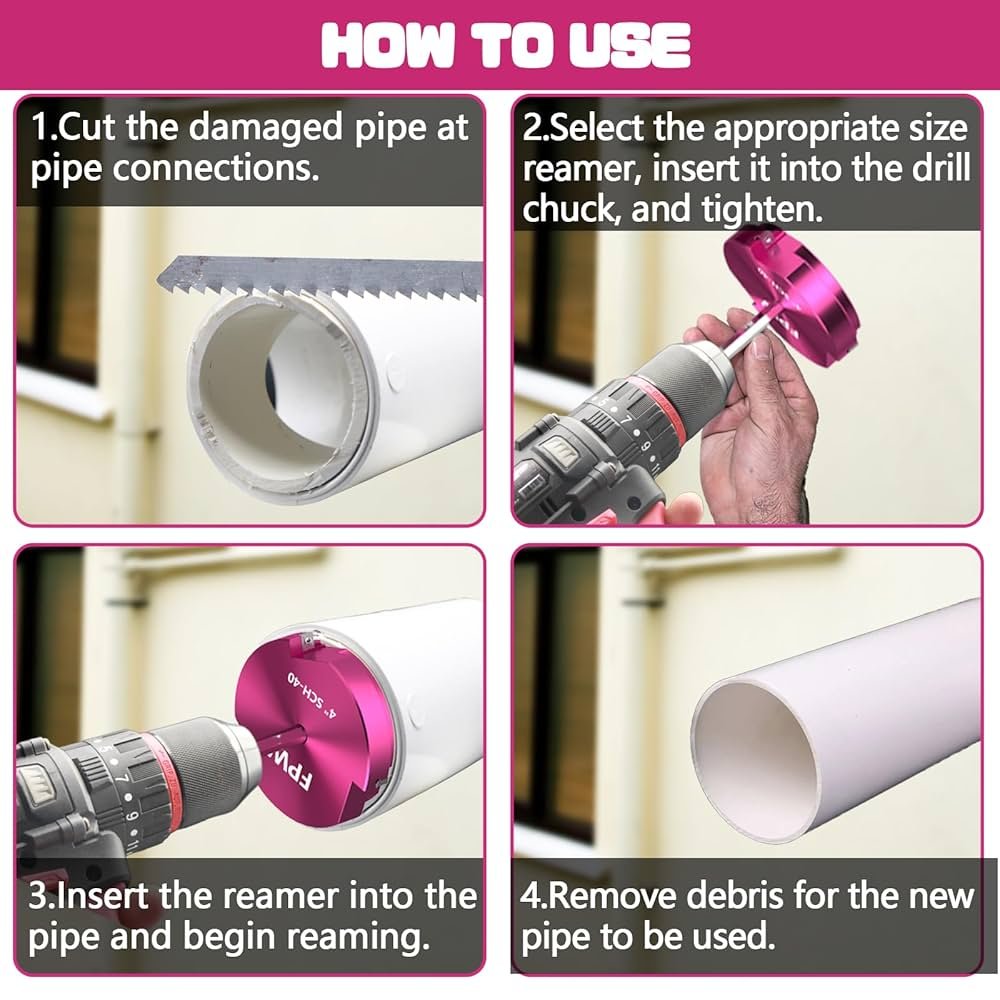
Step-by-step Reaming Process
Using a pipe reamer helps remove burrs and smooth the inside of pipes. This process improves pipe fitting and prevents damage. Follow these steps carefully to ream pipes safely and effectively.
The correct technique includes inserting the reamer, applying pressure, and rotating the tool. Each step matters to get a clean result without harming the pipe.
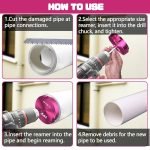
Inserting The Reamer
Start by selecting the right size reamer for your pipe. Insert the reamer slowly into the pipe end, making sure it fits snugly. Avoid forcing it in as this can damage the pipe.
- Check the pipe diameter and choose the matching reamer size.
- Hold the pipe steady with one hand.
- Gently push the reamer into the pipe opening.
- Make sure the blades touch the inner edge of the pipe.
- Stop inserting once you feel resistance from the pipe wall.
Applying Proper Pressure
Use steady and moderate pressure to avoid bending or breaking the tool. Too much force can harm both the pipe and the reamer.
| Pressure Level | Effect |
| Light | May not remove all burrs |
| Moderate | Best for smooth reaming |
| Heavy | Can damage pipe and tool |
Rotating The Tool Correctly
Turn the reamer slowly and evenly inside the pipe. Use the handle to rotate clockwise while keeping the tool steady.
- Grip the handle firmly.
- Rotate the reamer clockwise about 3 to 5 turns.
- Do not force rotation if you feel resistance.
- Withdraw the reamer slowly while rotating to clean the pipe edge.
Credit: www.vevor.com
Common Mistakes To Avoid
Using a pipe reamer correctly is important for good plumbing work. Many people make simple mistakes that can damage pipes or tools.
Knowing these common errors helps you use the pipe reamer safely and effectively.
Over-reaming The Pipe
Over-reaming means removing too much material inside the pipe. This can weaken the pipe and cause leaks.
It also wastes time and damages the pipe’s shape. Avoid pushing too hard or turning the reamer too many times.
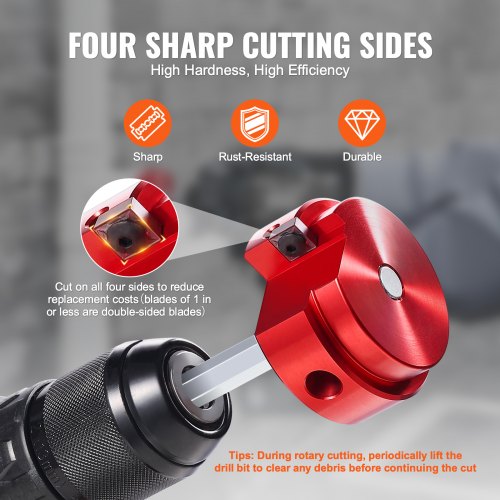
Using Dull Blades
Dull blades make reaming harder and less clean. They can tear the pipe instead of smoothing it.
- Check blades before use
- Sharpen or replace dull blades
- Use blades designed for your pipe type
- Clean blades after each use to keep sharpness
Ignoring Safety Measures
Not following safety rules can cause injuries. Wear gloves and eye protection to avoid cuts and flying debris.
| Safety Tip | Reason |
|---|---|
| Wear gloves | Protect hands from sharp edges |
| Use eye protection | Prevent eye injuries from metal shavings |
| Secure the pipe | Keep pipe steady to avoid slips |
| Work in a clean area | Reduce tripping hazards |
Maintaining Your Pipe Reamer
Keeping your pipe reamer in good shape helps it work better and last longer. Regular care prevents damage and rust.
Follow simple steps to clean, sharpen, and store your pipe reamer properly. This keeps it ready for every use.
Cleaning After Use
Clean your pipe reamer right after you finish using it. Remove all debris and metal shavings carefully.
Use a brush or cloth to wipe away dirt. Avoid water if possible to stop rust from forming.
- Brush off metal shavings gently
- Wipe with a dry cloth
- Use oil to protect metal parts
- Keep away from moisture
Sharpening Blades
Sharp blades make your pipe reamer cut better and safer. Check the blades often for dull spots.
Use a fine file or sharpening stone to fix dull edges. Move the tool at the same angle as the blade.
- Inspect blades before use
- Sharpen gently with a file
- Keep blade angle consistent
- Do not over-sharpen or remove too much metal
Proper Storage Tips
Store your pipe reamer in a dry place to avoid rust. Keep it in a tool box or hang it safely.
Cover the blades with a guard or wrap to protect them. Avoid stacking heavy tools on top of it.
- Store in a dry, cool area
- Use blade covers or wraps
- Keep away from heavy tools
- Check storage area regularly for moisture
Tips For Different Pipe Materials
Using a pipe reamer helps remove burrs and smooth the inside of pipes. Different pipe materials need different care when reaming.
Following the right steps for copper, PVC, and steel pipes ensures better fitting and longer pipe life.
Reaming Copper Pipes
Copper pipes are soft and easy to ream. Always use a sharp reamer to avoid deforming the pipe.
- Insert the reamer gently into the pipe end.
- Rotate it slowly to shave off burrs inside.
- Check the pipe edge with your finger to ensure smoothness.
- Clean the pipe end after reaming to remove metal shavings.
Reaming Pvc Pipes
PVC pipes can crack if handled roughly. Use a reamer made for plastic or a deburring tool.
| Tip | Reason |
| Use light pressure | Prevents cracking the pipe edge |
| Remove all burrs | Helps pipe fit better in connectors |
| Work slowly | Avoids damaging the pipe surface |
| Clean pipe after reaming | Keeps joint secure and leak-free |
Reaming Steel Pipes
Steel pipes are tough and need strong tools for reaming. Wear gloves and use steady force.
- Secure the pipe in a vise to prevent movement.
- Use a metal reamer suitable for steel pipes.
- Apply steady pressure and turn the reamer clockwise.
- Check for sharp edges and ream again if needed.
- Clean the pipe inside to remove metal shavings.

Credit: www.amazon.com
Frequently Asked Questions
What Is The Main Purpose Of A Pipe Reamer?
A pipe reamer removes burrs and smooths the inside edges of cut pipes. It ensures clean, safe connections and prevents damage to fittings.
How Do You Properly Use A Pipe Reamer?
Insert the reamer into the pipe end, twist gently while applying slight pressure. Rotate fully to remove rough edges and burrs evenly.
Can A Pipe Reamer Be Used On All Pipe Materials?
Pipe reamers work best on metal and plastic pipes. However, check the reamer type to ensure compatibility with the specific pipe material.
Why Is Deburring Pipes Important Before Installation?
Deburring removes sharp edges that can cause leaks or damage seals. It also improves flow efficiency and ensures a secure pipe fit.
Conclusion
Using a pipe reamer helps make pipe work cleaner and safer. It removes sharp edges inside pipes quickly. This tool saves time and effort during installation. Remember to hold the reamer steady while turning it. Clean pipes improve flow and prevent damage.
Practice a few times to gain confidence. Soon, using a pipe reamer will feel easy and natural. Keep your workspace tidy for best results. Simple steps lead to better plumbing jobs every time.