
Are rough, uneven edges ruining your woodworking projects? If you want your wood pieces to look professional and smooth, mastering the power planer is key.
This tool can transform your work instantly, but only if you know how to use it right. You’ll discover simple, step-by-step tips to handle a power planer with confidence. By the end, you’ll have the skills to create flawless, smooth edges every time.
Ready to take your woodworking to the next level? Keep reading and see how easy it can be.
Choosing The Right Power Planer
Using a power planer makes wood edges smooth and even. Choosing the right one is important for good results. You need to know what type fits your needs and what features to look for.
This guide will help you pick the best power planer. It covers types, key features, and safety gear you should have. Read on to learn more.
Types Of Power Planers
There are several types of power planers. Each type is made for different jobs. Choose one based on what you plan to do.
- Handheld Planer:Easy to use for small to medium jobs. Good for trimming edges and smoothing surfaces.
- Bench Planer:Larger and fixed in place. Best for flattening boards and working with larger wood pieces.
- Rebate Planer:Designed to cut grooves or rebates in wood. Ideal for detailed edge work.
Key Features To Consider
Look for features that make your work easier and safer. Some features improve control and precision.
| Feature | Benefit |
| Adjustable Depth | Allows precise control of how much wood is removed. |
| Comfortable Grip | Reduces hand fatigue during long use. |
| Dust Collection Port | Keeps your work area clean and improves visibility. |
| Power and Speed | Higher power handles harder wood; variable speed helps with different tasks. |
| Blade Quality | Sharp, durable blades give smooth finishes and last longer. |
Safety Gear Essentials
Wear safety gear to protect yourself. Planing wood creates dust and sharp chips.
- Safety Glasses: Protect your eyes from flying wood chips.
- Hearing Protection: Power planers can be loud and harm your hearing.
- Dust Mask: Keeps you from inhaling fine wood dust.
- Work Gloves: Protect your hands from splinters and sharp edges.
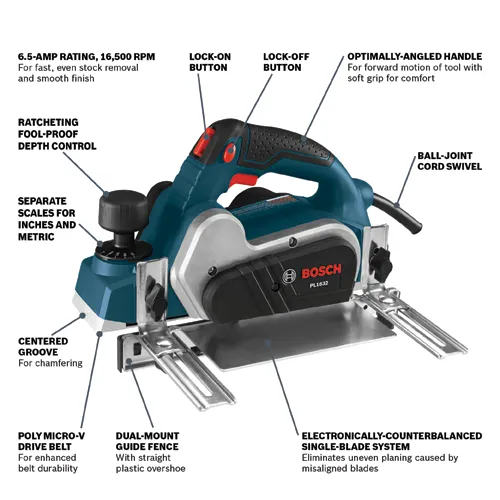
Credit: www.boschtools.com
Preparing Your Workspace
Using a power planer safely starts with a well-prepared workspace. Good setup helps you work faster and avoid mistakes.
Before you begin, organize your tools and clear the area. This way, you stay focused and safe.
Setting Up A Stable Work Surface
Choose a flat, solid surface to hold your wood steady. A stable surface prevents slips and uneven edges.
- Use a sturdy workbench or table
- Check that the surface is level
- Place a non-slip mat if needed
- Ensure good lighting over your workspace
Securing The Wood Piece
Hold the wood firmly to stop it from moving while planing. This helps you get smooth, even edges.
| Method | Description |
|---|---|
| Clamps | Use clamps to fix the wood to your workbench securely. |
| Bench Vise | A bench vise grips the wood tightly and allows easy adjustments. |
| Non-slip Pads | Place pads under the wood to reduce slipping on smooth surfaces. |
Clearing The Area
Keep your workspace clean and free of obstacles. This prevents accidents and lets you move smoothly.
- Remove loose tools and debris
- Keep cords away from the planer’s path
- Make sure there is enough space to handle the wood
- Have a trash bin nearby for wood shavings
Power Planer Setup
Setting up your power planer correctly is key for smooth and even edges. This guide covers the essential steps for proper setup before you start planing.
Take time to adjust the tool parts carefully. This helps you get the best results and keeps your work safe.
Adjusting The Depth Of Cut
The depth of cut controls how much wood the planer removes with each pass. Set it too deep and you risk damaging the wood or the tool.
- Turn off and unplug the planer before adjustments.
- Locate the depth adjustment knob or lever.
- Turn the knob to set the desired cutting depth. Start shallow for fine work.
- Test on scrap wood to check the depth before working on your project.
Checking Blade Sharpness
Sharp blades make smooth cuts and reduce tear-out. Inspect blades often to keep your planer working well.
| Blade Condition | Signs to Check |
| Sharp | Clean edge, no chips or nicks |
| Dull | Rough cuts, burning smell, more effort needed |
| Damaged | Visible cracks or missing pieces |
Replace or sharpen blades that show dullness or damage before use.
Aligning The Planer Base
The planer base must sit flat on the wood for even cutting. Misalignment causes uneven edges and tool vibration.
- Place the planer on a flat surface and check if the base rocks.
- Adjust the front and rear base plates if your model allows it.
- Use a straight edge to verify the base is level.
- Tighten screws securely after alignment.

Credit: www.familyhandyman.com
Planing Techniques For Smooth Edges
Using a power planer correctly helps create smooth, clean edges on wood. Good planing techniques reduce mistakes and save time.
Focus on hand position, pressure, and control for the best results. These details improve your work quality.
Correct Hand Positioning
Hold the planer firmly with both hands. Place one hand on the front handle to guide it.
Use your other hand on the rear handle to push the planer forward steadily. Keep your fingers clear of the blade area.
- Front hand guides direction
- Rear hand applies forward push
- Keep hands balanced and steady
Maintaining Steady Pressure
Apply even pressure on the planer to avoid gouges. Too much pressure can remove too much wood.
Press lightly at the start and end of each pass. Keep firm pressure in the middle for smooth cutting.
- Start with light pressure
- Increase pressure in the middle
- Ease pressure at the end
Direction And Speed Control
Move the planer with the wood grain to avoid splintering. Planing against the grain causes rough edges.
Keep a steady speed. Moving too fast leaves rough spots, while moving too slow can cause burns.
- Plan with the grain direction
- Maintain a steady, moderate speed
- Adjust speed to wood hardness
Troubleshooting Common Issues
Using a power planer can make your wood edges smooth and neat. Sometimes, you may face problems that stop your work. This guide helps you fix common issues quickly.
Knowing how to handle these problems saves time and improves your results. Keep your tools ready and your work safe by following these tips.
Avoiding Tear-out
Tear-out happens when the wood fibers split or chip away while planing. This can ruin the smooth edges you want.
To avoid tear-out, always plane with the grain of the wood. Move the planer slowly and steadily. Sharp blades help reduce damage to the wood surface.
- Check the blade for sharpness before starting
- Plane in the direction of the wood grain
- Use light passes instead of deep cuts
- Clamp the wood firmly to avoid movement
Dealing With Uneven Surfaces
Uneven surfaces make it hard to get a clean edge. The planer may dig too deep in some spots or miss others.
Fix this by checking the wood before planing. Mark low and high spots. Use multiple light passes and adjust the planer depth as needed.
- Inspect the wood surface for bumps or dents
- Set the planer to remove small amounts at a time
- Move the planer evenly across the surface
- Repeat passes until the surface is smooth
Handling Blade Clogs
Blade clogs happen when wood chips and dust stick to the blades. This lowers the planer’s performance and can damage the wood.
Clean the blades often during work. Use a brush or compressed air to remove dust. Replace blades if they get dull or damaged.
- Turn off and unplug the planer before cleaning
- Use a brush to remove wood chips from blades
- Blow dust out with compressed air
- Sharpen or replace blades when needed
Finishing Touches
Using a power planer gives you rough but shaped wood edges. Finishing touches make these edges smooth and ready to use. This guide covers sanding and care for your planer.
Sanding removes small bumps and makes the wood feel soft. Keeping your planer clean helps it work better and last longer.
Sanding For Extra Smoothness
After planing, sanding smooths out the surface. It removes small scratches and leaves a clean finish. Use sandpaper with the right grit for best results.
- Start with medium-grit sandpaper (80–120 grit) to even out the wood.
- Use fine-grit sandpaper (180–220 grit) for a smooth finish.
- Sand along the grain to avoid scratches.
- Wipe dust off between sanding steps.
- Check the surface by touch to see if it feels smooth.
Cleaning And Maintaining Your Planer
Clean your power planer after each use. Dust and wood chips can slow it down or cause damage. Regular maintenance keeps it working well.
| Maintenance Task | How to Do It | Frequency |
|---|---|---|
| Remove wood chips | Use a brush or compressed air | After each use |
| Check blades | Look for dull or damaged edges | Before each use |
| Lubricate moving parts | Apply oil to hinges and screws | Monthly or as needed |
| Store properly | Keep in a dry place away from dust | Always |

Credit: www.findbuytool.com
Frequently Asked Questions
What Is A Power Planer Used For?
A power planer is used for smoothing and leveling wood surfaces. It helps in removing imperfections and uneven edges. This tool is ideal for creating smooth, professional finishes on wood projects. It’s essential for carpenters and DIY enthusiasts aiming for precision.
How Do You Adjust A Power Planer?
To adjust a power planer, first ensure it’s unplugged. Use the depth adjustment knob to set your desired depth. Test on scrap wood to check the settings. Adjust as necessary for precision. Always follow the manufacturer’s guidelines for optimal results.
Can Beginners Use A Power Planer Safely?
Yes, beginners can use a power planer safely with proper precautions. Read the user manual thoroughly. Always wear safety gear such as goggles and gloves. Start with a low depth setting and practice on scrap wood. Keep hands away from the blade while operating.
What Safety Precautions Are Needed?
When using a power planer, wear safety goggles and gloves. Ensure the work area is clear of obstructions. Keep hands away from the blade. Unplug the planer when not in use. Always follow the manufacturer’s safety guidelines for optimal safety.
Conclusion
Using a power planer makes edges smooth and clean. Take your time and work carefully. Always check the tool before starting. Keep your hands steady and guide the planer slowly. Practice on scrap wood first to gain confidence. Clean the edges after planing for best results.
With patience, your woodwork will look neat and polished. Power planers help create professional-looking projects easily. Try these tips to improve your skills today.