Have you ever looked at intricate wood carvings and wondered how they were made? Imagine holding the power to create such stunning designs right in your hands.
With a rotary tool, carving becomes an accessible art form that even beginners can master. This versatile tool opens up a world of creativity, allowing you to transform ordinary pieces of wood into extraordinary works of art. By the end of this guide, you’ll discover the secrets to using a rotary tool for carving, unlocking your artistic potential and making your creative visions come to life.
Whether you’re a hobbyist or an aspiring craftsman, this article is your gateway to mastering the art of carving with ease and precision. Dive in, and let’s unleash your creativity together!

Credit: www.youtube.com
Choosing The Right Rotary Tool
A rotary tool helps carve wood, plastic, and other materials easily. Picking the right tool makes your carving safer and more precise.
This guide explains how to choose a rotary tool by looking at types, attachments, and safety features.
Types Of Rotary Tools
Rotary tools come in various types to fit different carving needs. Some have variable speeds, while others are cordless for easy use.
- Basic rotary tools: Good for light carving and small projects.
- Variable speed tools: Allow speed control for detailed work.
- Cordless models: Offer freedom to move without wires.
- Heavy-duty tools: Best for hard materials and long use.
Selecting The Best Attachments
Attachments change how your rotary tool works. Choose them based on the carving type and material you use.
| Attachment | Use | Material |
| Carving bits | Detail work | Wood, soft plastic |
| Sanding drums | Smoothing surfaces | Wood, metal |
| Cutting wheels | Cutting shapes | Plastic, metal |
| Grinding stones | Sharpening edges | Metal, stone |
Safety Features To Look For
Safety features protect you from accidents and tool damage. Look for these before buying your rotary tool.
- Speed control to avoid slipping
- Comfortable grip for steady handling
- Overload protection to stop overheating
- Safety guard to shield from flying debris
- Lock-on switch to prevent accidental starts
Preparing For Carving
Using a rotary tool for carving can be fun and creative. Before you start, it is important to get ready. This helps you work safely and get the best results.
In this guide, we will cover how to choose materials, set up your workspace, and wear safety gear. These steps will make your carving experience smooth and safe.
Choosing Suitable Materials
Pick materials that are easy to carve and safe to use with a rotary tool. Soft woods, plastics, and soft stones are good choices. Avoid very hard or brittle materials at first.
- Soft woods like basswood or pine
- Plastics designed for carving
- Soft stones like soapstone
- Materials that do not produce toxic dust
Setting Up Your Workspace
Arrange your workspace so it is clean and well-lit. Make sure you have enough room to move your tool freely. Keep your materials and tools close at hand but not cluttered.
| Workspace Item | Purpose |
|---|---|
| Good Lighting | See details clearly and avoid mistakes |
| Stable Table | Keep materials steady while carving |
| Tool Holder | Organize rotary tool and bits safely |
| Trash Container | Collect dust and small scraps |
Essential Safety Gear
Wear the right safety gear to protect yourself from dust, sharp bits, and noise. Always use safety glasses and a dust mask. Gloves can protect your hands but must fit well.
- Safety glasses to protect your eyes
- Dust mask to avoid breathing dust
- Gloves that fit snugly for hand protection
- Ear protection if the tool is loud
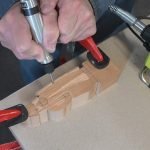
Basic Rotary Tool Techniques
Rotary tools are useful for carving small and detailed projects. Knowing basic techniques helps you work safely and neatly.
This guide covers how to hold the tool, control its speed and pressure, and use common carving motions.
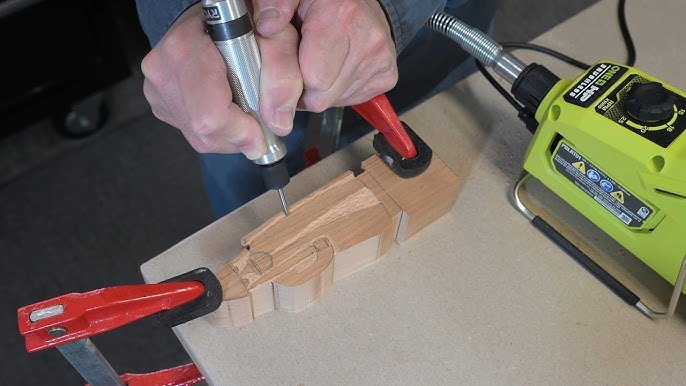
Holding The Tool Correctly
Hold the rotary tool like a pencil for better control. Use your dominant hand and rest your other hand on the work surface.
Keep your grip firm but relaxed to avoid shaking. This helps you carve clean lines and shapes.
Controlling Speed And Pressure
Adjust the speed of your rotary tool based on the material you carve. Lower speeds work for soft wood or plastic.
Apply gentle pressure. Let the tool do the work to avoid breaking bits or damaging your project.
- Use slow speed for detail work
- Use medium speed for shaping
- Use light pressure to prevent slips
Common Carving Motions
Use smooth and steady motions when carving. Move the tool forward, backward, or in small circles depending on the shape.
Try these motions for different effects and better control.
- Straight strokes for lines and edges
- Circular motions for curves and rounded shapes
- Light tapping for texture or dots

Credit: www.youtube.com
Advanced Carving Tips
Using a rotary tool for carving lets you create detailed and textured designs. Advanced techniques help improve your work and fix small errors quickly.
Focus on precise control and layering to add depth. Learning how to fix mistakes can save time and keep your project clean.
Creating Fine Details
Use small rotary bits for delicate lines and shapes. Work slowly and keep your hand steady. Light pressure prevents breaking or slipping.
- Choose diamond or carbide bits for sharp edges
- Use magnification to see tiny areas clearly
- Keep the tool speed moderate for control
- Hold the material firmly to avoid shaking
Layering And Texturing
Build your design by carving in layers. Start with broad shapes and add texture on top. Use different bit sizes and angles for variety.
| Technique | Effect |
| Cross-hatching | Creates shading and depth |
| Stippling | Adds rough texture |
| Sanding with fine bits | Smooths surfaces |
| Grooving | Defines sharp lines |
Fixing Mistakes
Small errors can be corrected without starting over. Use these methods to fix or hide problems in your carving.
- Lightly sand the area with a fine bit to smooth rough spots
- Fill deeper mistakes with wood filler or epoxy, then carve again
- Blend edges of fixes with surrounding areas for a natural look
- Use paint or stain to cover imperfections after repair
Maintaining Your Rotary Tool
Keeping your rotary tool in good shape helps it last longer. Regular care makes carving easier and safer.
This guide covers cleaning, storage, bit replacement, and fixing common problems.
Cleaning And Storage
After each use, clean dust and debris from your rotary tool. Use a soft brush to remove dirt from vents and moving parts.
- Unplug the tool before cleaning
- Wipe the exterior with a dry cloth
- Use compressed air to clear dust inside vents
- Store the tool in a dry, cool place
- Keep it in its case to protect from damage
Replacing Bits
Bits wear out over time and affect carving quality. Replace them to keep your tool working well.
| Signs to Replace Bits | How to Replace |
| Bit is dull or chipped | Turn off and unplug tool, loosen collet, remove old bit |
| Bit wobbles during use | Check collet for damage, insert new bit, tighten securely |
| Bit overheats quickly | Replace with correct bit size and type |
Troubleshooting Common Issues
If your rotary tool stops working or runs poorly, try these fixes first.
- Check power source and cord for damage
- Clean dust from vents and motor area
- Inspect and replace worn brushes if needed
- Ensure bits are tight and properly seated
- Let the tool cool down if it overheats

Credit: www.youtube.com
Project Ideas To Try
Rotary tools are great for many carving projects. They work well on wood, soft materials, and everyday items. You can create unique designs and personalize things around your home.
Try these ideas to get started with your rotary tool. Each project lets you practice different skills and make useful or decorative items.
Wood Carving Designs
Wood is a popular material for carving with a rotary tool. You can make signs, small sculptures, or decorative boxes. Use different bits to carve lines, shapes, or patterns.
- Carve simple shapes like leaves or animals on a wood panel
- Create a nameplate with letters carved in relief
- Make a wooden coaster with geometric patterns
- Design a small wooden ornament for decoration
Engraving On Soft Materials
Soft materials like leather, cork, or foam can be engraved with a rotary tool. This lets you add texture or images to items you want to customize or decorate.
| Material | Project Idea | Tool Bit |
| Leather | Engrave a wallet or bracelet | Fine engraving bit |
| Cork | Make a decorative coaster | Ball-shaped carving bit |
| Foam | Create custom stamps | Cutting bit |
Customizing Everyday Items
Use your rotary tool to add personal touches to everyday objects. You can carve, engrave, or etch designs on metal, glass, or plastic. This refreshes old items or makes gifts special.
Try these ideas to customize your things:
- Engrave a metal keychain with initials or a short message
- Etch a glass jar or cup with a simple pattern
- Carve designs into a plastic phone case
- Add decorative details to wooden kitchen utensils
Frequently Asked Questions
What Materials Can I Carve With A Rotary Tool?
You can carve wood, plastic, soft metals, and foam using a rotary tool. It’s versatile for detailed and rough carving tasks.
How Do I Choose The Right Bit For Carving?
Select bits based on your material and desired detail. Use carbide for metals, diamond for stones, and high-speed steel for wood.
What Safety Precautions Should I Take When Carving?
Always wear safety goggles, a dust mask, and gloves. Work in a well-ventilated area to avoid inhaling dust and debris.
Can Beginners Use A Rotary Tool For Carving?
Yes, rotary tools are beginner-friendly. Start with simple projects, use low speeds, and practice control for better results.
Conclusion
Using a rotary tool for carving can be simple and fun. Start with the right bits and steady hands. Take your time and work slowly for best results. Always wear safety gear to protect yourself. Practice on scrap materials before carving your final piece.
Enjoy the process and watch your ideas come to life. Carving with a rotary tool opens many creative doors. Keep learning and trying new techniques to improve. This tool can help turn simple projects into art. Give it a try and see what you create!