When you’re working on a woodworking project, getting your measurements right is the first step to success. But do you really know how to use a tape measure the right way?
Using it incorrectly can lead to mistakes, wasted wood, and frustration. This guide will show you simple, clear steps to master your tape measure so your cuts are precise every time. By the end, you’ll feel confident measuring like a pro and avoid costly errors that slow you down.
Ready to sharpen your skills and make your next project flawless? Keep reading!

Credit: www.reddit.com
Choosing The Right Tape Measure
Using a tape measure is key for accurate woodworking. Picking the right tape measure helps you work faster and better.
There are different tape measures for different jobs. Knowing the types and features helps you choose the best one.
Tape Measure Types
Woodworking needs a tape measure that fits your tasks. Some tape measures work better for small projects, others for large pieces.
- Standard Tape Measure:Most common type. Good for general measuring up to 25 feet.
- Steel Tape Measure:Durable and stiff. Best for longer, straight measurements.
- Cloth or Fiberglass Tape:Flexible and soft. Useful for curved surfaces or irregular shapes.
- Digital Tape Measure:Shows measurements on a screen. Great for precise reading.
Key Features To Look For
| Feature | Why It Matters | Woodworking Benefit |
| Blade Length | How far you can measure without moving the tape. | Longer blades cover bigger wood pieces. |
| Blade Width | Wider blades stay straighter when extended. | Easier to measure long, straight cuts. |
| Locking Mechanism | Keeps the blade from retracting. | Helps hold the measurement steadily. |
| Hook End | Grips the edge of wood firmly. | Prevents slipping for accurate measures. |
| Markings | How clear and readable the numbers are. | Faster and more exact reading. |
| Casing | Protects the tape and fits the hand. | Comfort and durability on the job. |

Credit: www.youtube.com
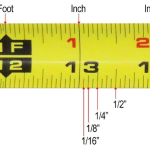
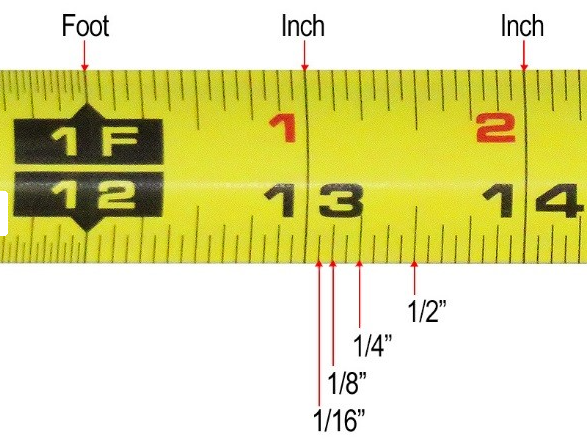
Reading Tape Measure Markings
Using a tape measure correctly is key in woodworking. Knowing how to read its markings helps you measure wood pieces accurately.
Tape measures have different scales and marks. This guide explains how to read those marks clearly.
Understanding Fractions And Decimals
Tape measures often show inches divided into fractions. Common fractions are halves, quarters, eighths, and sixteenths.
- 1/2 inch is the middle point between 0 and 1 inch
- 1/4 inch divides the inch into four parts
- 1/8 inch divides each quarter into two parts
- 1/16 inch divides each eighth into two smaller parts
Some tape measures also show decimal inches. Decimals make it easier to add and subtract measurements.
Metric Vs Imperial Units
Tape measures come in two main systems: metric and imperial. Woodworkers may use one or both.
| Unit System | Common Marks | How It Divides |
| Imperial | Inches, Fractions | Inches divided into halves, quarters, eighths, sixteenths |
| Metric | Millimeters, Centimeters | Centimeters divided into 10 millimeters |
Choose the system that matches your project or tools. Some tape measures show both units side by side.
Basic Measuring Techniques
Using a tape measure is essential for woodworking projects. Accurate measurements help you cut wood pieces correctly.
Learn to read the tape measure and measure different shapes. This skill keeps your project neat and fits parts well.
Measuring Straight Cuts
Place the tape measure flat on the wood surface. Align the start of the tape with the edge of the wood.
Pull the tape out to the desired length. Mark the wood at the exact point with a pencil.
- Keep the tape straight and tight for accuracy
- Use the lock on the tape to hold the length
- Double-check the measurement before cutting
Measuring Curves And Angles
For curves, bend the tape measure gently along the curve. Follow the shape closely to get the right length.
To measure angles, use the tape to measure each side. You can also use a protractor for more precision.
- Keep the tape snug but not stretched on curves
- Mark points clearly to transfer measurements
- Measure angles by comparing side lengths or using tools
Advanced Tips For Accuracy
Using a tape measure correctly is key for precise woodworking. Small mistakes cause big problems in your project.
These tips focus on two important areas: the hook end and locking the tape. Follow them to improve your measurements.
Using The Hook End Correctly
The hook end of a tape measure helps you measure inside and outside edges. It moves slightly to allow accurate readings.
- When measuring outside edges, hook the end over the wood edge.
- For inside measurements, press the hook against the inside surface.
- Check that the hook moves freely but is not loose.
- Allow the hook to slide exactly the thickness of its metal for correct zero point.
- Keep the tape straight and flat to avoid errors.
Locking The Tape For Stability
Locking the tape keeps it from retracting while you mark or measure. This prevents shifting and improves accuracy.
| Locking Tip | Benefit |
| Press lock firmly | Stops tape from moving |
| Check lock before measuring | Ensures stable measurement |
| Release lock slowly | Prevents tape snap back |
| Use lock on long measurements | Improves consistency |
Common Mistakes To Avoid
Using a tape measure correctly is key in woodworking. Small errors can cause big problems.
Watch out for common mistakes that reduce accuracy. Fixing these helps your project fit perfectly.
Misreading Measurements
Many woodworkers misread the tape measure numbers. This leads to cutting pieces too short or too long.
- Check if you read inches or centimeters.
- Look carefully at the fractional marks.
- Note if the tape starts at zero or a hook edge.
- Use good lighting to see numbers clearly.
- Double-check measurements before cutting.
Ignoring Tape Sag
Tape sag happens when the tape bends or droops during measuring. It shortens the actual length.
| Problem | Effect | Solution |
| Tape bends down | Measurement shorter than real | Hold tape tight and straight |
| Tape twists | Numbers hard to read | Keep tape flat on surface |
| Tape hooks slip | Wrong start point | Secure hook firmly on edge |
Maintenance And Care
Taking care of your tape measure helps it last longer and work better. Simple maintenance keeps the tape clean and accurate.
Proper care prevents damage and ensures easy use every time you measure wood.
Cleaning The Tape
Keep the tape free from dirt and dust. Wipe the blade with a soft cloth after each use. Avoid sticky substances that can slow the tape.
If the tape is very dirty, use mild soap and water. Dry the tape fully to stop rust from forming on the metal.
- Use a soft cloth to clean the tape blade
- Remove dirt and dust after every use
- Use mild soap and water for tough grime
- Dry the tape completely before storing
Proper Storage
Store your tape measure in a dry place to avoid rust. Keep it away from extreme heat or cold, which can damage the tape.
Always retract the tape fully and lock it in place. This stops bending and keeps the tape straight for accurate measuring.
- Retract tape fully after use
- Lock the tape to avoid bending
- Keep tape measure in a dry area
- Avoid direct sunlight and heat
- Use a toolbox or drawer for storage

Credit: www.youtube.com
Frequently Asked Questions
How Do I Read A Tape Measure?
To read a tape measure, identify the large numbers for inches. Smaller lines between them denote fractions. Understand the increments like 1/2, 1/4, and 1/8 inch. Use the hook to ensure accuracy. Always start measuring from the zero mark for precise readings in woodworking projects.
What Is The Tape Measure Hook For?
The tape measure hook helps ensure precise measurements. It grips the edge of wood, preventing slippage. This feature accounts for the hook’s thickness, providing accurate interior and exterior measurements. Always check the hook’s position before measuring. The hook’s movement compensates for the material thickness to maintain accuracy.
Why Is The Tape Measure Bend Important?
The tape measure bend, or “standout,” allows for extended measurements without support. This feature helps measure across longer distances. It provides stability and accuracy. The standout is crucial for woodworking when you’re measuring large pieces. A good standout can prevent sagging, ensuring precise measurements every time.
How Do I Measure Angles With A Tape Measure?
To measure angles, use the tape measure alongside a protractor or angle finder. Place the protractor at the angle’s vertex. Align the tape measure with the protractor’s arm. This method allows for accurate angle measurements. It’s essential for detailed woodworking projects requiring precise angle cuts.
Conclusion
Using a tape measure correctly helps you cut wood with care. Take clear measurements and mark them well. Always check twice before making any cuts. This simple tool makes your woodworking more accurate. Practice often to feel confident with your tape measure.
Small steps lead to better and safer projects. Keep your tape measure handy for every task. Your woodworking skills will improve over time. Just remember: patience and attention matter most.