When you’re working on furniture projects, getting every corner just right matters more than you might think. A try square is one of the simplest yet most powerful tools to help you achieve perfect angles and straight edges.
If you want your pieces to fit together seamlessly and look professional, knowing how to use a try square is a must. This guide will walk you through easy steps to master this tool, so your furniture projects turn out strong, precise, and beautiful every time.
Ready to take your craftsmanship to the next level? Let’s dive in.

Credit: www.wolfcraft.com
Choosing The Right Try Square
A try square helps you check right angles in furniture projects. Picking the right one makes your work easier and more accurate.
Try squares come in different types, sizes, and materials. Choosing the best fit depends on your project needs.
Types Of Try Squares
There are several try square types. Each type suits different tasks and skill levels.
- Steel Try Square: Durable and precise for heavy use
- Wooden Try Square: Traditional, good for light woodworking
- Combination Try Square: Has extra features like rulers or protractors
Materials And Build Quality
The material of the try square affects its accuracy and durability. Choose one that lasts and stays true.
- Steel blades resist warping and keep edges sharp
- Wood handles offer comfort but may wear out faster
- Plastic models are lightweight but less durable
Size Selection For Projects
Size matters when picking a try square. The blade length should match your project size.
- Small squares (3-4 inches) are good for tight spots
- Medium squares (6-8 inches) work for most furniture tasks
- Large squares (10+ inches) help with big pieces and marking long lines

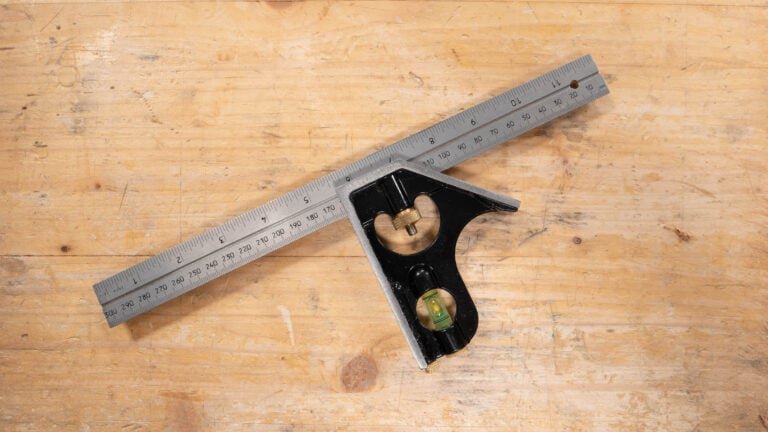
Credit: www.thisoldhouse.com
Setting Up Your Try Square
A try square is a simple tool for checking right angles in furniture projects. Setting it up correctly helps you get precise cuts and joins.
Follow these steps to prepare your try square before using it on wood or other materials.
Checking For Accuracy
First, check if your try square is accurate. Place it against a flat surface and mark along the blade. Flip the tool over and mark again from the same edge. If the two lines match, the try square is accurate.
If the lines do not match, your try square needs adjustment before use.
Calibrating The Tool
Adjust your try square to ensure it gives a true 90-degree angle. Use the following method to calibrate it:
- Loosen the screws or fasteners holding the blade.
- Align the blade so it matches the marked lines from the accuracy check.
- Tighten the screws firmly to hold the blade in place.
- Recheck the angle by repeating the marking test.
Maintaining The Edge
Keep your try square in good condition for long-term use. Protect the edges and blade from damage or rust.
| Maintenance Task | How to Do It |
| Clean the blade | Wipe with a dry cloth after each use |
| Prevent rust | Apply light oil to metal parts regularly |
| Store properly | Keep in a dry place, avoid heavy impacts |
| Check tightness | Tighten screws before every project |
Using The Try Square In Measurements
The try square is an important tool for furniture making. It helps check angles and mark lines. Using it right makes your project fit well and look neat.
Learn how to use the try square for marking lines, checking angles, and measuring depths. These skills improve your woodworking accuracy.
Marking Straight Lines
Place the try square’s stock firmly against the wood edge. Hold it steady to avoid movement. Then, use a pencil to draw a straight line along the blade.
- Ensure the stock touches the wood edge fully
- Keep the try square flat on the surface
- Draw the line with a sharp pencil for clarity
- Double-check the line before cutting
Verifying 90-degree Angles
Check if two pieces meet at a right angle using the try square. Fit the stock against one piece. The blade should touch the other piece evenly.
| Condition | What to Check | Result |
| Perfect fit | Blade and wood edge flush | 90-degree angle confirmed |
| Gap visible | Space between blade and wood | Angle needs adjustment |
| Blade overlaps | Blade extends beyond wood edge | Angle is more than 90 degrees |
Measuring Depths And Heights
Use the try square to measure depths or heights. Hold the stock on the surface. Extend the blade to the point you want to measure.
Follow these tips for accurate measuring:
- Keep the stock flush with the base surface
- Mark the blade end clearly with a pencil
- Use a ruler to read the measurement on the blade
Applying The Try Square In Furniture Making
The try square is a simple tool that helps furniture makers check angles and edges. Using it correctly ensures strong and neat furniture joints.
In this guide, you will learn how to use a try square for aligning joints, checking squareness, and making consistent cuts in your projects.
Aligning Joints And Edges
Place the try square against the edge of one piece to check if it is straight. Then align the adjoining piece to match the square’s blade.
- Hold the stock firmly on the workbench.
- Place the try square’s stock against the edge.
- Adjust the second piece until it fits flush with the blade.
- Clamp the pieces together before joining.
Checking Workpiece Squareness
Check if a board or panel is square by placing the try square at each corner. This prevents gaps and uneven frames.
| Step | Action |
|---|---|
| 1 | Place the stock of the try square against one edge of the corner. |
| 2 | Check if the blade touches the adjacent edge fully without gaps. |
| 3 | Repeat for all corners on the workpiece. |
| 4 | If gaps appear, mark the area to trim or sand. |
Ensuring Consistent Cuts
Use the try square to mark straight cutting lines and guide your saw. This keeps all pieces the same size and shape.
Follow these tips for consistent cuts:
- Place the try square on the workpiece where you want to cut.
- Use a pencil to draw a line along the blade.
- Double-check the line’s angle with the try square.
- Cut carefully along the marked line using a saw or cutting tool.
- Repeat this process for every piece to keep cuts uniform.
Common Mistakes And How To Avoid Them
Using a try square correctly is important for good furniture work. Many beginners make simple mistakes that cause errors.
This guide shows common errors and how to avoid them. It will help your projects be more accurate and professional.
Misreading Measurements
One frequent error is reading the try square wrong. People often confuse the blade edge with the measuring marks. This causes wrong cuts and fits.
- Look carefully at the blade edge, not the side of the tool.
- Use good light to see the marks clearly.
- Double-check measurements before marking wood.
- Practice holding the square steady while reading.
Improper Tool Handling
Wrong handling of the try square leads to inaccurate lines. Holding it at an angle or moving while marking causes errors.
| Common Handling Mistake | How to Avoid |
|---|---|
| Not holding the stock firmly against the edge | Press the stock tightly against the wood edge before marking |
| Tilting the blade when drawing the line | Keep the blade flat and steady on the surface |
| Moving the square during marking | Hold the square firmly with one hand while marking with the other |
Ignoring Tool Wear
Try squares wear out over time. A bent blade or chipped edge gives wrong angles. Ignoring this leads to mistakes in your work.
- Check the blade edge regularly for damage.
- Replace or repair the square if it is bent.
- Store the tool properly to avoid damage.
- Use a known good square to verify your tool’s accuracy.

Credit: www.wolfcraft.com
Care And Storage Tips
Using a try square correctly helps you measure angles accurately in furniture projects.
Taking care of your try square keeps it reliable and lasts a long time.
Cleaning After Use
Clean your try square after each use to remove dust and wood particles.
- Wipe the blade and handle with a dry cloth.
- Use a soft brush to clean corners and edges.
- For sticky residue, apply a small amount of mild soap and water, then dry it well.
Proper Storage Methods
Store your try square in a dry place to avoid rust and damage.
| Storage Method | Benefit |
|---|---|
| Hang on a pegboard | Prevents bending and keeps it visible |
| Keep in a toolbox with padding | Protects from scratches and impacts |
| Use a protective sleeve | Keeps the blade clean and rust-free |
Routine Maintenance
Regularly check your try square to keep it accurate and in good shape.
Follow this maintenance checklist:
- Inspect the blade for any dents or bends.
- Check the handle for cracks or looseness.
- Test the square’s accuracy against a known straight edge.
- Apply a thin coat of machine oil to metal parts to stop rust.
- Tighten screws or rivets if they feel loose.
Frequently Asked Questions
What Is A Try Square Used For In Furniture Projects?
A try square ensures accurate right angles when cutting or assembling wood. It helps maintain precision and quality in furniture making. This tool is essential for measuring and marking 90-degree angles on wood pieces.
How Do You Properly Hold A Try Square?
Hold the stock firmly against the wood edge. Keep the blade flat on the surface. This ensures an accurate 90-degree measurement for marking or checking corners.
Can A Try Square Check Wood Surface Flatness?
Yes, a try square can detect uneven surfaces. Place the blade against the wood and observe gaps. It helps identify warps or irregularities in the wood.
How Often Should You Calibrate A Try Square?
Calibrate your try square regularly, especially before important projects. Check against a known square or straight edge. Proper calibration ensures measurement accuracy and project quality.
Conclusion
Using a try square makes furniture projects easier. This tool helps ensure accuracy. Straight cuts improve the look of your work. Beginners find it helpful. Experts rely on it for precision. Practice using it regularly. Check your work for straight lines.
Small mistakes can affect the final outcome. Safety comes first; handle tools carefully. Remember, patience and practice lead to success. Start small, and improve over time. Share your projects with friends. Your skills will grow with experience. Enjoy your creative journey in furniture making.