
Are you tired of your woodworking projects looking uneven or sloppy? Getting precise, clean cuts and perfect angles can make all the difference in your work.
That’s where a try square comes in. This simple tool can help you measure and mark right angles quickly and accurately, saving you time and frustration. You’ll learn exactly how to use a try square to improve your woodworking skills and create pieces you’ll be proud of.
Keep reading, and soon you’ll be working smarter, not harder.
Try Square Basics
A try square is a simple tool used in woodworking. It helps check angles and mark straight lines. Woodworkers use it to make sure cuts and joints are accurate.
Understanding the parts and types of try squares will help you use it correctly. This guide covers these basics for beginners.
Parts Of A Try Square
A try square has two main parts. Each part has a special job to help with measuring and marking.
- Blade:The flat metal part used for measuring and marking. It is usually marked with measurement lines.
- Handle (Stock):The thicker part you hold. It is set at a right angle to the blade.
- Heel:The corner where the blade and handle meet. This is the right angle point.
- Face:The flat side of the handle that rests against the wood.
Types Of Try Squares
There are different types of try squares. Each type is made for specific uses and preferences.
| Type | Description | Common Use |
| Steel Try Square | Has a steel blade and a wooden or plastic handle. | General woodworking and metalworking. |
| Carpenter’s Try Square | Usually has a wooden handle with a metal blade. | Basic wood cutting and layout work. |
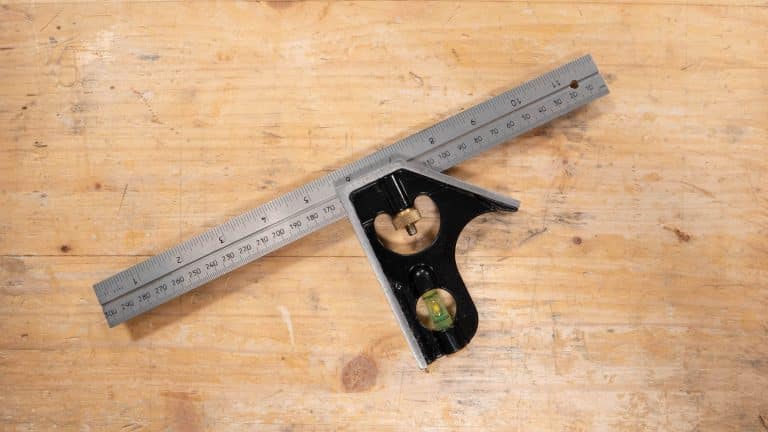
| Combination Square | Includes a sliding ruler and a head that can be adjusted. | Measures angles and depths, more versatile. |
| Framing Square | Larger square used for framing and roof work. | Large wood framing and carpentry. |

Credit: www.youtube.com
Choosing The Right Try Square
A try square is a simple tool for checking right angles in woodworking. Picking the right one helps you work with accuracy and ease.
Different try squares suit different tasks. Look at material, build quality, and size before you buy.
Material And Build Quality
Good material and strong build make a try square last longer and stay accurate. Look for rust-resistant metals or hardwood for the blade and stock.
- Stainless steel blades resist rust and wear
- Brass or steel stocks give firm support
- Wood stocks offer a traditional look but need care
- Check that the blade fits tightly into the stock
- Look for smooth edges and clear measurement marks
Size Considerations
| Size | Best Use | Advantages |
|---|---|---|
| 3-inch | Small projects and tight spaces | Easy to handle, precise for tiny cuts |
| 6-inch | General woodworking tasks | Good balance of size and control |
| 12-inch or larger | Big projects and framing | Can check longer edges and larger angles |
Choose a size that fits your usual projects. A small try square is handy for fine details. Bigger sizes work better on large wood pieces.
Preparing For Accurate Measurements
Using a try square correctly is important for woodworking. It helps you make straight cuts and right angles.
Before measuring, prepare your tools and work area. This ensures your measurements are exact and reliable.
Checking Tool Calibration
Check if your try square is accurate before use. A misaligned tool gives wrong measurements.
Place the try square against a known straight edge. Look for any gaps or uneven lines.
- Hold the try square firmly against the edge
- Look closely at the blade and stock alignment
- If gaps appear, the tool needs adjustment or replacement
Cleaning The Surface
Clean both the try square and the wood surface before measuring. Dirt or dust can cause errors.
Use a soft cloth to wipe the tool and wood. Remove any chips, sawdust, or sticky residue.
- Wipe the try square blade and stock
- Clear the wood surface where you measure
- Keep the workspace tidy to avoid mistakes
Using A Try Square For Marking
A try square is a simple tool used in woodworking to mark straight and accurate lines. It helps ensure your cuts and joints are precise.
Using a try square correctly can improve the quality of your work. Let’s look at how to align the blade and mark straight lines.
Aligning The Blade
Hold the try square firmly with the handle against the edge of the wood. The blade should lie flat on the surface where you want to mark.
- Place the handle flush against the wood’s edge.
- Make sure the blade is at a right angle to the handle.
- Check that the blade sits flat without gaps.
- Adjust your grip to keep the square steady.
Marking Straight Lines
After aligning the try square, use a sharp pencil to draw your line. Keep the pencil close to the blade for accuracy.
| Tip | Reason |
|---|---|
| Use a sharp pencil | Creates thin, clear lines for precise cuts |
| Hold pencil firmly | Prevents smudging and uneven lines |
| Draw slowly along the blade | Ensures a straight and clean mark |
Checking Wood Squareness
Using a try square helps you check if wood pieces have right angles. Squareness is key for good woodworking projects.
This tool lets you find corners that are not 90 degrees. It helps keep your cuts and joins accurate.
Testing Edges And Corners
Place the try square blade against the wood edge. The stock should fit tightly against the wood surface.
Look for gaps between the blade and wood. Gaps mean the edge or corner is not square.
- Hold the stock firmly against the wood edge.
- Check if the blade lays flat on the adjacent surface.
- Rotate the wood to test all edges and corners.
- Mark any spots with visible gaps or uneven contact.
Identifying Out-of-square Areas
Out-of-square areas appear as gaps or uneven lines when using the try square. These areas need adjustment.
Use a pencil to mark these spots. Later, you can trim or sand them for better squareness.
- Check each corner by placing the try square inside and outside the angle.
- Look for light passing through gaps between the blade and wood.
- Mark all problem areas clearly before fixing.
- Repeat the test after adjustments to confirm accuracy.
Tips For Precision And Consistency
A try square helps you measure and mark wood accurately. Using it right keeps your cuts straight and your projects neat.
Follow simple tips to get the best results. Being precise and consistent makes your woodworking easier.
Maintaining Firm Contact
Keep the try square firmly against the wood edge. This stops it from moving while you mark or check angles.
Apply steady pressure with your hand on the handle. Hold the wood steady with your other hand to prevent slips.
- Place the try square’s stock flush against the wood edge.
- Press the stock firmly to avoid gaps.
- Hold the blade tight on the surface to draw clean lines.
- Keep your wood stable on a flat work surface.
Avoiding Parallax Errors
Look straight down at the try square’s blade when marking. Angled views can cause lines to appear off.
Keep your eye level with the blade edge. This helps your marks stay accurate and consistent.
- Position your head directly above the blade edge.
- Do not view the blade from the side or at an angle.
- Use good lighting to see the blade and wood clearly.
- Double-check your marks before cutting.
Common Mistakes To Avoid
Using a try square correctly is important for good woodworking. Some mistakes can cause wrong measurements and cuts.
Learn about common mistakes to avoid when using a try square. This helps you get accurate results every time.
Misreading The Tool
One mistake is reading the try square wrong. The blade and stock must be aligned properly. If not, your lines will be off.
Make sure the stock sits flat against the wood. Check the blade edge carefully. Mark your lines clearly along the blade.
- Hold the stock firmly against the wood edge
- Look straight down to avoid angle errors
- Use a sharp pencil for clear lines
- Double-check your marking before cutting
Ignoring Tool Maintenance
Not keeping your try square clean and tight can cause mistakes. Dirt or rust changes the shape and accuracy.
Check the try square often. Clean the blade and stock. Tighten any loose screws. Store it in a dry place.
- Wipe off dust and wood chips after use
- Apply light oil to metal parts to stop rust
- Tighten screws if the blade moves
- Store in a toolbox or protective case

Credit: www.reddit.com
Advanced Uses Of A Try Square
A try square is a basic tool for woodworking. It helps check right angles and straight edges. Beyond simple tasks, it has advanced uses that improve accuracy.
Knowing these extra functions makes your woodworking more precise. It also helps you combine it with other tools for better results.
Checking Bevel Angles
A try square can check bevel angles by comparing the blade to the wood edge. This helps confirm if the angle is true or needs adjustment.
To do this, place the try square blade along the bevel. See if there are gaps between the blade and the wood. Gaps mean the angle is off.
- Hold the stock firmly against the wood edge.
- Slide the blade along the bevel surface.
- Look for any light or space between blade and wood.
- Adjust the bevel or mark corrections if needed.
Combining With Other Measuring Tools
The try square works well with rulers, protractors, and marking gauges. Using them together helps measure and mark complex shapes accurately.
For example, use a try square to set a straight edge. Then use a protractor to check exact angles. This method improves both speed and precision.
- Set edges square with the try square.
- Use a ruler for precise measurements along the edge.
- Check angles with a protractor or bevel gauge.
- Mark cut lines using a marking gauge aligned to the square.
Credit: commonwoodworking.com
Frequently Asked Questions
What Is A Try Square Used For In Woodworking?
A try square checks and marks right angles on wood. It ensures precise 90-degree cuts and joint accuracy. Woodworkers rely on it for measuring edges and marking straight lines. It helps maintain quality and consistency in woodworking projects.
How Do You Properly Hold A Try Square?
Hold the try square firmly by its handle with one hand. Place the stock flush against the wood edge. Keep the blade flat on the wood surface to mark or check angles accurately. This grip ensures stable and precise measurements.
Can A Try Square Measure Angles Other Than 90 Degrees?
No, a try square is designed only for 90-degree angles. For other angles, tools like a bevel gauge or protractor are used. The try square’s fixed blade ensures perfect right angles, vital for woodworking accuracy.
How Do You Maintain The Accuracy Of A Try Square?
Store the try square in a dry place to avoid rust. Regularly check its blade against a known square surface. Avoid dropping or bending the blade to maintain accuracy. Proper care ensures reliable and precise woodworking measurements.
Conclusion
A try square is essential for precise woodworking. It ensures accurate angles and clean cuts. Practicing with it improves your skills over time. Always check the alignment before starting any project. Keep your try square in good condition for lasting use.
It’s a simple tool, but it makes a big difference. With patience, you’ll achieve better results. Woodworking becomes more enjoyable and rewarding. Remember, precision is key. Use your try square confidently and see improvements. Happy woodworking!