Are you looking to tackle a tile project but unsure about how to cut tiles effectively? An angle grinder might just be your new best friend.
This versatile tool can make the difference between a professional-looking finish and a DIY disaster. Imagine the satisfaction of creating perfect cuts with ease, saving both time and money. In this guide, you’ll discover step-by-step how to use an angle grinder for tile cutting, ensuring precise results every time.
With the right knowledge, you can transform your space and impress anyone who steps into your newly renovated room. Ready to master the art of tile cutting? Let’s dive in and unleash your inner craftsman!

Credit: www.familyhandyman.com
Choosing The Right Angle Grinder
Using an angle grinder for tile cutting needs the right tool. Picking the proper grinder helps you work safely and efficiently.
This guide covers types, sizes, and safety features to help you choose well.
Types Of Angle Grinders
Angle grinders come in different styles. Each type suits certain jobs and materials.
- Electric grinders run on power cords. They are good for long jobs.
- Battery-powered grinders offer more freedom but less runtime.
- Air-powered grinders need an air compressor. They are light and powerful.
Selecting The Proper Size
Choose a grinder size that fits your tile cutting needs. Size affects control and power.
| Disc Diameter | Best For | Notes |
|---|---|---|
| 4.5 inches (115 mm) | Small tiles, detail work | Lightweight and easy to handle |
| 5 inches (125 mm) | Medium tiles, general use | Good balance of power and control |
| 7 inches (180 mm) | Large tiles, heavy cutting | More power but heavier to hold |
Safety Features To Look For
Safety is key when using angle grinders. Look for tools that protect you during cutting.
- Adjustable guards to shield sparks and debris
- Lock-on switches to prevent accidental start
- Anti-vibration handles for better grip and less fatigue
- Overload protection to avoid motor damage
- Spindle lock for safe disc changes
Credit: www.orientbell.com
Essential Tools And Materials
Cutting tiles with an angle grinder needs the right tools. These tools help you cut tiles cleanly and safely.
Using the correct tools makes your work easier and prevents damage to tiles or injury.
Tile Cutting Discs
Tile cutting discs are special blades for angle grinders. They cut through tiles without cracking them.
Choose discs made for tile or ceramic cutting. Diamond-tipped discs work best for hard tiles.
- Diamond blade discs: last longer and cut smoothly
- Continuous rim blades: good for wet cutting
- Segmented blades: faster cuts but rougher edges
Safety Gear
Safety gear protects you from dust and sharp tile pieces. Always wear the right gear when cutting tiles.
Wear goggles to protect your eyes and gloves to protect your hands from sharp edges.
- Safety goggles or glasses
- Dust mask or respirator
- Cut-resistant gloves
- Long sleeves and pants
- Hearing protection if needed
Measuring And Marking Tools
Accurate measuring and marking help you cut tiles to the right size. Use good tools for this step.
Mark the tile clearly before cutting. This prevents mistakes and wasted tiles.
- Tape measure for exact length
- Pencil or marker for clear lines
- Square or ruler for straight marks
- Masking tape to mark fragile tiles
Preparing The Workspace
Before cutting tiles with an angle grinder, prepare your workspace carefully. A good setup keeps you safe and makes the job easier.
Clear the area and gather all tools needed. This helps you work without interruptions.
Setting Up A Stable Surface
Place the tile on a flat, sturdy surface to avoid slipping. A stable base prevents accidents and ensures clean cuts.
Use clamps or a non-slip mat to hold the tile steady. This keeps your hands free and safe while cutting.
- Choose a solid workbench or table
- Use clamps to secure the tile
- Place a rubber mat to prevent slipping
Ensuring Proper Lighting
Good lighting helps you see the cutting lines clearly. Bright light reduces mistakes and improves safety.
Use natural light or bright work lamps. Position lights to avoid shadows on the tile surface.
- Work near a window if possible
- Use adjustable lamps for focused light
- Avoid glare on the tile surface
Dust And Debris Management
Cutting tiles creates dust and small pieces. Manage debris to keep the workspace clean and protect your lungs.
Use a vacuum or dust extractor near the cutting area. Wear a dust mask and safety glasses for protection.
- Place a vacuum hose close to the cutting spot
- Wear a dust mask to avoid breathing dust
- Keep safety glasses on to protect your eyes
- Clean the workspace after each cut
Marking And Measuring Tiles
Cutting tiles with an angle grinder needs careful marking and measuring. This helps make sure cuts fit perfectly.
Using the right tools and methods will save time and prevent mistakes during tile cutting.
Accurate Measurements
Measure tiles with a tape measure or ruler for exact cuts. Mark the cutting line clearly using a pencil or a washable marker.
- Double-check all measurements before marking.
- Mark both sides if the tile will be cut from both ends.
- Use a square tool to keep lines straight and precise.
- Measure twice to avoid cutting errors.
Using Templates And Guides
Templates help copy complex shapes and sizes onto tiles. You can make templates from cardboard or thin wood.
To use templates effectively:
- Create a template matching the tile’s cut shape.
- Place the template on the tile surface.
- Trace around the template with a pencil.
- Use a straight edge or guide for long straight cuts.
Tips For Straight And Curved Cuts
Straight cuts need a firm guide to keep the angle grinder on track. Clamp a straight edge or metal ruler to the tile.
For curved cuts, mark the curve clearly and move the grinder slowly. Take breaks to check the cut progress.
| Cut Type | Tool/Guide | Tip |
| Straight Cut | Straight edge or metal ruler | Clamp firmly for stability |
| Curved Cut | Freehand with marked curve | Move slowly and steady |
| Complex Shape | Template | Trace carefully before cutting |
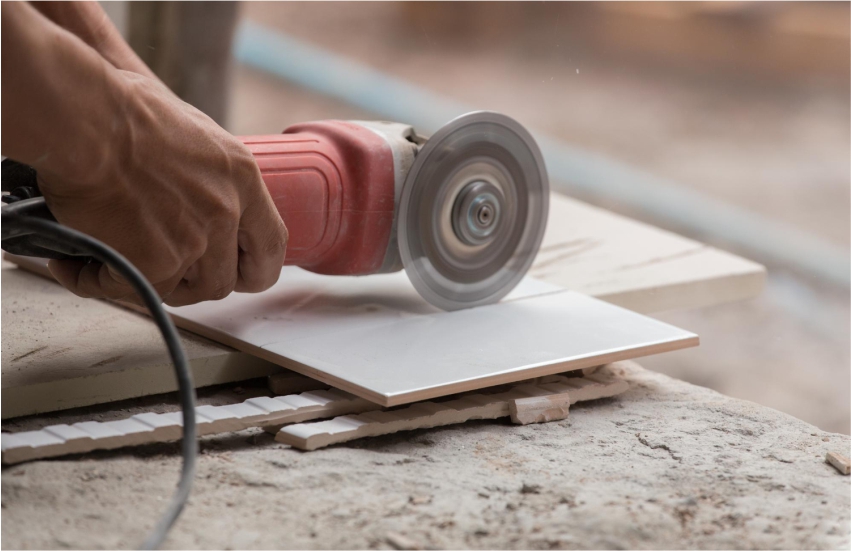
Cutting Techniques
Using an angle grinder to cut tiles needs careful handling. Proper cutting techniques help make clean and accurate cuts.
Focus on the right methods to avoid tile damage and ensure safety during the cutting process.
Scoring The Tile First
Start by scoring the tile surface lightly with the angle grinder. This creates a guide line for the cut.
- Use a diamond blade for clean scoring.
- Hold the grinder steady to avoid slipping.
- Score only once or twice to mark the cut.
- Do not press hard; let the blade do the work.
Controlled Angle Grinder Movements
Move the angle grinder slowly and steadily along the scored line. Control helps prevent chipping or cracking.
| Movement | Description |
| Start and Stop | Begin at the tile edge and stop beyond the cut line. |
| Steady Pace | Keep a slow, even speed to reduce stress on the tile. |
| Blade Angle | Hold the grinder at a 45-degree angle to the tile surface. |
| Pressure | Apply light, consistent pressure without forcing the blade. |
Managing Heat And Friction
Cutting tiles generates heat and friction. Managing both keeps the tile safe and the blade sharp.
Follow these tips to manage heat and friction effectively:
- Use water to cool the blade and tile during cutting.
- Take breaks if the blade gets too hot to prevent damage.
- Choose a blade designed for tile cutting to reduce friction.
- Keep the blade clean from debris buildup.

Credit: www.tileshop.com
Safety Tips While Cutting
Using an angle grinder to cut tiles can be dangerous if you do not follow safety rules. Always prepare properly before starting your work.
Safety helps prevent injuries and ensures a smooth cutting process. Learn how to handle the tool and protect yourself.
Proper Handling Of The Grinder
Hold the grinder firmly with both hands for better control. Keep your body balanced and stand in a stable position.
- Check the grinder before use for any damage.
- Use the right blade made for tile cutting.
- Do not force the grinder; let the blade do the work.
- Keep the power cord away from the cutting area.
- Turn off and unplug the grinder before changing blades.
Protective Clothing And Eyewear
Wear safety gear to protect your eyes, hands, and body from flying debris and dust.
- Use safety goggles to shield your eyes.
- Wear gloves to protect your hands from cuts and heat.
- Put on a dust mask to avoid breathing dust particles.
- Wear long sleeves and pants to cover your skin.
- Use ear protection if the grinder is loud.
Avoiding Common Mistakes
Many accidents happen because of simple errors. Learn what to avoid for safer cutting.
| Common Mistake | How to Avoid It |
|---|---|
| Cutting without proper blade | Use a blade made for tile cutting only |
| Not securing the tile | Clamp the tile firmly before cutting |
| Ignoring sparks and dust | Wear all protective gear and work in a clean area |
| Rushing the cut | Cut slowly and steadily for control |
| Using a damaged grinder | Inspect and repair the tool before use |
Finishing And Smoothing Edges
After cutting tiles with an angle grinder, the edges need smoothing. This step makes tiles safer and looks better.
Smoothing also helps tiles fit well in the space. Use the right tools and techniques for best results.
Using A Diamond Grinding Wheel
A diamond grinding wheel works well to smooth tile edges. It cuts small chips and creates a smooth finish.
Attach the diamond wheel to the angle grinder. Use slow, steady movements along the tile edge for control.
- Wear safety glasses and gloves.
- Keep the grinder steady and avoid pressing too hard.
- Move the wheel back and forth evenly.
- Check edges often to avoid over-grinding.
Removing Sharp Edges
Sharp edges can cause cuts or damage. Remove them using the angle grinder or a sanding block.
Work gently to round the corners and edges. This makes tiles safe to handle and install.
- Hold the tile firmly.
- Use light pressure with the grinder or sandpaper.
- Check the edge with your fingers for smoothness.
- Repeat until edges feel safe and even.
Cleaning The Tile After Cutting
Cutting and grinding leave dust and debris on tiles. Cleaning helps the tile look good and stick well.
Use a damp cloth or sponge to wipe the tile. Remove all dust before installation or sealing.
- Wear a mask to avoid inhaling dust.
- Wipe tiles with clean water.
- Dry tiles with a soft cloth.
- Check edges again for smoothness after cleaning.
Troubleshooting Common Issues
Using an angle grinder for tile cutting can be tricky. Problems may happen during the process.
This guide helps you fix common issues. You will learn how to handle tile breakage, overheating, and uneven cuts.
Dealing With Tile Breakage
Tile breakage is a common problem. It happens when the tile cracks or chips while cutting.
- Use a diamond blade made for tile cutting.
- Mark the cut line clearly before cutting.
- Cut slowly without forcing the grinder.
- Support the tile fully to avoid vibrations.
- Keep the blade wet to reduce heat and dust.
Angle Grinder Overheating
Overheating can cause damage to the grinder and the tile. It reduces cutting quality and tool life.
| Cause | Solution |
| Blade dull or wrong type | Replace or use correct blade |
| Cutting too fast | Slow down and let the blade do the work |
| Poor ventilation | Work in a well-ventilated area |
| Excessive pressure on grinder | Apply light pressure only |
| Lack of water cooling | Use water or wet cutting method |
Uneven Cuts And How To Fix Them
Uneven cuts make tiles hard to fit and look bad. Causes include poor control and wrong blade use.
- Hold the grinder steady and follow the marked line.
- Use a guide or straight edge to keep the cut straight.
- Check the blade for wear and replace if needed.
- Practice on spare tiles before cutting the final piece.
- Make shallow passes instead of cutting deep at once.
Maintenance Of Angle Grinder
Keeping your angle grinder in good condition makes it last longer. Proper maintenance helps the tool work safely and well.
Regular care includes cleaning, storing, replacing parts, and checking for damage. These steps keep your grinder ready for tile cutting.
Cleaning And Storage
Clean your angle grinder after every use. Remove dust and debris from the body and vents to avoid clogging.
Store the grinder in a dry place. Keep it away from moisture and dust to prevent rust and damage.
- Use a soft brush to clean vents
- Wipe the body with a dry cloth
- Store in a toolbox or case
- Avoid leaving it in damp areas
Replacing Discs
Change the cutting disc if it is worn or damaged. Using a bad disc can cause poor cuts and be unsafe.
Always use discs made for tile cutting. Follow the grinder’s instructions to replace the disc correctly.
- Turn off and unplug the grinder
- Press the spindle lock button
- Use a wrench to loosen the disc nut
- Remove the old disc carefully
- Place the new disc and tighten the nut
Regular Inspection Tips
Check your angle grinder often for any damage or loose parts. Look at the power cord, guard, and switches.
Fix any problems before using the tool again. Safety is very important when working with power tools.
- Inspect the power cord for cuts or cracks
- Ensure the safety guard is secure
- Test the on/off switch for smooth operation
- Listen for unusual noises while running
- Check for excessive vibration during use
Frequently Asked Questions
What Safety Gear Is Needed For Angle Grinder Tile Cutting?
Wear safety goggles, gloves, ear protection, and a dust mask. This gear protects you from debris, noise, and dust during cutting.
Which Blade Is Best For Cutting Tiles With An Angle Grinder?
Use a diamond-tipped blade designed for tile cutting. It ensures clean, precise cuts and lasts longer on hard materials.
How Do I Prevent Tile Breakage When Using An Angle Grinder?
Score the tile surface lightly first. Cut slowly and steadily to avoid cracks or chips during the cutting process.
Can I Use A Wet Cutting Method With An Angle Grinder?
Yes, wet cutting reduces dust and cools the blade. Use a water spray or wet sponge while cutting tiles.
Conclusion
Using an angle grinder for tile cutting takes practice and care. Always wear safety gear to protect yourself. Keep the blade steady and cut slowly for best results. Clean the tile edges after cutting for a neat finish. With patience, this tool helps create precise tile shapes.
Remember, safety and control matter most. Try small cuts first to gain confidence. This method saves time and effort on tile projects.